Features
- Designed for use with round hex and spline hammer systems
- Durable steel construction
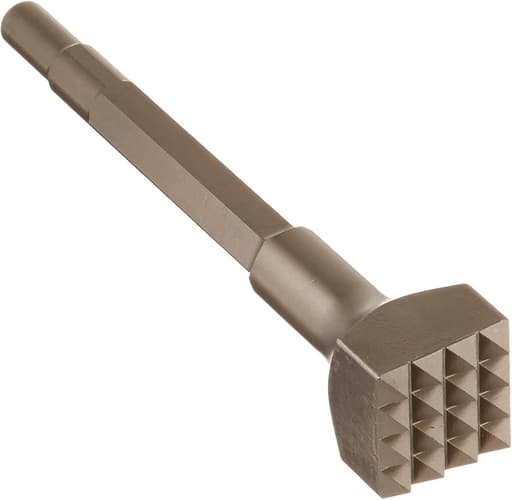
- One‑piece bushing tool
- 16‑tooth head
Specifications
| Model Numbers | HS1809; HS1809B10 |
| Total Length In | 9.25 |
| Chisel Cutting Edge In | 1.75 |
| Head Teeth | 16 tooth |
| Head Size | 1-3/4 in square |
| Shank Shape | Large spline |
| Pack Quantity | HS1809: 1; HS1809B10: 10 |
Related Tools
Related Articles

One-piece steel bushing tool for use with round hex and spline hammer systems. It has a 16‑tooth head, a 1‑3/4 in square head size, and an overall length of 9‑1/4 in.
Bosch Round Hex / Spline Hammer Steel Bushing Tool Review
Tile demo leaves behind a mess the photos never show: thinset ridges, high spots, and a surface that’s too slick for the next layer to bond well. That’s the kind of cleanup where a good bushing head earns its keep. I put Bosch’s HS1809 bushing tool through exactly that kind of work, and it’s become one of those bits I’m glad to find in the case when concrete prep pops up. It’s not flashy, but it’s effective, controlled, and straightforward to use.
Setup and compatibility
The bushing tool I used is the large spline version, and it drops into a spline-drive demolition hammer with a snug, no‑slop fit. Bosch lists it for round hex and spline hammer systems. Practically, that means you should verify the shank your hammer takes; modern SDS‑Max users will need a different bit or an adapter that’s appropriate for their tool. In a heavy demo hammer, the 9‑1/4 in overall length gives good line of sight to the work without feeling unwieldy, and it’s short enough that it doesn’t amplify vibration the way longer chisels sometimes do.
Once seated, it runs in hammer‑only mode—no rotation. There’s nothing to fine‑tune beyond setting your hammer’s impact rate to a comfortable cadence and letting the tool’s tooth pattern do the work. If you’re prepping occupied spaces, plan on dust control: a HEPA vac nearby and a helper to manage the hose, or light water misting where it’s allowed.
Build and design
This is a one‑piece steel head and shank, which matters more than it sounds. Bushing heads that are brazed or pinned can loosen over time under lateral loads; a single forging eliminates that failure mode. The business end is a 1‑3/4 in square head with 16 teeth. That footprint lands in the “control over coverage” category—large enough to keep you productive on floors, small enough to work around door thresholds and inside corners without marring adjacent materials.
The tooth count is a sweet spot. With 16 points on a compact head, you get a medium texture that’s aggressive enough to knock down thinset ridges quickly but not so coarse that it tears up sound concrete. The tooth geometry leaves a consistent, bite-sized stipple that’s ideal for mechanical keying prior to thin overlays, mortar, or self‑leveling underlayment.
Performance on concrete
I used the bushing tool after pulling ceramic tile from a slab, with a mix of stubborn thinset, trowel lines, and a few high spots where the slab crowned. On a mid‑power spline hammer, light pressure and slow sweeps made quick work of the raised ridges. The head is small enough that it doesn’t skate, which makes it easy to feather transitions—critical if you’re going to float a self‑leveler and don’t want height surprises telegraphing through.
The texture it leaves is uniform and predictable. That matters because bond depends on consistency. A grinder with a cup wheel can create burnished patches if you’re not careful; this bushing head never polishes—it only textures. As long as you keep the head fairly flat and don’t gouge an edge into the slab, the finish is remarkably even.
On cured, hard concrete, it’s not the fastest way to remove large areas of material; it isn’t meant to be. It excels at knocking down high spots, removing thinset “stalactites,” and creating a clean, toothy surface without over‑removing. If I had to scarify an entire garage, I’d roll out a scarifier or grinder. For selective prep, especially in residential rooms or tight commercial corridors, the bushing tool’s control wins out.
Technique tips
- Let the hammer do the work. Excess downforce just mushrooms the teeth and transmits more vibration back to you.
- Keep the head flat to the surface and sweep in overlapping passes. Feather edges by lifting slightly at the end of a stroke rather than driving the corner.
- Work perimeter areas first. Approach walls and thresholds at a shallow angle to avoid spalling.
- On adhesive or cutback, remove the gummy layer with a scraper before bushing. The teeth can clog in mastics; a wire brush clears them, but prevention is faster.
- For dust, a second set of hands with a vac nozzle shadowing the head catches a surprising amount. Where allowed, a light water mist keeps silica down and improves visibility.
Vibration and control
Bushing is impact work; some vibration is unavoidable. The compact head and one‑piece design keep chatter in check, and I found the sweet spot by lowering impact rate slightly below “full send.” That reduced bounce without sacrificing removal speed. Compared to wider bushing heads, the 1‑3/4 in square feels more precise and less prone to wandering, especially on uneven patches where a larger head can "bridge" and skip.
PPE is non‑negotiable here: good hearing protection, anti‑vibration gloves, eye protection, and dust control appropriate to silica standards.
Durability and wear
After several hours on slab and some stair nosing for an anti‑slip texture, the teeth still had clean flats with no significant rounding. One‑piece construction helps—there’s no joint to loosen, and the mass behind the head carries impacts well. Like any bushing tool, lingering in one spot overheats the points and accelerates wear, so short, overlapping passes are kinder to the tool and the surface. A quick wire‑brush after a dusty session keeps the teeth crisp. Surface rust doesn’t hurt function, but a light oil before storage keeps it looking new.
If you’re outfitting a crew, Bosch sells this head individually (HS1809) or in a 10‑pack (HS1809B10). For solo use, one is plenty; for production prep, having spares on hand avoids downtime.
Where it shines—and where it doesn’t
Strengths:
- Surface prep after tile or stone demo: knocking down thinset and setting a bondable profile.
- Creating a bush‑hammered, anti‑slip texture on steps or landings.
- Touch‑ups around drains, thresholds, and edges where grinders risk over‑grinding.
- Working in spaces where grinder dust is hard to contain.
Limitations:
- Large‑area removal or leveling across entire rooms—use a scarifier or grinder for volume work.
- Cutting or breaking concrete—this isn’t a chisel; it textures and abrades via impact.
- Adhesive‑heavy surfaces—pre‑strip first to avoid gummed‑up teeth.
- Compatibility if you’re on SDS‑Max only; this unit is for round hex and spline systems, with my test unit being large spline.
Alternatives and pairing
If productivity over large areas is your priority, a wider bushing head or a floor scarifier is faster. If a smoother profile is needed (say, prior to epoxy), pair this bushing pass with a quick grind using a 30‑40 grit diamond cup to knock down the stipple without removing too much. For ultra‑hard, steel‑troweled slabs, a needle scaler is gentler near delicate edges, but it’s slower; this bushing head strikes a better balance of speed and control in most prep scenarios.
Bottom line
The Bosch HS1809 bushing tool is a straightforward, durable option for concrete prep in the real world—where you’re often fixing small areas, blending patches, and getting a slab ready for the next layer without turning the space into a dust storm. The 16‑tooth, 1‑3/4 in head gives you control and a consistent texture, the one‑piece steel build inspires confidence, and the 9‑1/4 in length keeps handling tidy on a demolition hammer.
Recommendation: I recommend this bushing tool if you’re working with round hex or spline hammers and need controlled, consistent concrete texturing rather than bulk removal. It’s especially well‑suited for post‑tile surface prep, bonding profile creation, and anti‑slip finishes on small to medium areas. If you’re primarily on SDS‑Max, or you regularly tackle large, open floors where speed is everything, look to a compatible wider head or a dedicated scarifier. For targeted prep with a finish you can trust, this one earns a spot in the kit.
Project Ideas
Business
Anti‑Slip Surface Upgrades
Offer on‑site bush‑hammering of pool decks, ramps, stairs, and walkways to increase traction without coatings. The 16‑tooth head produces a uniform peened texture ideal for safety compliance. Package with cleaning, sealing, and maintenance plans.
Architectural Facade Texturing
Provide custom finishes on cast‑in‑place or precast concrete and stone—full‑surface distressing, banding, or panelized patterns. Use stencils and guides for consistent motifs across large areas. Market to architects, builders, and landscape designers.
Surface Prep for Overlays & Coatings
Specialize in removing laitance and glazing on concrete, creating a mechanical profile that improves adhesion for epoxy, waterproofing, or microtopping systems. Bundle with moisture testing and coating application for a turnkey solution.
Logo & Threshold Branding
Stencil client logos or text into entry thresholds and patios by bush‑hammering within masked designs. Durable, vandal‑resistant branding for boutiques, breweries, and campuses. Offer color‑wash or sealant tinting to enhance contrast.
DIY Rental + Training Kits
Rent a compatible round‑hex/spline hammer with the steel bushing tool, plus PPE and a step‑by‑step guide. Include practice pavers, finish samples, and phone support. Upsell consumables, sealers, and post‑project cleanup services.
Creative
Exposed-Aggregate Planter Series
Cast cylindrical or square concrete planters, then use the 16‑tooth, 1‑3/4 in square bushing head to selectively reveal aggregate and add a tactile band or gradient around the sides. Mask with tape to create clean borders and vary pressure for light vs. heavy exposure. Finish with sealant to deepen contrast.
Tactile Concrete Wall Art Panels
Create 12x12 in concrete or GFRC panels and bush‑hammer patterns—chevrons, grids, or radial bursts—by following pencil lines or laser‑cut stencils. The uniform tooth pattern yields an even peened texture that plays with light and shadow. Mount on cleats or frame with reclaimed wood.
Bush‑Hammered Stone Coasters & Boards
Take slate, granite offcuts, or concrete tiles and use the tool to texture only the perimeters, leaving a smooth center. The contrast looks high‑end and improves grip. Add a branded stamp or inlay, then back with cork. Sell as coaster sets and matching charcuterie boards.
Wabi‑Sabi Stepping Stones
Cast irregular stepping stones and distress the surface with the bushing tool to mimic weathered stone. Feather the edges and spot‑texture high points to improve traction. Arrange in garden paths; optional inlaid pebbles or metal numerals add character.
Industrial Concrete Tabletops
Pour a concrete slab for a coffee or side table, then bush‑hammer a subtle grid or border using the 1‑3/4 in head for consistent spacing. Seal matte for a soft, stone‑like feel. Pair with steel or hardwood bases for an urban‑loft aesthetic.