Features
- Automatically countersinks screws to a preset depth
- Allows a drill/driver to be used for professional screw-setting tasks
- Automatic clutch release to reduce drywall tear-out
- Reversible while chucked (push-in and turn-to-lock)
- Spinning finger grip for improved control and clear sightline to the screw
- Phillips P2 head with magnetic tip
- Hex shank for power transfer; fits standard three-jaw and hexagonal chucks
- Compatible with most rotary drills and drivers
Specifications
| Model Number | D60498 |
| Head Type | Phillips P2 |
| Length | 2" |
| Pack Quantity | 1 |
| Shank | Hex shank (fits 3-jaw and hexagonal chucks) |
| Magnetic Tip | Yes |
| Reversible While Chucked | Yes |
| Automatic Clutch Release | Yes |
| Intended Use | Drywall screw setting |
Related Tools
Related Articles

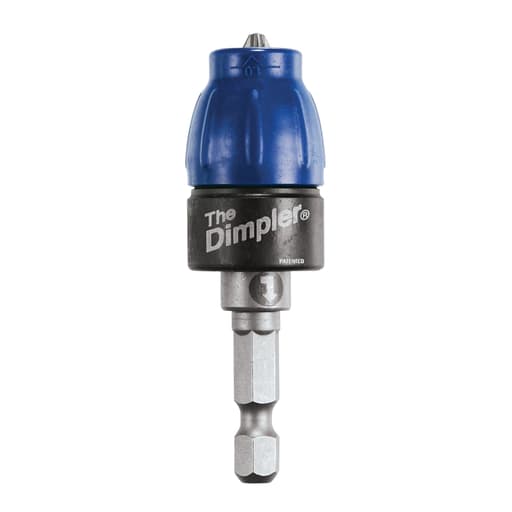
A drywall screw setter that automatically seats and countersinks screws to a preset depth when used with a standard drill/driver. It includes an automatic clutch release to help prevent drywall tear-out, is reversible while chucked, and has a spinning finger grip and magnetic Phillips tip to aid control and visibility.
Bosch Dimpler Drywall Screw Setter Review
I picked up the Bosch dimpler to see if it could bridge the gap between a basic drill/driver and a dedicated drywall screw gun. On paper it’s clever: a compact, countersinking screw setter with an automatic clutch that stops driving at a preset depth, reversible while chucked, with a spinning finger grip and a magnetic P2 tip. In practice, it can be a tidy little helper—especially for small rooms and patch work—but it comes with caveats that matter if you’re hanging a lot of board.
Setup and first impressions
The dimpler is short—around 2 inches—so it keeps your overall tool length manageable in studs, corners, and between joists. The hex shank drops into a standard three-jaw or hex chuck without fuss. The P2 tip is magnetic and holds coarse-thread drywall screws well enough that you can start a screw one-handed.
I had the best results pairing it with a standard drill/driver in low speed. A soft-start trigger and a mid-range clutch setting on the drill (not strictly required, but nice insurance) gave me a predictable feel. I don’t recommend using an impact driver. The repetitive hammering defeats the point of the dimpler’s built-in clutch and can shorten its life.
The spinning finger grip is underrated. If you pinch the collar with your non-dominant hand as you line up the screw, the nose stays planted and you can see the screw head clearly. It sounds minor, but it keeps the tip centered and reduces wobble, especially overhead.
In use: speed and control
On fresh studs with 1/2-inch board, the dimpler consistently brought screw heads just shy of flush on the first pull, and a light second touch seated them perfectly without tearing paper. That automatic clutch is the key. When it reaches preset depth, you hear the motor free-wheel and feel the load disappear. If you keep squeezing, it won’t bury the head deeper, which is exactly what you want to preserve the face paper.
Speed-wise, it’s faster than a bare P2 bit with a drill because you don’t have to feather your depth by feel. It’s not as fast as a drywall screw gun with a nose cone, and nowhere near a collated system, but for a bathroom, a laundry room, or a few soffits, it keeps a nice rhythm.
Depth consistency and finish quality
On fresh sheets, depth control was good as long as I kept the nose square to the surface. If you “heel” the drill or push at an angle, the collar won’t land flat, and you’ll over- or under-drive. The finger grip helps keep things square. I also found:
- Light pressure is your friend. Let the bit pull the screw in; don’t lean on the tool.
- Stop the moment the clutch releases. A quick, gentle second bump is fine if you’re just shy of depth.
- Pre-test on scrap of the same board to feel where the clutch drops.
Into wood studs, the results were tidy. Into steel studs, especially with finer-thread screws, I had a few instances where the collar retracted prematurely and the screw drove a hair too deep. Backing off the trigger speed reduced these misfires. The magnetic tip is helpful, but not so strong that it masks poor alignment.
Reversibility and visibility
Being able to reverse while the dimpler is still chucked is handy for backing out a proud screw or swapping to a new one if you strip the head. The collar’s cutout keeps the sightline open, so you can see the head as it approaches depth. That visibility is better than many bulkier nose-cone attachments.
Durability and maintenance
Here’s where the shine fades on longer runs. After a dozen or so sheets, I started seeing intermittent sticking in the collar. The clutch would occasionally hang in the retracted position after a reversal or a snag on a screw head. A quick tap on the bench or a twist of the collar freed it, and a blast of dust plus a drop of dry lube improved things for a while. But the sticking returned under heavier use.
Drywall dust is the enemy here. It packs into small clearances and increases friction on the clutch parts. The dimpler isn’t sealed, and repeated reversing seems to accelerate the gumming. Cleaning every few sheets helped. Still, by the time I’d finished a medium-sized area, depth consistency degraded: more frequent overdrives and the occasional under-set that needed a remedial bump.
The P2 tip held up acceptably, but once the edges rounded a bit, cam-out increased and the clutch saw more harsh engagements. Swap the bit at the first sign of slipping to protect the clutch. If your workflow demands hundreds of screws a day, this maintenance becomes a tax on your time.
Technique tips
- Use a standard drill/driver in low gear. Avoid impact drivers.
- Keep the tool square to the board. Use the finger grip to steady the collar.
- Start slow; let the screw bite before you add speed.
- Stop as soon as the clutch releases. Don’t “power through” a disengaged clutch.
- Blow out dust from the collar periodically. A dry PTFE spray helps keep the action smooth.
- Replace worn P2 tips early to reduce cam-out and clutch abuse.
How it compares
Against a simple stop-collar bit, the dimpler’s auto clutch is gentler on the paper, and you’re less likely to leave cratered heads that need filling. Against a dedicated drywall screw gun, it’s slower and less consistent on big runs, but it’s also a fraction of the size and lets you stay with your everyday drill. For punch lists, small renovations, and ceiling patches, it’s convenient to keep in the pouch.
If you hang board every day, a screw gun with a depth-adjustable nose cone remains the better choice. It will drive thousands of screws with repeatable depth and without the finicky maintenance. For production work, collated screw systems are faster still and keep your off-hand clear.
Pros and cons
Pros:
- Compact, easy to maneuver in tight spaces
- Automatic clutch reduces paper blowouts when used correctly
- Spinning finger grip improves control and sightline
- Reversible while chucked; quick to back out or re-seat screws
- Works with any standard drill/driver; no special tool required
Cons:
- Collar/clutch can stick as dust builds, especially after extended use
- Depth consistency degrades on longer runs without frequent cleaning
- Not suited to impact drivers; abuse shortens life quickly
- Occasional premature retraction can overdrive screws, more noticeable on steel studs
- Maintenance (cleaning and light lube) is needed to keep it behaving
Who it’s for
If you’re a DIYer, handyman, or a pro tackling small drywall jobs amid other tasks, the dimpler adds useful control without adding a dedicated tool to your kit. It shines in closets, bathrooms, soffits, and repair work where you want clean, countersunk heads with minimal fuss. If you’re hanging full houses, garages, or commercial spaces, the durability and consistency trade-offs become hard to ignore.
Recommendation
I recommend the Bosch dimpler for light to moderate, occasional drywall work where portability and control matter more than outright speed and production-grade durability. Used with a standard drill/driver, a light touch, and periodic cleaning, it delivers clean countersinks and reduces paper tear-out. For high-volume jobs or daily use, I don’t recommend it; a dedicated drywall screw gun or collated system will be faster, more consistent, and more durable in the long run.
Project Ideas
Business
Punch-List Wall Rescue
Offer a fast-turn drywall repair service specializing in nail/screw pops, minor holes, and skim touch-ups. The Dimpler provides consistent countersinks and avoids paper tear-out, reducing mud cycles and labor time—ideal for realtors and property managers needing photo-ready walls in 24–48 hours.
Event & Retail Set Walls
Rent and install pre-finished modular flats for events, trade shows, and retail displays. Use the Dimpler to assemble, skin, and re-skin panels quickly on-site without damaging paper, keeping turnover fast and surfaces pristine for repainting between clients.
Drywall Efficiency Kits
Sell curated kits to DIYers and small contractors that include a Dimpler, quality P2 screws, joint compound, and finishing tools, plus concise video guides. Emphasize the preset depth and clutch release to help novices avoid common mistakes and reduce callbacks.
Soundproofing & Overlay Upgrades
Package services for adding mass-loaded vinyl or an extra drywall layer with Green Glue. The Dimpler speeds uniform screw-setting across large surfaces, minimizes surface damage, and cuts finishing time—perfect for media rooms, multifamily units, and home offices.
Training & Content Microbrand
Build a niche YouTube/TikTok channel teaching pro drywall techniques (screw-setting, avoiding tear-out, fast patching). Monetize via affiliate links for the Dimpler and related tools, paid mini-courses, and local workshops for aspiring handypeople.
Creative
Geometric Screw-Dot Mural Panel
Design a removable feature panel where screw recesses form a geometric or pixel-style pattern. Use the Dimpler to create uniformly countersunk screw heads without tearing the paper, then finish with color-matched caps or skim-coat selective areas for contrast. Mount the panel to a cleat for easy swap-out.
Hidden LED Reveal Wall
Build a drywall feature with aluminum reveal trim and LED strips. The Dimpler’s preset depth keeps screws consistently below the surface around delicate trim edges, preventing telegraphed bumps and paper blowouts so light lines stay crisp and shadow gaps remain clean.
Pop-up Gallery Flats
Create lightweight, modular wall flats for photo shoots or pop-up exhibitions. Use the Dimpler to rapidly assemble and skin the frames with drywall, producing a smooth, paint-ready surface with minimal patching. The magnetic tip speeds overhead work and tight corners.
Magnetic Play Wall Upgrade
Install a thin steel sheet behind a new drywall layer to make a kids’ magnetic play wall. The Dimpler ensures the overlay drywall screws are countersunk to a consistent depth, reducing finish work and preventing torn paper during the re-skin process.
Curved Niche or Archway
Form a curved niche or arch using flexible drywall over a bent substrate. The Dimpler’s automatic clutch reduces surface blowouts on tight radii, keeping the fragile paper intact while achieving uniform recesses that are easy to tape and finish.