
Features
- Dimensions: 9-5/8 in. Width x 9-5/8 in. Bottom Width x 5-5/8 in. Overall Width x 9-5/8 in. Depth x 48 in. Height
- Made from expanded cellular PVC
- Ready for your prime and paint
- Virtually maintenance-free performance. E-Z lock joint design makes installation a breeze
- Assembles around a structural support. Comes with lifetime limited warranty
Specifications
| Color | White |
| Size | 10" Bottom Width to 6" Top Width x 4'H |
| Unit Count | 1 |
Related Tools
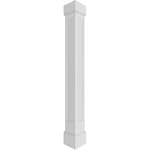
A 4-foot-tall tapered square column wrap kit that installs around an existing structural support, tapering from a 10-inch bottom to a 6-inch top and including a standard capital and base. Made from expanded cellular PVC, it ships ready for primer and paint and uses an E-Z lock joint design for straightforward assembly; it is covered by a lifetime limited warranty.
Ekena Millwork 10" Bottom Width to 6" Top Width x 4'H Premium Square Tapered Smooth PVC Endura-Craft Column Wrap Kit, Standard Capital & Base Review
Why I chose this column wrap
I needed a rot-proof, tapered look for a short porch retrofit, and I didn’t want to rebuild structural columns from scratch. The Ekena PVC column wrap kit hit the sweet spot: a true taper (nominal 10-inch bottom to 6-inch top), four-foot height that aligns with half-wall piers, and a material—expanded cellular PVC—that actually holds up in wet climates. I’ve used plenty of wood wraps over the years, and even with careful priming they eventually wick water at joints. PVC eliminates that worry, so I gave this kit a shot.
What you get out of the box
The kit arrives as components, not a preassembled sleeve. Mine included:
- Four flat, interlocking PVC panels that form the tapered shaft
- A two-piece base and two-piece capital with separate trim moldings
- E-Z lock style edges on the shaft for alignment
- A smooth, paint-ready surface in bright white
It’s designed to assemble around an existing support. That could be a 4x4, 6x6, or a steel post, as long as your post and base plinth geometry fit inside the taper. The material is expanded cellular PVC—dense enough to machine cleanly, light enough to handle, and completely impervious to rot and insects.
A note on packaging: my kit arrived with minor scuffs and a couple of lightly bruised corners. Nothing a sanding block and PVC filler couldn’t fix, but it’s worth opening the box well before your install day so you can deal with any touch-ups.
Sizing and the “nominal vs. actual” reality
The listing calls the profile a 10-inch bottom tapering to a 6-inch top over a 48-inch height. In practice, the outside measurements are slightly shy of those round numbers—think roughly 9-5/8 inches at the bottom and about 5-5/8 inches at the top. That’s normal with trim components and keeps proportions right once the cap and base are on.
Two tips before you commit:
- Measure your structural post and any hardware or brackets at the top and bottom. The inside clear dimension near the top can get tight on tapered wraps.
- Dry-fit the base and capital around your post before you cut or paint anything. If your porch slab has a slope, you may need to scribe the base for a tight, level appearance.
If you plan to run railing into the column, account for rail bracket thickness and layout before final assembly.
Installation: straightforward, but not “no tools required”
This isn’t a snap-together product. The E-Z lock edges do make alignment easier than plain butt joints, but you’ll still want a methodical approach and at least one helper.
Tools and supplies I found essential:
- Two sets of hands (three is even better)
- Clamps and strapping tape
- Exterior-rated PVC adhesive or fast-curing construction adhesive compatible with PVC
- Stainless trim screws (#7 x 1-5/8 in. worked well) and a driver
- A biscuit joiner for the cap and base seams, or a plan B using pocket screws and adhesive
- Miter saw for trim, block plane or sander, caulk gun, PVC filler, sanding sponges
- High-quality exterior primer (if your topcoat system needs it) and paint
My kit did not include printed instructions in the box, so I pulled the PDF from the manufacturer’s site. The directions are serviceable but assume some finish-carpentry experience. The biggest curveball is the cap and base: they assemble from halves and benefit from biscuits to keep the seam aligned while adhesive cures. You can improvise with stainless screws and a good adhesive, but a biscuit joiner yields a cleaner seam that needs less filling.
The build sequence that worked for me:
1. Dry-fit the four shaft panels around the post to confirm clearances at top and bottom.
2. Assemble the base plinth halves with biscuits and adhesive; clamp square and let cure.
3. Set the base plinth on the porch, scribe to any slab slope, and fasten per your substrate.
4. Plumb your post, shim as needed, and secure it structurally (the wrap is non-structural).
5. Glue and fasten the shaft panels around the post. I used a combination of adhesive in the E-Z lock joints and stainless trim screws placed where the cap and base trim would later cover them.
6. Assemble and install the capital, then apply the base and cap moldings.
7. Fill, sand, caulk, spot-prime where needed, then finish with exterior paint.
Expect to spend meaningful time on surface prep if you want invisible seams. PVC sands nicely and takes a bead of acrylic latex caulk cleanly.
Handling and workability
PVC machines like a soft hardwood but with its own quirks:
- Pre-drill near edges to avoid chipping. The material can be brittle if you over-torque screws or work in cold temperatures.
- Use sharp blades on the miter saw to keep the factory-smooth edge quality.
- Clean dust before finishing; static can make PVC dust cling.
The E-Z lock joints align accurately and reduce the wrestling match you normally get with tapered assemblies. That said, managing taper, square, and plumb all at once is easier with a third pair of hands.
Finish and curb appeal
Once painted, the column reads like a traditional wood taper—crisp lines, clean reveals, and no telltale plastic sheen. I backfilled the minor shipping dings with PVC filler, sanded to a feather edge, and can’t find them now under paint. With careful caulking and adhesives, the seams all but disappear. After a few weeks of Northwest rain, there’s zero swelling or paint telegraphing at the joints. That’s the promise of PVC—and the reason I keep returning to it for exterior architectural elements.
A quick note on “maintenance-free”: the material itself won’t rot, but you still need paint for UV protection and aesthetics. Plan on periodic washing and occasional touch-ups just like any exterior trim. The advantage is that your paint is sitting on a stable substrate, not spongy end grain.
Durability and movement
PVC expands and contracts with temperature more than wood. On a four-foot column, it’s manageable, but I still:
- Used compatible, flexible sealants
- Avoided tight, unvented traps where water could collect
- Left small movement-friendly joints under the trim where they won’t show
With those practices, I’m confident in long-term performance. The lifetime limited warranty is a nice bit of assurance, too.
Pros
- Authentic tapered profile with a clean, painted-wood look
- Rot-proof expanded cellular PVC; ideal for wet or insect-prone climates
- E-Z lock joints aid alignment and speed assembly
- Ships paint-ready; sands and machines cleanly
- Includes matching capital and base for a complete look
- Once painted, seams can be made nearly invisible
Cons
- Packaging can allow minor dings; plan on filler and sanding
- Nominal vs. actual dimensions require attention; inside clearances at the top are tighter than you’d think
- Cap and base assembly is easier with a biscuit joiner; not truly a beginner install
- Requires two people (three is better) for a clean, stress-free assembly
- Must be painted; “maintenance-light,” not maintenance-free
Who should buy this
If you’re a contractor or an experienced DIYer comfortable with finish carpentry, adhesives, and paint, this kit delivers a premium look with the durability of PVC. If you want a truly plug-and-play solution with minimal tools, or if you’re uncomfortable scribing bases and managing tapered geometry, you may prefer a preassembled non-tapered wrap or to hire the install out.
Recommendation
I recommend the Ekena PVC column wrap, with a caveat: it shines in the hands of someone with the right tools and patience. The finished result is crisp, convincingly “wood,” and impervious to the rot that killed the original columns I replaced. Just budget time for careful assembly, plan for paint, and double-check your clearances at the top of the taper. For porches and entries where a traditional tapered profile matters and longevity is non-negotiable, this kit is a smart, long-term upgrade.
Project Ideas
Business
Pre-Finished Decorative Column SKU
Offer a ready-to-install, pre-primed and painted version of the standard 10"→6" x 4' column as a retail SKU aimed at DIY homeowners and contractors. Provide color options, custom capital styles, and quick-ship service. Market the lifetime-limited-warranty and low-maintenance PVC benefits. Upsell mounting hardware and a matching base/capital bundle; price competitively for impulse purchases at home centers or online.
Event Decor Rental Service
Start a rental business supplying painted columns for weddings, corporate events, and photo shoots. Stock several finishes (white classical, metallic, distressed) and capitals for different themes. Offer delivery, on-site installation, and styling packages (lighting, florals). Columns are durable and easy to clean between events—generate recurring revenue from seasonal bookings.
DIY Workshop & Kit Sales
Host hands-on workshops that teach customers how to convert column wraps into planters, lamp posts, or interior accents. Sell companion kits (pre-cut openings, planting inserts, mounting brackets, lighting kits) online or in-store. Workshops build community, create product evangelists, and drive kit sales; record and sell video tutorials for passive income.
Retrofit & Revitalization Service
Offer a home improvement service that retrofits old, rotting porch posts with new expanded cellular PVC column wraps. Provide on-site measurements, matching capitals/bases, priming and painting to match the home’s style, and professional installation using the E-Z lock system. Market to historic-home owners and property managers as a low-maintenance, cost-effective alternative to full post replacement.
Accessory Line & Digital How-To Content
Develop and sell modular accessories for the column wrap (lighting conversion kits, planter inserts, mounting brackets, decorative trim pieces). Package the products with premium how-to guides and short instructional videos demonstrating installation and creative conversions. Use the content to drive traffic to an e-commerce store and to support B2B sales to contractors and event planners.
Creative
Vertical Planter Column
Turn the 4' tapered PVC column into a freestanding vertical planter. Cut 3–5 staggered rectangular openings into the sides, line each cavity with landscape fabric or small planter boxes, add potting mix and plants (succulents, herbs, or trailing annuals). Seal the bottom and add drainage holes or a hidden removable tray. The E-Z lock joint makes it easy to disassemble for planting, and the expanded cellular PVC is rot- and moisture-resistant, so it will last outdoors once primed and painted.
Decorative Lamp/Post
Convert the hollow wrap into a weatherproof lamp post base for a porch or garden light. Run low-voltage or solar wiring through the interior before assembly, mount a small fixture or lantern on the capital, and anchor the base to a concrete or wood pad. Prime and paint with exterior-grade paint, and use silicone around any electrical penetrations. The tapered profile gives a classic look while hiding wiring cleanly.
Flanking Fireplace Pillars
Use two column wraps as paired interior pillars to frame a fireplace, entryway, or built-in shelving. The 4' height is ideal for mantel-height accents: mount each wrap around a simple wood core or attach to a plywood backing, then add decorative trim or molding to match your décor. Prime and paint to match your mantel, or use faux finishing techniques (antiquing, metallics) for a custom look.
Birdhouse/Feeder Tower
Create a multi-level birdhouse or feeder by cutting entry holes and installing small ledges or feeding trays inside the column at different heights. Mount the column on a post or heavy base in the yard, and paint with bird-safe exterior paint colors. The durable PVC resists weather and makes cleaning simple—design separate removable panels for easy access when cleaning or refilling.
Garden Trellis/Obelisk
Extend the column into a garden obelisk or trellis for climbing vines (roses, clematis, sweet peas). Add interior cross-supports or splice additional PVC sections to reach taller heights. Attach trellis rings or horizontal slats to the outside where vines can grab hold. Prime and paint with outdoor paint or stain alternative to blend with your landscape.