Features
- Non‑marring feet to protect material surfaces
- Quick‑release attachment clamps for fast attachment and detachment
- Polymer feet for stable placement on flat surfaces
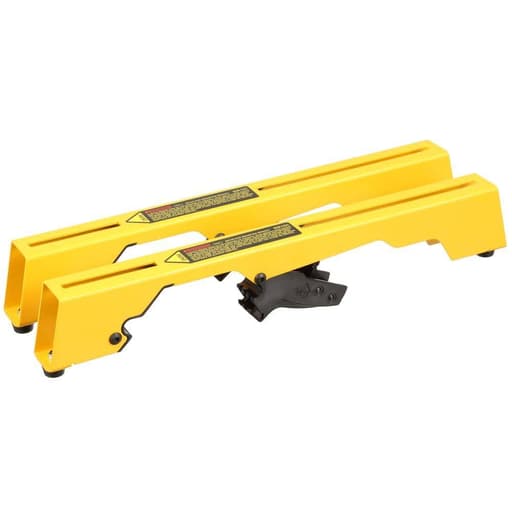
- Includes two mounting brackets
Specifications
| Color | Yellow |
| Number Of Pieces | 2 |
| Height | 18.5 in (470 mm) |
| Width | 4.5 in (115 mm) |
| Depth | 3.38 in (86 mm) |
| Weight | 3.5 lbs (≈2 kg) |
| Material | Steel (mounting hardware included) |
| Compatible Stands | DW723, DWX723, DWX724, DWX725 |
| Includes | (2) tool mounting brackets and mounting hardware |
| Warranty | 3 Year Limited Warranty; 1 Year Free Service; 90 Days Satisfaction Guaranteed |
Related Tools

Related Articles

Pair of mounting brackets designed to secure a miter saw to a stand or workbench. They use quick‑release clamps for attaching and removing the tool and have polymer, non‑marring feet for stable placement on flat surfaces.
DeWalt Miter Saw Workstation Tool Mounting Brackets Review
I’ve been swapping saws on and off stands for years, and anything that makes that routine faster without compromising safety gets my attention. DeWalt’s miter saw mounting brackets promise quick, tool‑less swaps and the option to set a saw on a bench without the stand. After several weeks of jobsite use and a few days in the shop, I have a pretty clear picture of where these brackets shine—and where they need work.
Setup and compatibility
Installation is straightforward. The pair comes with all the mounting hardware you need, and the slotted steel rails make it easy to align with most miter saw bases. I mounted a full‑size sliding saw and a compact trim saw with no hole‑drilling, just repositioning the bolts in the slots. The brackets hook onto DeWalt’s common rails (DW723, DWX723, DWX724, DWX725), and they’re color‑coded yellow so they’re easy to spot when you inevitably set them down in a busy jobsite.
At roughly 3.5 pounds for the pair, they don’t add much weight to the tool. That matters when you’re carrying a saw in one hand and a nailer in the other. The steel bodies feel stout and resist torsion well when tightened to the saw base.
Quick‑release convenience
The main draw is the quick‑release. Slide the bracket hooks over the stand rail, snap the levers down, and you’re locked in. Swapping saws between stations is genuinely faster than bolting and unbolting, and the motion becomes muscle memory by the end of day one. If you run a shared stand for multiple saws—or you like to pull the saw off the stand and onto a bench mid‑project—this convenience is real.
The quick‑release is also the weak link. The latching mechanism uses plastic components for the handle and some internals. On my set, one lever loosened up noticeably after a couple weeks of daily use. It didn’t fail, but it did start to take a firmer press to get a confident lock. Keeping the latch area free of dust and chips helps; fine MDF dust in particular made the mechanism feel gritty. I got in the habit of giving the latch a quick blow‑off before locking it down.
On‑stand performance
When the latches are fresh and properly seated, the connection to the stand is impressively solid. With the compact saw, I could cut and swing the head without any rattle. With the larger slider, I noticed a hint of side‑to‑side play with the head extended, but not enough to affect cut accuracy. Most of that movement felt like latch compliance rather than rail flex.
If you feel wobble out of the box, check that both latches are fully seated and that the brackets are evenly spaced on the saw base. I didn’t find a formal tension adjustment for the latch on my units. A simple fix that worked well for me was applying a thin strip of UHMW tape to the stand rail where the bracket hooks ride. It took up the slack and eliminated the slight rattle without affecting the ability to latch.
One caution: don’t use the latch lever as a carrying handle. It’s tempting, but that’s a good way to stress the plastic when the saw is mid‑air. Grabbing under the saw base or by the saw’s built‑in handle is safer.
Bench‑top use
A nice perk of these brackets is the ability to park your saw on a flat surface without the stand. The polymer, non‑marring feet keep the steel off finished tops, and the saw sits stable enough for light work. I used this setup for layout and a few quick cuts on a melamine bench.
Two caveats. First, the latch mechanism protrudes a bit under the bracket. On a clean table it’s fine, but if you slide the saw across a raised lip or over a clamp, that protrusion can snag. Second, the polymer feet are on the harder side and wear quickly on rough concrete. After a week of dragging the saw across a slab, the feet showed noticeable wear. Once worn, the mounting screws start to telegraph through, which defeats the “non‑marring” promise. A strip of neoprene pad on the feet or even some stick‑on rubber bumpers extends their lifespan and keeps the screws off delicate surfaces.
Durability and maintenance
The steel rails themselves feel bombproof, and the included hardware hasn’t loosened with threadlocker applied at install. The long‑term concern is the plastic latch. I had one release handle develop slop; it still functioned, but it didn’t inspire confidence. Regularly checking the lever’s pivot and keeping grit out helps. Also, resist the urge to force the lever closed if it isn’t lining up perfectly—back off, realign, and try again. For heavy saws, I also make a habit of engaging the rear hook first, then closing the front latch; that reduces twist on the mechanism.
The feet, as noted, are consumables in a rough environment. If you’re primarily working indoors on finished floors, they’re great. On raw jobsite surfaces, plan on some TLC or replacements over time.
Ergonomics and safety
Ergonomically, the brackets do their job: they make mounting intuitive, and they don’t add awkward protrusions where your hands want to be. The levers require a firm push but not excessive force. I like that you can visually confirm the latch position. For safety, I always give the saw a deliberate lift and wiggle after latching; you shouldn’t feel any movement. If you do, address it before cutting.
One more safety note: if a latch doesn’t release, don’t pry the bracket off the rail. Release tension from the saw’s weight first and gently work the lever. Forcing things can turn a sticky latch into a broken one.
Value and warranty
As an accessory that turns one stand into a multi‑tool platform, these brackets are easy to justify. Compared to the time you save and the flexibility you gain, the price is sensible. The three‑year limited warranty, one year of free service, and 90‑day satisfaction guarantee are meaningful here, especially given the plastic latch’s vulnerability. I had no trouble getting a release handle replacement through support, which kept my set in rotation without buying a whole new pair.
Who they’re for
- Great for: users already invested in DeWalt stands who want to swap tools quickly; remodelers and trim carpenters moving between rooms; anyone who occasionally needs to drop a saw onto a bench.
- Use with care: crews running heavier sliding saws in rough, dusty environments; shops that routinely drag saws across concrete; anyone who expects to treat latches like metal hardware.
If you run lightweight to mid‑sized saws and keep the latch area clean, these are efficient. If you hammer gear hard every day, the plastic levers are the gating factor.
Tips to get the most out of them
- Clean the latch area before locking and unlock with the saw’s weight supported.
- Add thin UHMW tape on the stand rail if you detect minor play.
- Protect the feet with stick‑on rubber or a small neoprene pad if you’re setting the saw on finished surfaces frequently.
- Apply threadlocker to the mounting bolts and recheck torque after the first week.
- Avoid using the levers as handles.
Recommendation
I recommend these brackets with clear caveats. The quick‑release workflow is genuinely useful, the steel bodies and included hardware are solid, and compatibility across DeWalt stands makes them a practical standard. However, the plastic latch mechanism and fast‑wearing feet limit long‑term durability in rough conditions. If you’re already on a DeWalt stand and you value speed and flexibility—especially with lighter saws—these are worth it, backed by a solid warranty that softens the risk. If your saw is heavy, your sites are dirty, and you expect metal‑level toughness from every component, you’ll be happier with a more robust clamping solution or by keeping a spare set on hand.
Project Ideas
Business
Quick‑Swap Shop Retrofit Service
Offer a service to standardize a client’s shop with universal base plates and these brackets across all benchtop tools. Deliver calibrated setups, matching hole patterns, and labeled plates so crews can swap tools on DWX723/724/725 stands instantly, reducing downtime and footprint.
Mobile Trim & Crown Pop‑Up Crew
Launch a mobile finish carpentry outfit. Outfit vans with stands and bracketed miter saws that set up in minutes on driveways or inside homes without scuffing floors (non‑marring feet). Fast setup/teardown means more billable installs per day and minimal disruption for clients.
Weekend Pro Kit Rentals
Rent complete miter saw station kits: stand, brackets, universal base plate, fold‑out wings with stop, and dust shroud. Market to DIYers for weekend projects. The quick‑release system makes transport simple, lowers damage risk, and boosts turnaround, while deposits and optional delivery add revenue.
Accessory Line: Universal Plates & Wings
Design and sell CNC‑cut universal mounting plates with threaded inserts and alignment pins tuned to these brackets, plus lightweight measuring wings and stowable stops. Bundle hardware and templates, target online marketplaces, and offer custom hole patterns for less common saws.
High‑Throughput Training Workshops
Run short, back‑to‑back classes (trim basics, picture framing, deck builds). Standardize every station with these brackets so instructors can swap saws, blades, and jigs in seconds. Faster station turnover increases class capacity and revenue while maintaining consistent alignment.
Creative
Quick‑Swap Benchtop Fleet
Build a universal benchtop platform with matching hole patterns so multiple tools (miter saw, planer, benchtop sander) can mount to identical base plates and click into the brackets. Use the quick‑release clamps to change tools in under a minute, and rely on the polymer, non‑marring feet to safely rest the benchtop on finished floors or countertops during setup.
Flip‑Top Cart With Bracket Dock
Create a flip‑top rolling cart where one side docks the miter saw via the brackets and the opposite side holds another tool. The brackets let you detach the saw instantly for service or blade changes. Add alignment pins and a stop block so the saw returns to perfect calibration after every flip.
On‑Site Trim Station With Measuring Wings
Build attachable measuring wings with adhesive tape measures and a movable stop that clamp to a DWX723/DWX724 stand. Mount the saw to the brackets at center. The quick‑release lets you remove the saw and clip in an auxiliary flat table so the station doubles as an assembly surface between cuts.
Wall‑Dock Storage and Carry System
Install a wall rail in your shop that accepts the brackets so the miter saw can hang securely off the floor. When it’s time to go, quick‑release from the rail and drop onto a lightweight carry board whose underside uses the brackets as feet, protecting surfaces with the non‑marring pads.
Patio‑Safe Outdoor Build Table
Make a foldable trestle table sized to the bracket width. The polymer feet allow you to set the rig on decks or tile without scratching. Integrate dust collection hooks and a cord management tray so you can do outdoor furniture builds without marking up the client’s hardscape.