Features
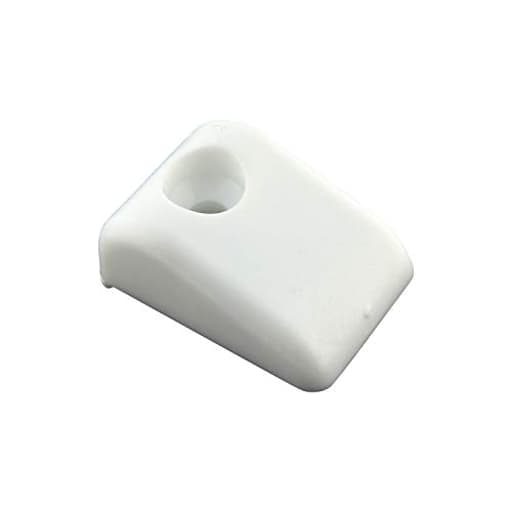
- Interior Drawer Bumpers for cabinets with white finish
- Prevents runner on interior drawers from marring cabinet doors
- High strength nylon to prevent scratching surfaces
- Screws Included for simple installation on your drawer boards.
Specifications
| Color | White |
| Unit Count | 10 |
Related Tools
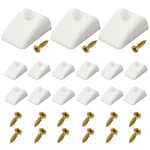

Interior drawer bumpers for roll-out shelves that protect cabinet doors and surfaces by preventing the drawer runner from making contact. Made of high-strength white nylon to resist scratching; screws are included for installation and the package contains 10 bumpers.
Rok Hardware Furniture Drawer Slide Bumper for Roll Out Shelves Review
A simple fix for a common cabinet problem
Pull-out shelves are great until they start chewing up the backs of your cabinet doors. The first time I noticed gray scuffs and a faint groove where a slide runner kissed the paint, I went looking for a low-effort, durable solution. The Rok drawer bumpers did exactly what I needed: create a reliable stop so the shelf never lets the runner contact the door, without adding bulk or turning into a maintenance item.
Design and materials
These bumpers are small, rigid blocks of white nylon with a countersunk hole for a single screw. In practice, that’s all you need for this job. The nylon is rigid enough that it doesn’t compress or mushroom, so the stop point stays consistent. The finish is smooth and won’t telegraph marks onto painted doors the way a slide runner will. They come in a pack of ten with matching screws, which is enough for five shelves if you’re installing a bumper on each side.
The profile is low, which matters on tight pull-outs where you can’t afford to give up an extra quarter inch of travel. They’re also neutral-looking; the white disappears on typical light interiors and doesn’t draw the eye if you open the cabinet and see them mounted on the sides of the pull-out.
If I could tweak the design, I’d love a slightly softer face material to soften the closing sound. Nylon is tough, but it’s not cushy. That said, rigidity here is also a plus: a soft rubber pad might peel or shift, and the last thing you want is a moving stop.
Installation in practice
Installation is straightforward and quick. Here’s the approach that’s worked well for me:
- Determine contact points: Close the cabinet door and gently push the pull-out forward until the runner is about to hit the door. Note where a bumper would need to touch the door or frame first to prevent that contact. If you want the door itself to be the stop surface, aim the bumper to meet the back of the door. If you’d rather keep all contact off the door, align the bumper to meet the cabinet frame or a fixed rail behind the door.
- Choose the mounting face: On most roll-outs, I mount one bumper near the front of each side panel, flush with the face so the shelf hits evenly. On tight clearances, mounting to the side of the pull-out instead of the front can help preserve travel.
- Mark and pre-drill: Nylon is tough, but your shelf side is often plywood or hardwood. A small pilot hole prevents splitting and helps the screw seat without cracking the bumper. Hold the bumper where you want it, mark the hole with an awl or pencil, and pre-drill a shallow pilot.
- Attach with the included screw: The countersunk screw pulls the bumper snug and flush. Don’t over-torque; nylon can crack if you drive it like a deck screw.
Per shelf, you’re looking at a couple of minutes. I install them in pairs—one on each side—so the shelf hits square and the slides don’t bind. On heavier shelves (think loaded pantry roll-outs), a square stop keeps things feeling solid.
Performance and day-to-day use
Once installed, the bumpers do exactly what they’re supposed to: they become the first point of contact on closing, preventing runners or hardware from scuffing the door. On painted cabinetry, that’s the difference between a pristine door and a repair job six months in.
The stop point is satisfyingly consistent. Nylon’s lack of compression is a factor here—each close feels the same, and I haven’t seen any creep or deformation. If you’re coming from stick-on felt or silicone dots, you’ll notice that these are less forgiving but far more durable and predictable. Noise-wise, there’s a firm tap when the bumper meets the door or frame. If you want to soften that, a small adhesive felt dot on the bumper face works well without turning into a gummy mess.
I also appreciate how these tame older or slightly out-of-square pull-outs. When the geometry isn’t perfect, slides can drift and graze the door on one side. Setting matched stops re-centers the closing behavior and reduces racking.
Fit and compatibility
- Face-frame vs. frameless: Works fine in both. On face-frame cabinets with inset doors, I typically align the bumper to hit the back of the door. On frameless with overlay doors, I aim the bumper to meet a fixed cabinet edge just behind the door plane to keep contact off the door. You’ve got options either way.
- Tight clearances: The low profile matters. I’ve used these on narrow spice pull-outs and deep pantry trays without sacrificing meaningful travel. If your slide tolerances are razor-thin, test-fit with painter’s tape before you drill.
- Retrofit vs. new: They’re equally at home as a retrofit on aging kitchens and on fresh installs. If you’re refreshing older cabinets, these are a clean way to fix a problem without reshaping hardware or adding bulky blocks.
Durability and maintenance
Nylon holds up. In my use, there’s no fraying, no denting, and no edge crumble. White interiors can show grime; the bumpers wipe clean with a damp cloth and a drop of mild soap.
If you care about color matching, these can be painted to blend into darker interiors. Scuff lightly, clean with alcohol to remove oils, prime with a plastic-bonding primer, and topcoat with your cabinet finish. Treat them like any slick plastic: cleanliness and the right primer are the difference between a paint job that sticks and one that chips.
Quirks and minor drawbacks
- They’re rigid: That’s a plus for repeatable stops, but it’s not a soft-close experience. Add a felt dot if you want a quieter close.
- Color: Only white out of the box. Paint if needed.
- Precision matters: Because they set the stop point, a sloppy placement can leave your shelf short of its intended travel. Dry-fit and mark with the door closed to avoid guesswork.
- Screws: The included screws match the countersink well. As with any small hardware kit, I do a quick count before starting and keep a few spares on hand.
None of these are deal-breakers; they’re just the practical realities of a simple, purpose-built part.
Value
You could cobble together a solution with scrap wood blocks, double-stick silicone dots, or improvised bumpers. I’ve tried them all. The Rok bumpers take less time, look cleaner, and provide a consistent stop that doesn’t wander or fall off. Given that you’re protecting finished cabinet doors—a high-labor, high-visibility surface—the cost of these pales next to touch-up or repainting. A ten-pack is typically enough to outfit a small kitchen’s worth of pull-outs, and you’ll probably be glad you have a couple left over for the next project.
Tips to get the most out of them
- Use painter’s tape to mark the door’s interior where you want the bumper to hit, then mark your pilot hole through the bumper for precise alignment.
- Install both sides at the same height to keep the shelf from twisting at the stop.
- If you need micro-adjustment, you can shim behind the bumper with a thin card or veneer to nudge the stop point out a hair.
- For quieter operation, add a small felt pad to the bumper face after installation.
The bottom line
The Rok drawer bumpers are the kind of low-cost, high-impact hardware I like to keep on hand. They solve a specific problem—stop slide runners from damaging cabinet doors—cleanly and reliably, they install in minutes, and they stay put. The nylon is tough, the profile is compact, and the included screws make for a tidy, one-and-done install. I’d like a softer face option for quieter closures and more color choices, but those are nice-to-haves rather than must-haves.
Recommendation: I recommend these to anyone with roll-out shelves behind hinged doors—DIYers and pros alike. They’re an easy insurance policy for cabinet finishes, they bring consistency to how pull-outs close, and they save you from the inevitable scuffs that show up when runners meet paint. If you want a near-silent stop, add a felt dot. If you want a precise color match, paint them with a plastic-friendly primer. Either way, the core function is solid, and that’s what matters most.
Project Ideas
Business
Silent Drawer Upgrade Service
Offer a small-service business that retrofits kitchen and bathroom cabinets with drawer bumpers to eliminate marks and reduce noise. Charge per drawer or per cabinet, offer quick onsite installs, and target real estate staging, rental property owners, and busy homeowners.
Preinstalled Bumper Roll-Out Shelves
Manufacture or sell roll-out shelves and include the bumpers preinstalled as a premium feature. Market the product to cabinet makers, kitchen remodelers, and online furniture marketplaces as a higher-quality, scratch-resistant option.
Branded Bumper Kits for Retail
Create and sell small branded kits (10–20 bumpers + screws + simple installation guide) targeted at DIYers and handymen via Etsy, Amazon, or local hardware stores. Offer kit variations (standard, soft-close combo with felt, color-matched options) and bundle them with short how-to videos.
Contractor & Stager Wholesale Program
Set up a wholesale supply line aimed at interior designers, home stagers, and contractors who need bulk bumpers for multiple projects. Provide volume discounts, quick shipping, and co-branded packaging so professionals can include bumpers as a standard upgrade.
Content & Workshop Monetization
Produce short tutorial videos, step-by-step guides, and local workshops teaching cabinet maintenance and simple upgrades using these bumpers. Monetize through ads, paid classes, downloadable guides, and selling physical bumper kits at workshops or online.
Creative
Silent Spice Rack Retrofit
Turn a noisy pull-out spice rack into a soft-closing, scratch-free drawer by installing bumpers at contact points where the runner meets the cabinet face. Add a felt strip behind the bumper for extra quieting. Result: a smooth, professional upgrade with minimal tools.
Mini Display Feet for Shelves
Use the bumpers as discreet feet on small wooden display shelves, picture ledges, or floating boxes to protect walls and surfaces. Screw one or two bumpers under the back edge to create a slight tilt for better display angle and to keep items from scraping the wall.
Repurposed Crate Drawer Stops
Convert wooden crates into roll-out drawers by adding simple runners and using the bumpers as stops and cushions at the front and back. This is ideal for rustic storage builds—keeps the wood from banging and protects the finish.
DIY Cabinet Makeover Kit
Create a small makeover project: remove old hardware, sand and refinish the drawer faces, then install bumpers at contact points to ensure the new finish doesn't get marked when drawers are used. Package as a one-afternoon upgrade for renters or first-time homeowners.
Tactile Craft & Sensory Panels
Use the nylon bumpers as tactile elements on sensory boards or fidget panels. Mount several bumpers at different heights and spacings on a board for a quiet, durable touch surface—good for kids' playrooms or classroom sensory corners.