Features
- Keep wires organized: The cable chase wire bracket provide a reliable way to keep electrical cables separate and neat, wire management can help clean up a messy look and facilitating follow-up maintenance.
- Save time and energy: Using the cable chase bracket eliminates the need for lot of drilling and stapling(fixed with screws), greatly saving installation time and labor.
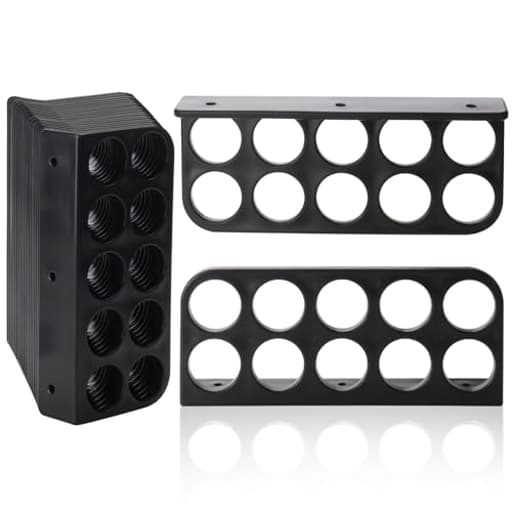
- Wide application: The electrical cable wire support brackets are designed with1” 10-hole design, can fit for various electrical cords wires and cables, especially adapted to NMB cable wires.
- Easy to install: 10-hole design make it easy to route multiple cables by simply having wire cord cable bracket along walls, under ceilings, or in other narrow spaces, great space saving for future expansion.(Screws NOT Included)
- Safe and less damaging: Greatly reduce damage to house joists and woods by using cable chase cable bracket. Reduce wire damage from vibration or friction by holding cables securely to prevent them from sagging or moving.
- Smooth and flat edges: The cable holder bracket organizer have a good finish, with 1” diameter holes that are smooth and no sharp edges to fray the electrical wires.
Specifications
| Color | Black |
| Size | 20 Pack |
Related Tools
Twenty 1" 10-hole cable chase brackets for routing and supporting electrical cords, particularly NMB cables (screws not included). They mount to joists, walls, or ceilings to keep cables organized, reduce sagging and abrasion, and avoid repeated drilling or stapling; edges are smooth to prevent wire fraying.
CLLOMAGY 20Pack Cable Chase-Wire Bracket,Cable Support Wire Bracket Holder for NMB Electrical Cord Organized Management,Labor Time Saving,1" with 10-Hole Design Review
Why I reached for these brackets
Routing a handful of NM-B runs across a basement and up into a crawl space, I wanted a cleaner, faster option than drilling joists and hammering staples for each cable. I tried the CLLOMAGY cable chase brackets primarily to save time and keep lines tidy for future service. The concept is simple: rigid bars with ten 1-inch holes you mount along a path, then thread cables through. In practice, they removed a lot of hassle, especially in tight or awkward areas where drilling isn’t ideal.
Design and build impressions
Each bracket is a rigid, black strip with ten evenly spaced 1-inch openings. The finish is smooth with no flashing or sharp edges, and that matters—edges that bite into cable jackets cause headaches later. The hole spacing allows enough separation that cables don’t rub each other when you pull new runs, and the low profile doesn’t intrude on future finishes (I tucked a run behind where a drop ceiling could go without clearance issues).
There are mounting points for screws (you’ll need to supply your own), and the overall layout encourages one-cable-per-hole routing. That’s the right approach for heat dissipation and troubleshooting later. While the brackets feel robust, I treated them as a guide and support—not a structural solution—and avoided leveraging them to yank or bend heavy bundles around corners.
Installation: faster in all the right ways
I mapped a path along the bottom of joists, snapped a line for alignment, and installed brackets every few feet, with extras near transitions and pulls. A few notes from the install:
- Screws: I used #8 pan-head wood screws into framing. Pan heads seat well without biting into the bracket. Screws are not included, so plan accordingly.
- Pilot holes: In older or dense framing, quick pilot holes kept things moving and prevented splitting.
- Spacing: Placing brackets roughly every 32–48 inches worked fine for NM-B and low-voltage lines. I tightened spacing near turns and drops.
- Order of operations: Mount all the brackets, thread a pull string or the first cable through the series, and then add additional runs as needed. Preplanning which hole gets which circuit saved me from crossing lines mid-run.
Pulling cable through was straightforward. The 1-inch holes are generous for typical 12/2 and 14/2 NM-B, and they also fit coax and Cat6 nicely. The smooth edges meant I didn’t worry about jacket scuffing, even when feeding through multiple brackets in a row. Compared to drilling separate holes for each cable in multiple joists, the time savings were real—especially in tight overhead work.
Cable management and safety
Separating cables into individual holes keeps things tidy and reduces friction and movement. I also found it easier to trace individual circuits later, which is a small but meaningful win during troubleshooting. Because the holes are distinct, you avoid packing multiple current-carrying conductors together in one opening, which is better for heat and avoids some derating concerns that come with bundling.
A few best practices I followed:
- One cable per hole. It’s tempting to double up, but separation is the whole point here.
- Maintain bend radius. Use additional brackets to create gentle turns rather than forcing tight bends.
- Segregation: Keep power and low-voltage lines apart—ideally on separate brackets or at least spaced apart—both for code and to minimize interference.
- Support near transitions: Add a bracket or other support near drops, turns, and entry points to boxes or conduits so cables don’t sag.
If you’re working around I-joists or engineered lumber, these brackets shine because you can follow the underside rather than boring new holes. Always follow the joist manufacturer’s rules for boring and notching, but being able to avoid holes entirely in sensitive zones is a major advantage.
Where these brackets shine
- Open basements, garages, and crawl spaces: Fast, orderly routing along framing without swiss-cheesing joists.
- Tight overhead spaces: When access for drilling is limited, the linear path along joists is much easier to build out.
- Prewires and expansions: Leave a few holes unused, and you’ve got capacity for future circuits or low-voltage lines without disturbing the existing layout.
- Serviceability: Visual tracing is much simpler when each run has its own passage in a straight line.
I also appreciate the low profile. Having a neat, shallow plane of cables leaves you options for future finishes, insulation, or a ceiling system without rerouting.
Limitations and gotchas
- Screws not included: Not a dealbreaker, but you’ll want the right fasteners on hand. Pan-head screws work best; avoid countersinks that could chew into the bracket.
- Not a miracle for every situation: Big feeders, armored cable, or conduit aren’t what these are for. This is a guide system for typical NM-B and low-voltage runs.
- Environment: There’s no marking indicating a UV rating or outdoor use, so I keep them indoors in dry locations.
- Overconfidence risk: Because pulling is easy, it’s also easy to overpopulate a route. Stick to one cable per hole and maintain spacing between power and low-voltage.
One more note: plan the route before mounting. Brackets look best and work best when aligned. A chalk line and a few minutes of layout saved me from rework.
Durability and holding power
Once anchored to solid framing, the brackets hold cables securely enough that there’s no sag or chatter when the building vibrates. The rigid body doesn’t flex once mounted with two screws, and the holes are smooth enough that repeated pulls didn’t show any scuffing on the bracket or the cable jackets. I wouldn’t use them as a substitute for support where code calls for staples near boxes or entry points, but as a pathway they’re reliable.
Value and pack size
A 20-pack is a practical quantity for a medium run in a basement or an attic branch. At ten holes per bracket, you’ve got room to reserve capacity as you go, rather than packing every hole at once. I used roughly one bracket every 3 feet, with extra near transitions—so one pack covered a solid length with some leftovers for future adds.
Tips to get the most from them
- Map first, mount second. Use a chalk line for long, straight shots.
- Keep labeling handy. As you thread new cables, tag them so the neat look also translates to easier diagnostics later.
- Add a bracket near every turn. You’ll preserve bend radius and make future pulls smoother.
- Leave growth space. Don’t fill every hole on day one; your future self will thank you.
The bottom line
The CLLOMAGY cable chase brackets do exactly what they promise: they keep cable runs neat, reduce wear points, and save real time in installs where drilling and stapling would be tedious or impractical. The 1-inch holes and smooth finish make pulling straightforward, and the low profile leaves options open for future finishes. You’ll need to bring your own screws and a bit of layout discipline, but once they’re in, they create a clean, serviceable pathway that’s friendly to both current projects and future changes.
Recommendation: I recommend these brackets for anyone running multiple NM-B or low-voltage lines in open framing, especially in basements, attics, and crawl spaces. They’re faster than drilling, neater than staples, and more flexible for future expansion. As long as you observe standard practices—one cable per hole, proper separation of systems, and solid mounting—they’re a smart, time-saving addition to the electrical toolbox.
Project Ideas
Business
Home Cable Management Service
Offer a service for home offices, home theaters, and smart home installs that uses these 10‑hole brackets to create durable, code‑friendly cable runs. Charge per room or per linear foot; include labeling, a as‑installed diagram, and a tidy handoff packet for the homeowner.
DIY Cable Management Kits (Etsy/Shop)
Assemble and sell curated kits that include a subset of brackets (painted/finished), screws, zip ties, mounting templates, and step‑by‑step instructions for common jobs (desk, TV, workshop). Market kits for remote workers, gamers, and makers with easy online tutorials and before/after photos.
Events & Pop‑Up Power Routing
Provide temporary cable routing services for pop‑ups, trade shows, and events: use the brackets to create tidy under‑counter or overhead runs that prevent trip hazards and speed setup/tear‑down. Offer recurring clients a modular pack rental with labeled pieces for fast deployment.
Contractor/Trade Supply Bundle
Create branded packs of these brackets paired with screws, anchors, and a quick‑reference guide for electricians, AV installers, and contractors. Sell in volume to small contractors or include as an upsell in retrofit electrical jobs to reduce future maintenance calls.
Workshops & Training for Makerspaces
Host hands‑on classes teaching cable management best practices using the brackets—cover home networking, audio/video installs, and shop organization. Charge per seat and sell a take‑home kit so attendees leave with the parts and instructions to replicate the project at home.
Creative
Under‑Desk Cable Runway
Mount a row of brackets along the underside of a desk or workstation to create a discrete runway for power, monitor, and peripheral cables. Use the 10‑hole spacing to separate and route multiple cables neatly, add labeled zip ties and adhesive clips for quick reconfiguration, and paint the brackets to match the desk for a finished look.
Illuminated Wall Grid (LED Art)
Create a decorative wall grid by fastening brackets to a plywood panel in a geometric pattern and threading LED strips or low‑voltage lamp cords through the 1" holes. The smooth edges protect the wires, and the repeated 10‑hole units make it easy to scale the design into backlit artwork or ambient accent lighting.
Vertical Garden Lighting & Irrigation Organizer
Use brackets on a vertical pallet or trellis to route power cords for grow lights and small irrigation tubing for a living wall. The 1" holes keep hoses and wires separate to avoid abrasion, while the compact 10‑hole sections let you add or remove lines as the garden grows.
Media Center Mosaic & Accessory Holder
Turn a board of mounted brackets into a multifunction media hub: route TV and console cables through the holes, and use some empty holes to hang controllers, remotes, or headphones with small hooks. Paint the brackets in contrasting colors to make a practical, decorative focal piece.
Workshop Hose & Cord Management Rail
Mount several brackets along a shop wall or under a workbench to store extension cords, air hoses, and battery charger leads. The 10‑hole design lets you bundle similar lines together and prevents sagging or abrasion in a busy workspace.