Features
- This US flat slot storm door handle set replacement is NOT universial, please compare to your existing ones before you drop an order.
- Handle PZ (center of cylinder to center of handle) is 2-1/2-inch.
- Trim plate screw holes spaced at 7-1/4". Lock faceplate screw holes spaced at 7".
- Helpful Tips: Do not throw away your original hardware, you may need them for the installation of your new part. Put a piece of cardboard between screwdriver and door to prevent marring or chipping paint.
- Ideal for out-swinging metal and wood storm doors 1" - 2" thick.
- Minor modification may be required; may require drilling new holes or enlarging existing trim plate holes.
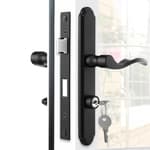
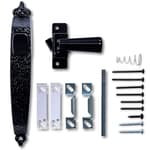
- Package Includes: 1x mortise lock body, 1x strike plate, 2x lever handles, 2x escutcheon plates, 1x square spindle, 1x key cylinder, 1x hardware pack.
- NOTE: Secure the spindle and cut it down using either a hacksaw or a pair of pliers to break off the tailpiece at the desired notch. File down any metal shards at the tip of the tailpiece for a clean finish.
Specifications
| Color | Matte Black |
| Unit Count | 1 |
Related Tools
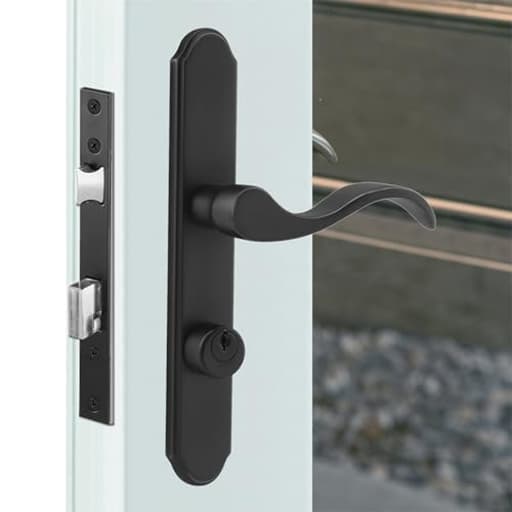
This flat-slot storm door handle set is a complete replacement for out-swinging metal or wood storm doors 1"–2" thick and includes a mortise lock body, strike plate, two lever handles, two escutcheon plates, a square spindle, key cylinder and installation hardware. It has a 2-1/2" PZ handle spacing, 7/8" backset, 7-1/4" trim plate screw spacing and 7" lock faceplate screw spacing, comes non-handed in matte black, may require trimming the spindle or enlarging holes for installation, and is not universal.
ReigaHood US Flat Slot Storm Door Handle Complete Set Fits for Larson and Wright Screen Door Hardware, 2-1/2" Handle PZ, 7/8" Backset, 7-1/4" Trimplate H.C., Non-Handed, Matte Black Review
A tired storm‑door latch can turn a simple trip outside into a two‑handed wrestling match. I recently replaced a worn assembly on an older out‑swinging aluminum door with the ReigaHood storm door handle set, and it brought the door back to life—provided I respected its strict fit requirements and took my time during install.
What this set is (and isn’t)
This is a complete flat‑slot mortise handle and lock kit for out‑swinging storm doors between 1 and 2 inches thick. It’s non‑handed, so it works for left or right swing doors. The handle‑to‑cylinder spacing (PZ) is 2‑1/2 inches, the backset is 7/8 inch, trim plate screw holes are 7‑1/4 inches apart, and the lock faceplate screws are 7 inches apart. Those numbers matter. If your existing door doesn’t match them—or can’t be persuaded to—this isn’t the right kit.
What you get: a mortise lock body, strike plate, inside and outside levers, matching escutcheons, a square spindle, a keyed cylinder, and all mounting hardware. The finish is a uniform matte black that plays nicely with both modern and traditional trim.
Build quality and feel
The levers have a simple, clean profile with a slightly flattened grip that feels comfortable, even with gloved hands. The finish resisted fingerprints and small scuffs while I wrestled with alignment, and it matched other black exterior hardware close enough that no one will notice a difference from a few feet away.
The mortise body is solid and the action smoothed out after the first dozen cycles. Out of the box there was a hint of graininess as the latch moved across the flat slot; a small dab of silicone lubricant on the latch face and strike plate took care of that. Once installed, the lever return felt positive, without the mushiness that plagues tired storm door hardware.
Fit and compatibility: measure twice
Before removing anything, I measured the existing setup. You’ll want to verify four things:
- Door thickness: 1–2 inches
- PZ (center of cylinder to center of handle spindle): 2‑1/2 inches
- Backset (edge of door to center of spindle): 7/8 inch
- Screw spacings: 7‑1/4 inches on the trim plate; 7 inches on the lock faceplate
On my door, three of the four matched; the exterior trim holes were just a hair tight. I used a step bit to enlarge them by less than 1/16 inch, touched up the raw edge with paint, and moved on. If your door is significantly off any of these dimensions, expect more than “minor modification.”
Installation experience
I’d rate the install as straightforward for anyone comfortable with door hardware, with two caveats: spindle length and cylinder alignment.
Removing the old set: I kept the original screws and strike on hand. That was a smart move; one of the provided machine screws was slightly short for my interior trim stackup, and reusing an original fastener saved a run to the store. Put a scrap of cardboard under your screwdriver to avoid dinging paint.
Test fit the mortise body: Before committing, I slid the new lock body into the door pocket to check depth and faceplate alignment. The 7‑inch screw spacing landed perfectly; the latch lined up with the existing strike with only a minor shim tweak.
Spindle cutting: The included square spindle comes long. You must trim it. I marked the length with the exterior lever and cylinder dry‑fitted, then cut at the nearest factory notch with a hacksaw. Don’t eyeball this—too short and you can’t recover. I deburred the cut with a file to avoid chewing up the internal cam.
Cylinder and cam engagement: The keyed cylinder has to engage the lock body cleanly. If the cylinder binds when you tighten the escutcheon, back off and reseat it. Forcing it can snap a tailpiece or leave you with a cylinder that turns but doesn’t throw the latch. A light hand and incremental tightening did the trick for me.
Final alignment: I mounted the outside lever loosely, installed the interior lever, and cycled the latch a dozen times before final torque. This exposed a small rub on the strike; a few file strokes eliminated it.
Total time: just under an hour, including the minor hole enlargement and spindle trim.
Everyday performance
Once installed and bedded in, the handle feels reassuringly solid. The lever action is light, with a crisp return. The latch engages the strike positively without slamming the door, and the key cylinder turns cleanly with no granular feedback. On windy days, the door stayed latched without needing a hard pull. I noticed no rattle from the trim or lever, even after a few weeks of daily use.
Noise is minimal; if your storm door has a closer that slams, you’ll want to tune that separately to get the full “new door” feel.
Security and expectations
This is storm door hardware, not a deadbolt for a primary entry. It’s adequate to keep the storm door shut and provide incidental security, but it shouldn’t be your only line of defense. The cylinder operates as it should and the latch holds firmly, but the door and frame construction will ultimately limit security more than this set.
Durability notes
The matte black finish shrugged off a month of sun and rain without chalking or spotting. The latch face showed expected brightening where it meets the strike, but no peening or deformation. I recommend a drop of silicone or PTFE lube on the latch and a tiny smear on the strike once a year—more often if you live near salt air.
What could trip you up
Non‑universal fit: If your PZ, backset, or screw spacing don’t match, you’re into modification territory. Check your measurements carefully before buying.
Spindle length: Cut once, correctly. If you cut the spindle too short, the lever may not engage, and you’ll be stuck. Measure with everything dry‑fitted.
Cylinder seating: Misalignment can cause a crunchy turn or partial throws. Tighten the escutcheon screws gradually and test as you go.
Door thickness stackups: If you have storm‑door accessories (closer brackets, built‑up weatherstripping), screw length may be marginal. Keep your original hardware; you may need a longer machine screw or a different thread.
Who it’s for
- Homeowners with out‑swinging storm doors that match the 2‑1/2 inch PZ, 7/8 inch backset, and listed screw spacings
- Folks who prefer a clean, low‑sheen black finish and a lever over a pushbutton latch
- DIYers comfortable with careful measuring, light drilling, and cutting a spindle
Tips for a clean install
- Photograph your old hardware before removal, front and back. It’s a handy reference for orientation and screw lengths.
- Test fit every component before trimming the spindle. Blue painter’s tape can hold parts in place while you mark.
- Use a step bit to enlarge trim holes; it leaves cleaner edges in thin aluminum skins than a twist bit.
- Deburr every cut. A sharp edge on the spindle will chew the lock internals.
- If the latch doesn’t sit deep into the strike, loosen the hinges and pull the door toward the stop as you retighten, or shim the strike slightly.
Pros
- Full kit with matching components and a consistent finish
- Non‑handed design simplifies setup for left or right swings
- Smooth, positive lever action once aligned
- Reasonably forgiving to tune, provided your measurements match
Cons
- Not universal; strict dimensional requirements
- Spindle trimming is mandatory and easy to mess up if you rush
- Instructions are basic; experienced DIYers will be fine, beginners may need a video or two
- May require minor hole enlargement or reuse of original hardware
Bottom line
The ReigaHood storm door handle set is a solid, good‑looking replacement for flat‑slot mortise storm door hardware—if your door matches its dimensions. The parts fit together well, the finish is attractive, and the action is smooth once installed. It’s not a puzzle‑box: measure accurately, dry‑fit everything, cut the spindle carefully, and you’ll be rewarded with a door that feels new again.
Recommendation: I recommend this set for anyone with a compatible out‑swinging storm door who’s comfortable with light modification and careful measuring. If your door’s measurements differ from the 2‑1/2 inch PZ and 7/8 inch backset, or if you’re not up for trimming a spindle and potentially enlarging holes, look for a model that matches your door exactly or consider an OEM replacement to avoid fitment headaches.
Project Ideas
Business
Storm-Door Replacement & Retrofit Service
Offer a local service replacing old storm-door hardware with new sets like this one (target homeowners, landlords, property managers). Service includes measuring (confirm non-universal fit), minor drilling/enlarging of holes, spindle trimming, and finish touch-ups. Upsell: weatherstripping, threshold checks, and a 30–60 day follow-up. Market via neighborhood flyers, Nextdoor, and local Facebook groups; price per door plus parts and a small travel fee.
DIY Conversion Kits & Video Tutorials
Create and sell aftermarket DIY kits that include templates, pre-cut spindle options, foam spacers, extra screws, and a laminated step-by-step sheet plus a link to a how-to video showing trimming the spindle, aligning 7-1/4" trim plate holes, and protecting paint (cardboard tip). Sell on Etsy, Amazon, or your own store; offer tiered kits (basic/complete with mortise-lock prep). Produce short how-to clips for YouTube/Instagram to drive traffic.
Custom-finish & Matching Hardware Packages
Provide a small-batch finishing service (powder-coating, brushed finishes, or color-matching) for customers renovating front-entry or storm doors who want consistent hardware. Offer bundled packages: handles, kickplates, hinges and locksets matched to a finish. Target interior designers, boutique homebuilders, and renovation clients. Include measurement verification service to reduce returns (note: this product is NOT universal).
Upcycled Home-Decor Product Line
Turn surplus or slightly imperfect storm-door hardware into handcrafted decor (coat racks, shelf supports, lamp bases) and sell on Etsy, craft fairs, and Instagram. Emphasize sustainability and story (e.g., repurposed functional parts given new life). Price items with a materials-and-labor markup; offer personalization (engraving, color). Use high-quality photos showing the matte-black aesthetic and provide care instructions (filed spindle edges, how to mount).
Creative
Reclaimed-wood Coat & Key Rack
Mount the two lever handles as heavy-duty hooks on a reclaimed wood board (handles act as coat/hooks; escutcheon plates as backplates). Use the strike plate or lock faceplate as a small key catch. Fasten the mortise lock body inside the board as an accent or to hide small compartments. Ideal for entryways — matte-black finish gives an industrial look. Tip: pre-drill holes to match the 7-1/4" trim-plate spacing or use new screws; cut the square spindle down if using any cross rods.
Mini Cabinet or Jewelry Box Hardware Upgrade
Refit a small wooden cabinet or handmade jewelry box with the lever handles as pulls and the keyed cylinder for a working locking feature. The included mortise lock body allows you to add a real latch to a small box door (doors 1"–2" thick fit best). You may need to enlarge or drill new holes and trim the spindle to proper length; keep original hardware as templates during installation.
Industrial Wall Shelf with Handle Brackets
Use the levers as decorative shelf brackets: secure the escutcheon plates to vertical supports and bolt the lever arms under a narrow shelf for an industrial floating-shelf look. Incorporate the strike plate and lock faceplate as visible metal accents. Matte black hardware pairs well with raw wood or painted brick. Recommend using anchors and checking screw spacing for a secure mount.
Steampunk/Industrial Lamp or Sculpture
Turn the key cylinder, spindle, and lock components into a tabletop lamp or mixed-media sculpture. The keyed cylinder makes an eye-catching faux keyhole; the square spindle can be shortened and used as a structural element or lamp stem. If wiring a lamp, follow electrical-safety guidelines or use a lamp kit. File down cut spindle edges for a smooth finish and seal any exposed metal to prevent rusting.