Features
- Carbide tip for increased wear resistance in concrete
- Centric conical tip for improved centering during drilling
- Enhanced flute design for dust removal
- Hex drive nutsetters for attachment to driver sleeves
- Includes multiple sizes of drill bits and nutsetters
Specifications
| Model Number | TCHC9 |
| Pack Quantity | 9 |
| Bit Diameters (In) | 5/32, 3/16 |
| Working Lengths (In) | 2, 1, 0.5 |
| Total Lengths (In) | 3, 2, 1 |
| Drive Type | SDS-plus |
| Tip Material | Carbide |
| Intended Material | Concrete |
| Manufacturer Order Number | 2610071817 |
Related Tools
Related Articles

Set of SDS-plus masonry drill bits and nutsetters for installing concrete screws. Carbide-tipped bits with a centric conical tip to help guide the bit during drilling, and flutes designed to remove dust for more efficient drilling and longer bit life.
Bosch 9 pc Universal Concrete Screw Installation Kit (SDS-plus) Review
Why I reached for this concrete screw kit
I’ve installed a lot of concrete screws over the years—ledger brackets, bottom plates, conduit straps, and dozens of tap-on fixtures—and the two things that make or break the job are accurate holes and clean workflow. The Bosch concrete screw kit hits those two targets well. It pairs SDS‑plus masonry bits sized for common concrete screws with matching nutsetters, so I can drill and drive without hunting through different cases. It’s a compact, purpose-built kit that feels like it was designed by someone who’s spent time on a ladder with a rotary hammer in one hand and an impact driver in the other.
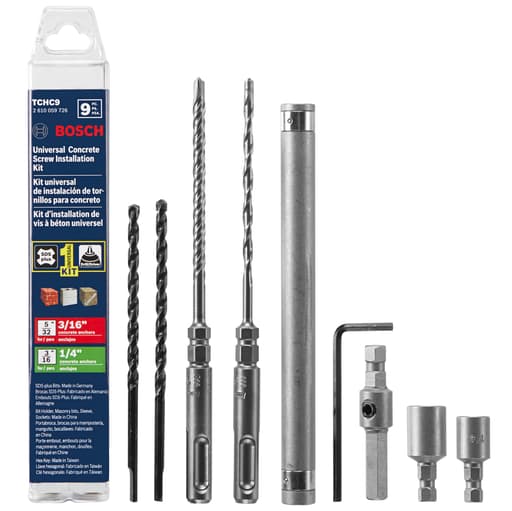
What’s in the kit
This 9‑piece kit centers on two SDS‑plus carbide masonry bits in the key pilot sizes for concrete screws: 5/32 inch (for most 3/16‑inch screws) and 3/16 inch (for most 1/4‑inch screws). The bits come in short, practical lengths—the working lengths span roughly 1/2, 1, and 2 inches, with overall lengths of about 1, 2, and 3 inches. That sounds tiny on paper, but for screw anchors it’s the right call; shorter bits start straighter, run truer, and are easier to control in tight spaces.
The kit rounds out with hex‑drive nutsetters for installing the screws after drilling. These live in my impact driver while the SDS‑plus bits stay in the rotary hammer. The combination keeps the pace up and reduces tool swapping or fiddling with adapters.
Setup and compatibility
- Drive type: SDS‑plus. You’ll need a rotary hammer with an SDS‑plus chuck to use the included bits.
- Tip material: Carbide.
- Intended material: Concrete (and it handled mortar and block fine in my testing).
- Nutsetters: 1/4‑inch hex drive for a driver sleeve or an impact driver.
If you only own a standard hammer drill with a 3‑jaw chuck, this kit isn’t a drop‑in solution. You’d need an SDS‑plus adapter (which I generally avoid for heavy masonry work) or different bits. On the flip side, if you already run an SDS‑plus rotary hammer—and many pros do—these bits are exactly what you want for consistent pilot holes.
Drilling performance
Bosch’s centric conical tip does what it claims: the bit noses in accurately and resists skating on harder aggregate. I like to start a shallow dimple, square up, and then lean on the hammer action; the bit tracked true and didn’t walk off layout lines, even on a broom‑finished slab.
Chip evacuation is solid. The flute design carries dust out efficiently, which matters more than it gets credit for. Cleaner flutes keep drilling temperatures down and maintain hole diameter. On cured slab and older block, I could feel the bit maintaining bite rather than glazing. In side‑by‑side holes with an older generic bit, the Bosch bit cleared faster and needed less push.
A couple of practical notes:
- Use rotation + hammer mode; rotation‑only will be frustrating.
- Mark your target depth with tape or a stop collar—these short bits make it easy to hit the right embedment without overshooting.
Hole quality and fit
For concrete screws, hole consistency is everything. The 5/32‑inch bit left snug, repeatable holes for 3/16‑inch screws; I didn’t see the “spinout” you get when a hole runs wide. The 3/16‑inch bit sized properly for 1/4‑inch screws as well. After blowing or vacuuming dust, screws set firmly without over‑torqueing.
If you’re used to longer, whippier bits, the shorter overall lengths here are a welcome change. They reduce flex, improve perpendicularity, and cut down on hand fatigue because you don’t have to fight the tool to stay on line.
Driving the screws
The included nutsetters fit securely and ran true with no noticeable wobble. I used them in an impact driver at a moderate setting, and they transferred torque cleanly without cam‑out or rounding off screw heads. Having the nutsetters in the same box as the drill bits is more than a convenience; it made it easy to keep a consistent, repeatable workflow from hole to hole.
Pro tip: After drilling, clear the hole—two quick blasts with a hand blower or a squeeze bulb, or a vacuum pass. You’ll get higher holding power and fewer snapped screws. The flutes help, but concrete dust still needs a manual assist for best results.
Durability over a workday
I ran the 5/32‑inch bit through a dozen holes in cured slab and about the same in CMU. The carbide tips held their edge well, and the cutting face still looked crisp after the set. I didn’t hit rebar in my runs; carbide will chip if you do, but the bit’s centering and stiffness make it easier to feel aggregate changes and back off before you bind.
Heat buildup was minimal thanks to decent chip flow and short dwell time. If you’re drilling continuously in hard aggregate, pause occasionally to keep the bit cool and extend life.
Ergonomics and workflow
The short lengths make the kit great for overhead work and tight corners—think strapping EMT on a basement ceiling or fastening a sill plate near a stem wall. The reduced leverage also makes it easier to keep the bit square without bracing your whole body behind the tool.
I appreciate that everything lives in one small kit. With a rotary hammer in one hand and an impact driver pocketed with the nutsetter, the pace is fast and repeatable. It’s the small quality‑of‑life benefit that adds up over a long install.
Limitations and trade‑offs
- SDS‑plus only: If you don’t own a rotary hammer, this isn’t your kit.
- Limited diameters: It covers 5/32 and 3/16 inches—perfect for 3/16 and 1/4 screws—but nothing larger. If you also set sleeve anchors, wedge anchors, or big structural fasteners, you’ll need additional bits.
- Short working lengths: Great for screw anchors, not for deep embedments or through‑drilling thick materials. For that, you’ll want longer SDS‑plus bits.
- Concrete focus: It works on mortar and block, but it’s not a universal masonry set for tile, brick veneer drilling with glassy glaze, or precision stone work.
These aren’t flaws so much as scope decisions. This kit is purpose‑built for concrete screw installs, and it sticks to that mission.
Who it’s for
- Pros and DIYers who already own an SDS‑plus rotary hammer.
- Electricians, plumbers, HVAC techs, and carpenters who routinely install 3/16 and 1/4‑inch concrete screws.
- Anyone who values accurate, repeatable pilot holes and a quick drill‑and‑drive workflow.
If you’re an occasional user with only a hammer drill, you might be better served by a hex‑shank masonry bit set and a couple of separate nutsetters.
Tips for best results
- Mark hole depth based on the screw’s embedment requirement; these short bits make precise depth easy.
- Always blow out or vacuum holes before driving.
- Let the hammer action do the work—don’t lean so hard that you widen the hole.
- Keep a spare 5/32‑inch bit if your job is heavy on 3/16‑inch screws; that size sees the most use and will dull first.
Value
As a 9‑piece package, the kit covers the common sizes and couples them with the nutsetters you actually need. You’re paying for carbide, SDS‑plus compatibility, and a more controlled drilling experience. For frequent concrete screw installs, the productivity boost and hole quality justify the spend. For occasional use, it’s still attractive if you already own a rotary hammer; otherwise, the buy‑in to SDS‑plus may not pencil out.
Recommendation
I recommend the Bosch concrete screw kit for anyone with an SDS‑plus rotary hammer who regularly sets 3/16 and 1/4‑inch concrete screws. The centric carbide tips start cleanly, the flutes clear dust efficiently, and the short, stiff bits deliver accurate holes that hold screws reliably. The included nutsetters streamline the drill‑and‑drive sequence, and the whole kit slots naturally into a pro workflow. If you need larger diameters, deep‑reach bits, or don’t own SDS‑plus, this won’t cover every scenario—but for its intended job, it’s a well‑thought‑out, durable, and genuinely useful kit.
Project Ideas
Business
Masonry Mounting Service (Tapcon Specialist)
Offer a fast, dust-conscious service for mounting TVs, shelves, signage, hose reels, bike racks, and safety hardware into concrete, brick, or block using concrete screws. The SDS-plus kit speeds pilot drilling and the nutsetters streamline driving hex-head anchors. Package flat-rate installs (first 4 anchors included) and upsell cable management and patching.
Retail and Restaurant Facade Upgrades
Provide quick-turn installations of exterior menu boards, sign brackets, light fixtures, and security cameras on masonry facades. Use the carbide bits for clean holes that hold in mixed masonry. Market to small businesses needing after-hours installs; bundle layout, hardware supply, and compliance with embedment specs.
Property Manager Fixture Refresh
Create recurring service contracts for apartment and office buildings to install or replace mailbox clusters, bike hooks, hand sanitizer stations, extinguisher cabinets, and wayfinding signs on concrete or block. The kit’s centering and dust-clearing features reduce job time, enabling predictable per-stop pricing.
Home Gym and Storage Wall Installs
Specialize in anchoring squat rack wall mounts, pull-up bars, wall bike racks, and heavy-duty shelving into garage and basement masonry. Use correct bit-to-screw pairings (5/32 in for 3/16 in screws, 3/16 in for 1/4 in screws) and the nutsetters for reliable installs. Offer inspection and load guidance, and upsell protective floor mats and layout planning.
Event and Pop-up Infrastructure Anchoring
Provide temporary-to-semi-permanent anchor points for markets and events in parking lots or courtyards: banner arms, cable runs, removable bollards, and queue stanchions. Drill clean pilot holes and secure with removable concrete screws for quick teardown. Include hole patching options and a map of anchor locations for repeat events.
Creative
Vertical Herb Garden on a Concrete Wall
Build a slatted cedar panel and mount planter boxes to a concrete or brick wall. Use the SDS-plus bits (5/32 in for 3/16 in concrete screws) to drill clean pilot holes with good dust evacuation, then drive hex-head concrete screws with the included nutsetters. The centric conical tip keeps holes straight so the slats sit flat, giving a crisp, modern look for herbs or succulents.
Garage French-Cleat Tool Wall on Foundation
Anchor a pressure-treated ledger and French cleat strips directly to a concrete or block foundation wall for a modular tool storage system. Drill precise holes with the carbide-tipped bits, then use hex-head concrete screws for fast, strong attachment. The enhanced flute design clears dust, helping maintain correct hole size for maximum screw holding power.
Outdoor String Light and Decor Anchors
Create a grid of low-profile anchors along a concrete patio, balcony ceiling, or brick facade for string lights, planters, or seasonal decor. Pre-drill with the SDS-plus kit for 3/16 in or 1/4 in concrete screws as required, then drive with the nutsetters. This yields tidy, reliable mounting points that can be reused and rearranged without wall plugs.
Basement Pegboard or Slatwall on Masonry
Mount pegboard or slatwall panels to basement concrete walls using furring strips anchored with concrete screws. The centering tip helps keep holes aligned across multiple furring strips, making panel seams tight. Finish by attaching storage accessories—great for craft rooms, laundry, or a compact workshop.
Exterior Art and House Number Standoffs
Install metal or acrylic house numbers and art panels on brick with stand-off mounts. Drill accurate holes to consistent depths so all standoffs sit level, then drive hex-head concrete screws with the nutsetters. The result is a clean, gallery-style presentation that resists weather and requires no plastic inserts.