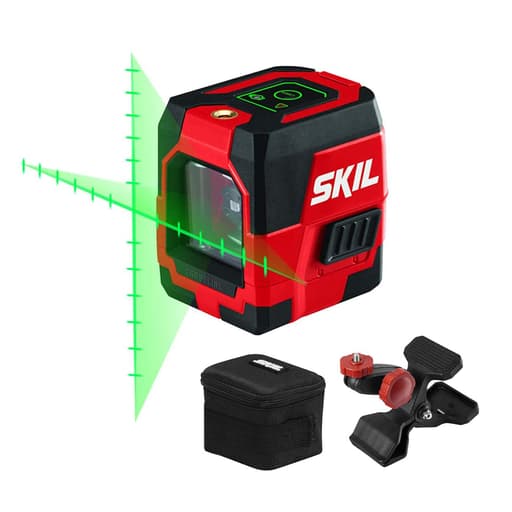
Features
- Projects horizontal and vertical green laser lines with projected measuring marks
- Projected measuring marks for consistent spacing that change with distance to the surface
- Self-leveling with a locking mode to fix lines at any angle
- Visible range up to 65 ft
- Integrated rechargeable lithium‑ion battery with micro‑USB charging and multi‑color charge indicator (green/yellow/red)
- Multifunctional clamp that attaches to top or bottom for positioning
- Dual 1/4 in tripod threads (top and bottom)
- Includes soft case and charging cable
Specifications
| Visibility Range | Up to 65 ft |
| Laser Line Accuracy | ±3/16 in at 30 ft |
| Laser Projection | Green cross line with projected measuring marks |
| Tripod Threads | Dual 1/4 in (top and bottom) |
| Battery | Integrated rechargeable lithium‑ion, charged via Micro‑USB |
| Charge Indicators | Green, yellow, and red LEDs |
| Included Accessories | Soft case, charging cable, clamp |
| Locking Mode | Yes — allows positioning lines at any angle |
Related Tools

Related Articles

A compact cross-line laser that projects horizontal and vertical green lines with integrated measuring marks. The unit self-levels, can be locked at a fixed angle, and uses a built-in rechargeable lithium‑ion battery with a micro‑USB charging port. It includes a clamp and can be mounted to standard tripods.
Skil Self-leveling Green Cross Line Laser with Measuring Marks Review
First impressions and field use
I put the Skil cross-line laser to work on a wall of built‑ins and a long run of laundry room shelving. Instead of pulling a tape and flicking a chalk line for each course, I set the unit on a tripod, let it settle, and started driving screws along the green reference. Layout went from “measure, mark, re-check” to “follow the line.” The bright green cross was easy to track across multiple studs and cabinets, and the measuring marks projected along the line gave me quick, even spacing without juggling a tape while I balanced a level.
What this laser is and who it’s for
This is a compact, self-leveling green cross-line laser with a twist: it projects measuring marks along the line. It’s aimed squarely at DIYers and pros who want fast, consistent layout for tasks like shelving, picture galleries, wainscoting, trim, and light tile work. It’s not a rotary laser for large rooms or a receiver‑capable outdoor unit; it’s an indoor‑first, general layout tool with practical conveniences.
Key specs that matter in use:
- Visibility range: up to 65 ft
- Accuracy: ±3/16 in at 30 ft
- Green cross-line with integrated measuring marks
- Self-leveling with a locking mode for angled lines
- Dual 1/4 in tripod threads (top and bottom)
- Rechargeable lithium‑ion battery via Micro‑USB with green/yellow/red charge indicator
- Included clamp, soft case, and charging cable
Setup, mounting, and the included clamp
The dual 1/4 in tripod threads on the top and bottom are more useful than they might sound. Mounting on the bottom is the standard approach for a floor-based tripod or a stand. The top thread lets you hang the laser upside down under a cabinet or from a clamp and still get the cross where you need it. That flexibility made ceiling grid checks and shelf alignment near soffits much easier.
The included clamp is handy for quick positioning on door tops, stair rails, or open stud walls. Being able to attach it to either the top or bottom of the laser expands your options, especially in tight spaces where a tripod footprint is awkward. My tip: ensure whatever you clamp to is rigid; any flex or sag translates into drift at the line. For repeatable work, a basic camera tripod or a pole mount gives more stable, micro-adjustable placement.
Visibility and accuracy
Green diodes pay dividends indoors. The line stays visible at typical room distances without needing to dim the lights. At 20–30 ft, I could see both the horizontal and vertical lines cleanly on painted drywall and primed trim. On glossy tile and bright, sunlit surfaces, you’ll still need to mind angles and glare, and like most cross-line lasers, direct sunlight washes it out quickly. The 65 ft rating feels realistic for larger, shaded interiors but optimistic for bright, open areas.
The published accuracy of ±3/16 in at 30 ft lands in the “good enough for most interior work” category. For shelving, cabinets, gallery walls, and casing, it’s plenty. If you’re laying long tile runs or doing exacting finish carpentry over extended spans, be mindful of cumulative error. I verified mine against a trusted spirit level and a long straightedge; it tracked well across a typical room width without perceptible bow or taper.
The measuring marks: genuinely useful, with a few caveats
The measuring marks are this tool’s standout feature. They’re projected “ticks” along the line that maintain consistent spacing on the surface. In practice, that means you can space shelf brackets, picture hooks, or slats evenly without repeatedly pulling a tape. As you move the laser closer or farther from the wall, the projection adjusts so the spacing remains consistent where you’re working.
Two notes from using it:
- Maintain a consistent distance to the surface as you work. If you shift the laser forward or backward mid‑layout, the spacing on the wall adjusts, which can throw off a partially marked run.
- The extra visual information is great for layout, but it adds clutter if you just want a clean line. I got used to it quickly, but if you’re sensitive to visual noise, you’ll notice the ticks at first.
I found the marks particularly helpful for installing a row of coat hooks, setting shelf standards, and plotting beadboard stiles. I still check critical measurements with a tape on the first and last positions, then use the marks to fill in the in‑betweens.
Self-leveling and lock mode
Set the Skil cross-line laser on a reasonably level surface, and it snaps to level in a moment. It’s quick enough that micro‑adjusting tripod height or clamp position doesn’t feel tedious. The lock mode is equally practical: flip it on, and you can hold a fixed angle for stair rail trim, diagonal backsplashes, or sloped lines. As with any locked pendulum, remember you’re no longer level—the line is exactly the angle you set, nothing more—so align it carefully to a reference point or template.
Power and charging
The integrated lithium‑ion battery and Micro‑USB charging make this an easy tool to top up from a wall charger or a power bank. The three‑color LED indicator (green/yellow/red) is simple and useful; I appreciate knowing when I’m in the “finish this task before charging” zone. An integrated battery keeps the footprint compact and avoids cracked battery doors. The tradeoff is obvious: you can’t swap in a spare pack mid‑day. For intermittent use throughout a project, that’s not a deal-breaker, but if you live with a laser on all day, you’ll want to charge between tasks.
I’d prefer USB‑C in 2025, both for durability and cable consolidation. Micro‑USB works, but it’s dated, and the connectors are easier to fumble or wear.
Build quality and usability
The unit itself is compact, easy to toss in the included soft case, and quick to deploy. The case is better than a bare tool bouncing around a toolbox, but it isn’t a hard-shell; if your kit takes real jobsite abuse, consider a more protective box or foam insert. Controls are straightforward, and the line brightness is consistent across the beam. The cross-line alignment stayed true after being transported and clamped in a variety of orientations, which is what matters most day to day.
Limitations and wish list
- Bright outdoor use: Like most cross-line lasers without a receiver/pulse mode, it’s an indoor-first tool. Expect washed-out lines in full sun.
- Accuracy for precision finish work: ±3/16 in at 30 ft is solid for cabinetry and trim but not a replacement for a survey-grade reference or a high-end finish laser when you’re pushing tolerances.
- Micro‑USB: It works, but USB‑C would be more modern and robust.
- Integrated battery: Convenient, but non-removable. Plan charging around your workflow.
- Visual clutter: The measuring marks are great for layout but can be busy if you just need a line. There’s no evidence you can toggle them off, so factor that preference in.
Practical tips for better results
- Use a tripod for long runs. Fine height adjustments make aligning the line to a reference mark much faster than fiddling with shims.
- Mark endpoints with a pencil before moving the laser. If you need to reposition, those reference points help verify you’ve maintained alignment and spacing.
- Check surfaces for curvature. On wavy walls, any straight reference (laser or chalk) will reveal the waves—decide whether you want to follow the laser (true level) or split the difference for visual consistency.
- Protect the housing and lens. A quick wipe before use keeps the line crisp; dust and smudges bloom the beam.
The bottom line
The Skil cross-line laser stands out because its measuring marks turn a leveling tool into a layout assistant. For shelving, trim, gallery walls, and similar interior projects, it meaningfully speeds up work while keeping results consistent. The green beam is bright indoors, the self-leveling is fast, and the dual tripod threads plus clamp give you flexible mounting options. Accuracy is appropriate for most interior tasks, and the rechargeable battery with status LEDs keeps power management simple.
I would recommend this tool to DIYers and working pros who do a lot of interior layout and want a faster, more reliable process than tapes and pencil lines alone. Choose it for its bright green cross, genuinely useful measuring marks, and practical mounting options. Skip it if you need receiver compatibility for outdoor work, absolute top-tier accuracy over long spans, or a USB‑C charging port and swappable batteries. For the intended jobs, though, it hits the sweet spot of speed, visibility, and convenience.
Project Ideas
Business
Pro Picture Hanging & Art Install Service
Offer a white-glove service for homes, galleries, and offices. Use the self-leveling cross for fast, accurate alignment and the measuring marks for consistent spacing of frames, mirrors, and panels. Sell packages (straight-line, grid, salon-style) with per-piece pricing and a premium for large-format installs.
Accent Wall & Trim Layout Specialist
Provide design-and-install of painted geometric walls, wainscoting box grids, board-and-batten, and wall paneling. The locking angle mode speeds herringbone/chevron layouts, while measuring marks standardize rail/stile spacing. Market to realtors/stagers and bundle with paint/finish services.
Laser Tool Rental Kit
Rent the laser with a compact tripod, clamp, charger, blue tape, and a quick-start guide. Offer weekend and weekly rates plus optional delivery. Upsell add-ons (stud finder, level targets). Include a QR code to a short tutorial playlist to reduce support time and increase customer success.
Retail/Trade Show Visual Merchandising Setup
Contract with retailers and exhibitors to align wall graphics, window decals, shelf-edge labels, and signage. The bright green lines are visible under store lighting and the measuring marks ensure consistent offsets and repeatable spacing across long runs. Bill day rates with rush/after-hours premiums.
Mural Pre-Grid & Layout Service for Artists
Partner with muralists to pre-grid large walls. Use the laser to project square or rectangular grids at precise intervals, tape the grid, and mark key reference points. Offer packages that include on-site measurements, grid layout, and transfer lines for complex compositions.
Creative
Geometric Accent Wall Masterpiece
Create crisp herringbone, chevron, or striped accent walls. Use self-leveling mode for perfect horizontals/verticals, then lock the laser to specific angles for chevrons. The projected measuring marks let you tape equal-width bands or set consistent gaps between shapes as you move the laser across the wall.
Constellation String Art
Design a night-sky mural by mapping constellations with nails and string. Project crossing lines to locate star points, and use the measuring marks to keep equal spacing between nails. The clamp helps position the laser on shelves or ladders for large wall coverage up to 65 ft.
Typographic Mural Grid
Lay out a lettering or calligraphy mural with precise baselines, x-heights, and cap heights. Project multiple horizontal passes at measured intervals using the marks, then lock the line at angles for italic scripts. The accuracy keeps letterforms consistent across large surfaces.
LED/Neon Flex Alignment
Install LED strip or neon flex in perfectly straight runs or geometric patterns. Use the cross line to align inside corners and the measuring marks to maintain consistent offsets from ceilings, trim, or other lines. Dual tripod threads help mount the laser in tight or high spots.
Gallery Wall Composer
Build a salon-style gallery wall with flawless alignment and spacing. Use the horizontal line to set a common centerline and the vertical to align edges. The measuring marks make it simple to keep consistent gaps between frames without a tape measure.