Features
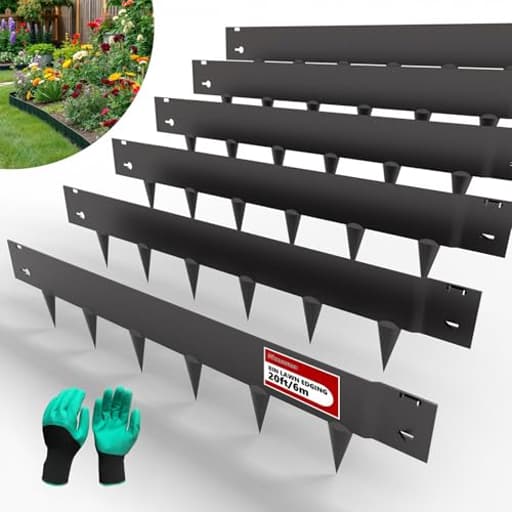
- 𝐀𝐛𝐨𝐮𝐭 𝐭𝐡𝐞 𝐄𝐝𝐠𝐢𝐧𝐠: Enhance your garden's appearance with our 6-pack of 8-inch galvanized steel landscape edging. Designed to create clean, defined borders, this edging is user-friendly and effective at keeping grass and weeds out of flower beds and vegetable patches, ensuring a tidy, well-maintained garden.
- 𝐃𝐮𝐫𝐚𝐛𝐥𝐞 𝐆𝐚𝐥𝐯𝐚𝐧𝐢𝐳𝐞𝐝 𝐒𝐭𝐞𝐞𝐥 𝐌𝐚𝐭𝐞𝐫𝐢𝐚𝐥: Crafted from rust-resistant galvanized steel, this lawn edging is built to withstand harsh weather conditions. Its durable construction ensures long-lasting performance and maintains its aesthetic appeal, making it an ideal choice for outdoor use and low-maintenance landscaping
- 𝐅𝐥𝐞𝐱𝐢𝐛𝐥𝐞 & 𝐁𝐞𝐧𝐝𝐚𝐛𝐥𝐞 𝐃𝐞𝐬𝐢𝐠𝐧: Our steel garden edging is highly flexible, allowing you to easily shape it to follow the curves of your lawn, flower beds, or landscaping features. Its sturdy build ensures it retains its form over time, providing a reliable solution for your garden design needs.
- 𝐐𝐮𝐢𝐜𝐤 & 𝐄𝐚𝐬𝐲 𝐈𝐧𝐬𝐭𝐚𝐥𝐥𝐚𝐭𝐢𝐨𝐧: Featuring a front-and-back interlocking system, this edging offers hassle-free assembly. The 4-inch sharp teeth easily penetrate the soil for a secure fit, creating a stable garden border. Simply position the edging and tap it into place—no need for complicated tools or steps.
- 𝐕𝐞𝐫𝐬𝐚𝐭𝐢𝐥𝐞 𝐋𝐚𝐧𝐝𝐬𝐜𝐚𝐩𝐢𝐧𝐠 𝐔𝐬𝐞: Perfect for more than just garden borders, this 8-inch landscape edging kit is versatile enough for outlining pathways, separating zones, or building raised garden beds. Elevate your garden design effortlessly with this adaptable garden border kit.
Specifications
| Color | Black |
| Size | 6 Pack ( 40 x 8IN ) |
| Unit Count | 6 |
Related Tools
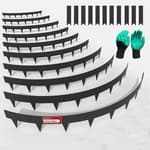
Set of six 40-inch by 8-inch galvanized steel landscape edging pieces for creating defined borders around lawns, flower beds, pathways, and raised beds. Each black, rust-resistant panel is flexible for shaping around curves and uses a front-and-back interlocking system with 4-inch teeth for hammer-in installation to secure the edging in soil.
STIRLINGEAR 20ft. Galvanized Steel Landscape Edging (6-Pack) – 40" x 8" Metal Garden Border, Hammer-in Lawn Edging for Landscaping, Tree Rings, Yard & Pathway – Black Steel Lawn Edge for Garden Design Review
Finding a lawn edge that looks clean, holds its line, and doesn’t fight you during installation is harder than it should be. After a full weekend installing the Stirlingear edging around two mulch beds and a short gravel path, I can say it strikes a smart balance of durability, appearance, and practicality—with a few caveats that are worth planning for.
What you get and how it looks in the yard
Each kit includes six 40-inch panels in black-finished, galvanized steel. Put together, that’s 20 feet of edging at a nominal 8-inch height. The finish reads as a soft black, not glossy, and it blends into mulch and shadow nicely instead of shouting for attention. That subtlety matters; after installation, the beds look intentionally framed, not “bordered.”
The metal thickness and stiffness give it a crisp, straight look on runs where you want a razor line. That’s the biggest aesthetic advantage over plastic: no waves, no heave-looking bulges, and far less sun fade. On day one, it looks like a professional install. Weeks later, it still does.
Installation: straightforward with the right prep
The panels join with a front-and-back interlocking seam and rely on stamped 4-inch “teeth” to bite into the soil. Here’s what worked well for me:
- Prepping the line: I laid a string line for straight edges and marked curves with a garden hose. A shallow trench—just an inch or so—made seating and leveling easier, especially in compacted areas.
- Tools: A spade, a rubber mallet, and a short scrap of 2x4 were my essentials. The board spreads hammer force and protects the top edge from scuffs. In stubborn soil, a small sledge used gently, through the board, helped.
- Assembly: I found it best to loosely connect two panels on the ground, verify the seam is fully engaged, then lift and set them as a unit. For long curves, a second set of hands made a big difference. The panels aren’t unmanageably heavy, but the combination of weight and stiffness rewards teamwork.
The interlock is tidy once seated, but it’s not foolproof if you twist panels while hammering. If you force a tight bend right at a seam, you can partially disengage the hook. My workaround was to pre-shape the run as much as possible before setting the seam, then tap the assembly in while keeping the joint aligned. If you want absolute belt-and-suspenders security at hidden joints, a discreet self-tapping screw through the overlapped area will lock the connection, though I didn’t find that necessary in straight or gentle curves.
Curves and corners: know the limits
Stirlingear markets this as flexible, and that’s true to a point. The panels will form gentle curves smoothly. I had no trouble creating a sweeping arc along a bed edge or a 4–5-foot diameter circle around an established tree. Where you can run into trouble is attempting very tight radii or trying to force a sharp corner while panels are already joined and partially set in the ground. In those situations, the metal resists and you end up with a faceted look or put stress on the joint.
Practical tips for curves:
- Pre-bend gently by hand along your marked arc before you hammer in.
- Avoid creating a curve directly at a seam; shift seams a foot or two away from the tightest sections.
- For small-diameter rings, use shorter segments to create a “polygon” that reads as a circle at normal viewing distance.
- For true right angles, you’ll get a cleaner result by cutting and mitering two pieces than by trying to crease the steel.
Depth, height, and containment
Because the panels are 8 inches tall with integral teeth, you have flexibility in how much sits above grade. I left about 2 inches exposed in mulch beds to keep chips from washing into the lawn, and went nearly flush along the gravel path to allow mower wheels to ride close without catching. If grass rhizomes are a concern, burying more depth helps, but leave at least a bit exposed if containment is your goal. The teeth anchor well in average loam and clay; in rocky runs, pre-loosening with a narrow trenching spade pays off.
Durability and finish
So far, the combination of galvanized steel and black finish has been resilient. To hedge against chipping, I avoided striking the panels directly and used the 2x4 as a buffer. Where I inevitably scuffed a corner during transport, the exposed zinc layer did its job; no rust has appeared after weeks of rain. If you do make cuts, hit the fresh edge with a rust-inhibiting primer or cold galvanizing spray and a black touch-up for good measure.
Compared with aluminum edging I’ve used, this steel feels more confidence-inspiring around high-traffic transitions (e.g., where wheels or feet might bump it). Compared with plastic, it simply holds a straighter line and keeps looking sharp as temperatures swing.
Day-to-day use and maintenance
- Lawn care: The crisp edge reduces the amount of manual edging I need to do. A trimmer passes cleanly along the metal, and the mower doesn’t snag if you keep the exposed reveal low along turf borders.
- Frost heave: In temperate climates, any edging can move a bit through seasons. The weight and depth here help. If you expect significant freeze-thaw, keep seams tight, avoid creating pivot points at curves, and tamp the backfill well after installation.
- Cleaning: A quick hose rinse or brush brings the black finish back if it gets dusty. It doesn’t trap debris or leaf litter like taller borders can.
What could be better
- Solo installation on long runs is a workout. The panels are manageable individually, but aligning and hooking them while maintaining a smooth curve is easier with two people. If you’re working alone, assemble in short sections and take your time.
- The interlock is neat but requires careful alignment. If you rush and hammer while a seam is half-engaged, you’ll fight it. I would love to see a slightly more forgiving joint design or a subtle mechanical “click” when fully seated.
- Tight curves are not its forte. This steel is bendable, not “coilable.” For very small tree rings or intricate shapes, you’ll either accept a segmented look or choose a more pliable edging material.
Value
It’s not the cheapest edging option, but the combination of clean lines, material longevity, and low maintenance puts it in the “buy once” category for many projects. If your goal is a professional look without resorting to custom steelwork, this hits a sweet spot. I’d budget one kit per 20 feet, plus a little extra if you anticipate cutting for corners or terminations.
Installation checklist
- Gloves and eye protection (edges aren’t razor sharp, but don’t invite trouble)
- String line or hose to lay out edges
- Spade or trenching tool for stubborn soil
- Rubber mallet and a short 2x4 as a striking block
- Tin snips or an angle grinder if you plan to cut and miter
- Rust-inhibiting spray for any cut edges
Who it’s for
- Homeowners and pros who want a crisp, unobtrusive border that holds its line
- Beds, paths, and large tree rings that call for gentle curves or straight runs
- Sites where durability and a clean finish matter more than ultra-tight shaping
Who should look elsewhere:
- Projects requiring tight, continuous curves with small radii
- Installations where a single person must complete long, complex curves quickly
Recommendation
I recommend the Stirlingear edging for anyone aiming for a durable, low-profile metal border with a clean, professional look. It installs cleanly with basic tools, holds straight lines beautifully, and forms graceful curves when you respect its bending limits. The galvanized steel and black finish have held up well for me so far, and the teeth anchor securely in typical garden soils.
Plan for careful joint alignment, enlist help for long, curved runs, and pre-shape where needed. If your design demands tiny-radius circles or intricate shapes, this isn’t the right material. For most beds, paths, and tree rings, though, it’s a smart, long-lasting upgrade over plastic and a sturdier alternative to lightweight metals.
Project Ideas
Business
Edge-Only Installation Service
Offer a focused landscaping niche: professional landscape-edge installation. Market quick jobs (lawn to flowerbed trims, path borders) with fixed-price tiers based on footage and curves. Low equipment overhead and high repeatability make this an excellent local service with scalable crews.
Modular Raised-Bed Kits (DIY or Assembled)
Package the panels into DIY raised-bed kits: pre-cut, pre-drilled, and including connectors, liner, and fasteners. Sell online (Etsy, Shopify) or to garden centers. Offer an assembly add-on for local customers—higher margins on assembled units and recurring sales for seasonal kits.
Bespoke Garden-Feature Commissions
Create custom metal garden features (curved planters, partition screens, signage) using the edging as raw material. Target homeowners, cafes, and small commercial properties. Charge design + fabrication fees; upsell powder-coating, lighting, or plant installation.
Workshops & Pop-Up Clinics
Host paid weekend workshops teaching people how to build raised beds, herb towers, and path edging using the panels. Partner with nurseries or community centers, sell kits on-site, and capture leads for follow-up installation or coaching services.
Subscription Garden Refresh Service
Offer an annual or seasonal subscription that includes edge maintenance, seasonal bed reshaping, and small updates (adding panel features, new curves, or seasonal decorative inserts). Recurring revenue stabilizes cash flow and builds ongoing client relationships.
Creative
Curved Native-Plant Ribbon Beds
Use the flexible 40" panels to create flowing, ribbon-like raised beds that follow natural landscape lines. Hammer panels together, backfill with soil and compost, and plant low-maintenance native perennials. The 8" height is ideal for defining root zones and preventing grass intrusion while keeping a soft, organic profile.
Stacked Raised Herb Towers
Cut and interlock multiple panels vertically to build 16–24" tall stacked herb towers. Add a liner or landscape fabric, drill drainage holes, and create tiered pockets for thyme, basil, and salad greens. These take up small footprints and make mobile, high-yield kitchen gardens for patios or restaurants.
Industrial Garden Art & Partition Panels
Transform sections into decorative partitions or sculptural garden art. Bend panels into semicircles or waves, weld or bolt them together, then patina or powder-coat for weatherproof finishes. Incorporate cutouts for backlighting or climbers to create focal points in a yard.
Stepping-Stone Frames & Path Edging
Use the edging as reusable frames for pouring concrete stepping stones or as permanent borders along gravel paths. The interlocking system makes continuous curbs easy; the 4" teeth keep the stones and substrate separated from lawn intrusion, improving path longevity.
Fire-Pit Ring & Seating Border
Form a neat, heat-resistant perimeter around a small fire pit by arranging and pinning panels into a circular ring. Surround the ring with low benches or seating beds filled with drought-tolerant plants—edging provides a clean division between seating, lawn, and the fire area.