Features
- 𝐃𝐮𝐫𝐚𝐛𝐥𝐞 𝐆𝐚𝐥𝐯𝐚𝐧𝐢𝐳𝐞𝐝 𝐒𝐭𝐞𝐞𝐥 𝐂𝐨𝐧𝐬𝐭𝐫𝐮𝐜𝐭𝐢𝐨𝐧: Made from high-quality galvanized steel, this 33ft landscape edging (10-pack) is built to withstand outdoor conditions, providing long-lasting durability and rust resistance for your garden, yard, or flower beds.
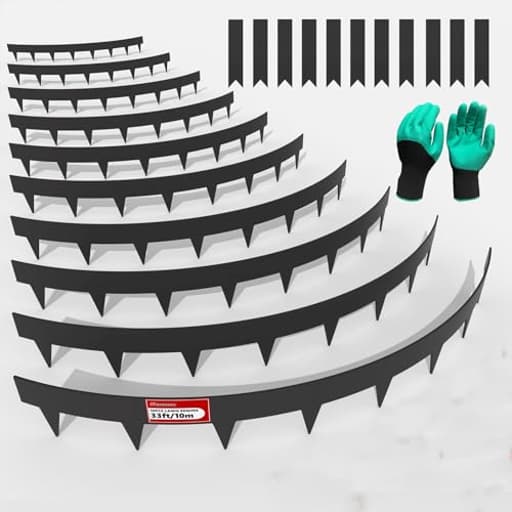
- 𝐅𝐥𝐞𝐱𝐢𝐛𝐥𝐞 & 𝐄𝐚𝐬𝐲 𝐭𝐨 𝐈𝐧𝐬𝐭𝐚𝐥𝐥: Each 40" long metal edging strip has a total height of 5 inches, including 3-inch stakes that go underground for secure installation. Only 2 inches will be visible above the ground. The hammer-in design allows you to create clean, professional-looking garden borders with minimal effort.
- 𝐒𝐞𝐜𝐮𝐫𝐞 & 𝐒𝐭𝐚𝐛𝐥𝐞 𝐃𝐞𝐬𝐢𝐠𝐧: Comes with 11 stakes, ensuring strong anchoring in soil and stability against shifting over time. Ideal for maintaining defined garden edges and pathways.
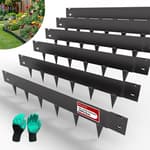
- 𝐒𝐥𝐞𝐞𝐤 𝐁𝐥𝐚𝐜𝐤 𝐅𝐢𝐧𝐢𝐬𝐡 𝐟𝐨𝐫 𝐌𝐨𝐝𝐞𝐫𝐧 𝐀𝐩𝐩𝐞𝐚𝐥: The powder-coated black steel adds a stylish, modern touch to your outdoor landscaping while blending seamlessly with various garden styles.
- 𝐕𝐞𝐫𝐬𝐚𝐭𝐢𝐥𝐞 𝐆𝐚𝐫𝐝𝐞𝐧 𝐁𝐨𝐫𝐝𝐞𝐫 𝐒𝐨𝐥𝐮𝐭𝐢𝐨𝐧: Perfect for creating crisp, clean separations between lawns, flower beds, pathways, and patios. Easily cut or bend to fit curves, corners, and custom garden designs.
Specifications
| Color | Black |
| Size | Pack of 10 ( 40 x 5 Inch ) |
| Unit Count | 10 |
Related Tools
Ten 40-inch galvanized steel edging strips (approximately 33 ft total) with a powder-coated black finish provide a corrosion-resistant solution for defining lawn, bed, pathway, and patio borders. Each strip is 5 inches high, with a 3-inch portion intended to be driven into the ground (about 2 inches visible), and the set includes 11 stakes for anchoring. The hammer-in design allows the strips to be cut or bent to follow curves and corners.
STIRLINGEAR 33ft. Galvanized Steel Landscape Edging (10-Pack) – 40" Metal Edging for Landscaping with 11 Stakes, Hammer-in Metal Landscaping Edging for Yard Pathway & Flower Beds – Lawn Edge for Garden Design Review
Why I tried this steel edging
I was looking to clean up the transitions between lawn, mulch beds, and a flagstone path without resorting to plastic or faux-stone edging that tends to wave and warp after a season. The Stirlingear steel edging promised a low-profile, modern look with enough rigidity to hold a straight line yet still be flexible enough for curves. After installing a full 10-pack around a front walkway and a couple of beds, I’ve formed a pretty clear picture of where it excels and where you’ll want to plan ahead.
What you’re working with
- Ten strips, each 40 inches long, for about 33 feet of total coverage
- Overall height is 5 inches; about 3 inches goes underground, leaving roughly a 2-inch reveal
- Powder-coated black over galvanized steel
- Eleven metal stakes for anchoring
- Hammer-in design; can be cut and bent to suit curves and corners
Out of the box, the finish was even and consistent. The steel has a reassuring stiffness—more substantial than composite or plastic edging, but not the heavy commercial stuff that’s a bear to shape. Edges were reasonably clean, but still… it’s steel. Gloves are non-negotiable.
Installation experience
I installed in loamy soil with some clay pockets and occasional roots. The hammer-in approach does work, but the “just pound it into the ground” idea comes with caveats:
- Straight runs: Easy, especially if you establish a shallow guide trench with a flat spade. I set a taut string line for alignment, then used a dead-blow mallet and a scrap 2x4 as a striking block to avoid marring the finish. Sections tap down evenly when the soil has a bit of give.
- Curves: Gentle arcs are doable by hand—brace one end with your foot and ease the strip into shape before setting it. For a truly smooth radius, plan to pre-bend over a form (a large bucket, a rolled log, or a curved retaining block) rather than relying on in-ground persuasion. Tight radii are possible, but expect faceted segments rather than a perfect sweep unless you take time to pre-form.
- Corners: Clean 45s and 90s are straightforward with a bench and rubber mallet. For sharp corners, score a shallow line on the inside of the bend with a hacksaw or cutoff wheel, then fold gently to avoid cracking the coating.
- Stakes: The included 11 stakes were enough to anchor the ends and a couple of midpoints on straight runs. On curves or uneven ground, I supplemented with additional steel landscape spikes to keep the edges from drifting over time. If your soil is reactive or you see frost heave, extra anchoring is a smart move.
- Rocks and roots: If you hit resistance, stop hammering. A quick dig with a narrow trenching spade to remove the obstruction will keep the top line straight and the coating intact.
I connected sections with simple butt joints and made sure a stake was nearby to keep the joint aligned. The low 2-inch reveal rewards careful leveling; small variations in grade are noticeable, so spend a few extra minutes checking with a torpedo level.
Tools I used:
- Flat spade and trenching shovel
- Dead-blow mallet + 2x4 striking block
- Tin snips for minor trim; angle grinder with a thin cutoff wheel for clean cuts
- Rubber mallet for forming bends
- String line and level
- Work gloves and eye protection
Plan on about 1.5–2 hours to install a full 10-pack if your path is prepped and reasonably rock-free. Add time for precise curves and clean corners.
Look and fit
Once in place, the black powder coat gives a crisp, low-profile edge that reads modern without drawing attention to itself. The 2-inch reveal is just enough to keep mulch in and turf out visually, and it sits comfortably alongside natural stone and concrete pavers. Because it’s low, mowers can ride a wheel along it for a clean cut, but I still string-trim the last hairline edge for a manicured look.
If you need a dramatic height difference, this isn’t the product for that—its job is to define and contain, not to act as a tall retaining lip.
Performance in use
- Containment: It holds mulch and stone very well, even along a sloped path, as long as you respect that 2-inch reveal. For very fluffy bark or deep aggregates, you’ll want to ensure the grade is slightly below the top edge to avoid spillover.
- Root barrier: Two inches above ground and three inches below won’t stop aggressive rhizomes forever, but it does slow lawn incursion significantly. Edging with a string trimmer every couple of weeks helps.
- Stability: After one wet/dry cycle and a few weeks of foot traffic near the path, the line stayed true. Where I added extra stakes on curves, there’s zero wandering.
Durability and finish
The powder coat resisted scuffs from the 2x4 striking block and mallet, though cutting and tight bending will expose bare metal on edges. Those spots showed the underlying galvanization, which should still resist rust; I touched them up with an outdoor enamel to be safe. I expect the coating to hold up well through seasons, but like any coated steel, edge chips will want occasional attention in corrosive climates.
Where it shines
- Clean, professional-looking borders with minimal visual bulk
- Gentle to moderate curves, tidy corners, and straight runs
- Pathways and beds where a 2-inch reveal is sufficient
- Homeowners who want a durable, metal solution without wrestling with heavy commercial-grade sections
Where to think twice
- Very tight, perfectly smooth curves without pre-bending
- Areas needing a taller barrier or mini-retaining edge
- Extremely hard or rocky soils where trenching is unavoidable
- Long, winding installations if you’re unwilling to add extra stakes beyond the included set
Practical tips for a smoother install
- Lay out your run with a garden hose or string and mark the line before you dig or drive.
- Pre-cut or pre-bend sections on the ground; don’t force bends once the strip is half-buried.
- Use a wood block as a strike surface to protect the finish.
- Stagger joints so they don’t all land on the same plane in curves; it looks cleaner and holds better.
- Add stakes on the outside of curves and at joints. Consider extra spikes if you get freeze-thaw movement.
- Touch up cut edges with rust-inhibiting paint.
Value and alternatives
Compared to plastic or composite edging, this steel option offers a noticeably tighter line and better longevity. It’s more expensive up front but less likely to wave, bulge, or heave out of shape. It’s also less intimidating than the thick, commercial steel systems that require more aggressive forming and heavier tools. If you’re after a clean, modern border and can live within the 2-inch reveal, this strikes a good balance between performance, appearance, and effort.
Bottom line
The Stirlingear edging delivers a sturdy, polished border that stays put and looks intentional. Installation is approachable for a homeowner if you prep the line, pre-bend curves, and use a light touch with the mallet. The included stakes get you started, but plan to add a few more for complex layouts. It won’t handle tight, sweeping arcs without some prep work, and it isn’t tall enough to act as a structural edge—but as a containment and definition tool, it’s effective and tidy.
Recommendation: I recommend this edging for homeowners who want a durable, low-profile metal edge with a modern look and are comfortable doing basic layout and light forming. It’s a pragmatic upgrade over plastic and composite options, with a cleaner result and better stability. If you need tall edging or flawless tight curves with zero prep, consider a different system or be ready to invest a bit more time in forming and anchoring.
Project Ideas
Business
Specialty Edging Installation Service
Offer a local service focused on professional metal edging installation for homeowners and small commercial properties. Package tiers: simple lawn-to-bed edging, custom curved designs, and combined planter/bench builds. Charge per linear foot plus customization fees; market via before/after photos and targeted neighborhood flyers.
Pre-cut Custom Edge Kits + How-To Guides
Sell DIY kits (pre-cut strips, stakes, corner brackets, and fasteners) for common layouts (circle, rectangle, gentle curves) through an online store or Etsy. Include downloadable step-by-step instructions and short video tutorials. Upsell tools like shears, rubber mallets, and connector packs.
Upcycled Garden Art & Product Line
Create and sell finished products made from the edging—raised planter boxes, modern garden sculptures, low retaining walls, and bench-planter hybrids—at markets, boutique garden centers, or online. Emphasize durable galvanized construction and powder-coated finish; offer custom sizes and colors.
Workshops & Local Training Classes
Host hands-on weekend workshops teaching homeowners and aspiring landscapers how to bend, cut, and install metal edging, plus build one project (e.g., planter or bench). Charge per attendee and offer follow-up installation services or kit discounts. Partner with community centers and nurseries for space and marketing.
Seasonal Edge Maintenance Subscriptions
Offer a recurring service (spring/fall) to refresh and re-anchor edging, replace damaged sections, and re-line beds for mulching. Subscription model provides steady revenue and builds customer relationships for upsells (planting, irrigation add-ons, custom redesigns). Promote via local SEO and neighborhood direct mail.
Creative
Modular Low-Profile Raised Planters
Use several 40" edging strips cut and joined at the corners to form rectangular or square raised planters with a modern 2" visible rim. Bend short sections to create rounded corners, anchor with the included stakes, line with landscape fabric, and fill with soil. Benefits: lightweight, rust-resistant, stackable modules for herbs, annuals, or succulents; easy to expand or reconfigure.
Curved Border Planter Benches
Bend multiple strips to create continuous curved borders that double as low planter walls and seating backs. Screw short cross-braces across the buried 3" tabs (or weld) for stability, add a timber or composite cap to the top edge for seating, and plant between bench and lawn. The black powder-coat gives a sleek modern look and resists outdoor wear.
Spiral Herb Towers / Tiered Spiral Planters
Form the edging into a loose spiral or stacked concentric rings anchored with stakes to create vertical herb towers. Each 40" piece becomes a single turn or tier; join ends with simple brackets. Fill tiers with soil pockets for a space-saving, eye-catching herb feature that’s great for patios or tiny yards.
Pathway Edge Lighting & Mosaic Frame
Use edging strips as a flush, black frame along walkways and inset small solar lights, recycled glass bottles, or decorative tiles along the visible 2" lip. The hammer-in stakes keep the edge stable while the sleek black rim creates crisp contrast for night lighting or mixed-material mosaic accents.