Features
- ✅INSTALLATION – Simply place into a standard 15/16" T-bar drop ceiling grid or adhere to any flat surface.
- ✅MATERIAL BENEFIT: Made of durable, lightweight PVC that won’t crack, resists moisture and corrosion, and is both safe and 100% recyclable.
- ✅PACK CONTENTS: 12 main tiles (24"x24") and 1 blank edge tile for border filling, Covering 48 sq.ft.
- ✅CONSTRUCTION: Thin, lightweight, and easy to handle—paintable and effortlessly cut with snips, scissors, or a utility knife for fast, hassle-free installation.
- ✅MULTIPURPOSE: With sophisticated 3D patterns, these tiles work equally well for renovations or new builds, enhancing walls and ceilings alike.
Specifications
| Color | Snow White |
| Size | 12 |
| Unit Count | 12 |
Related Tools
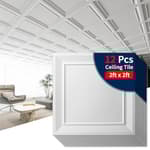

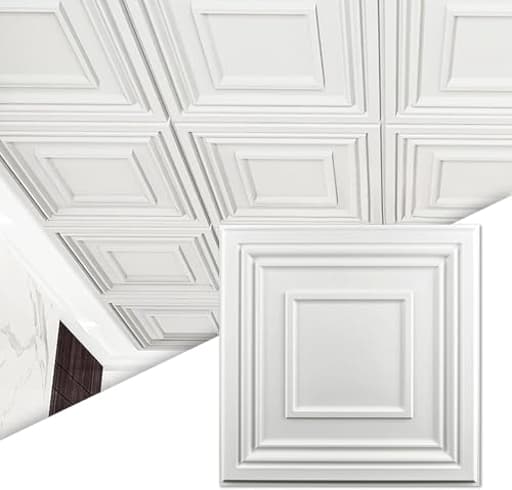
24" x 24" PVC drop ceiling tiles sold in a 12-pack (covers 48 sq ft) with one blank edge tile for border filling. They fit a standard 15/16" T-bar grid or can be adhered to any flat surface; the lightweight, moisture- and corrosion-resistant panels are paintable, cuttable with snips or a utility knife, and recyclable.
Art3d Drop Ceiling Tiles 24x24 Inch (12-Pack, 48 Sq.ft) – Glue Up PVC Ceiling Tiles 2x2 Ft., Decorative Ceiling Panels for Kitchen, Living Room, Office and Home, White Review
Why I reached for these tiles
I needed a fast, clean way to refresh two spaces: a basement office with a tired T‑bar grid and a small bathroom with a rough, paint-rolled ceiling. I wanted something moisture-resistant, easy to cut around vents and lights, and simple enough to install in an afternoon without hauling dusty mineral fiber tiles. That’s what led me to Art3d’s 2x2 PVC ceiling tiles. I used them both as drop-ins for the grid and as glue-ups on the bathroom ceiling to see how they behave in each scenario.
Design and materials
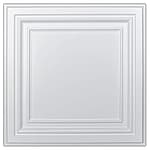
These are 24-by-24-inch PVC tiles in Snow White with a crisp, modern 3D pattern. The relief is fairly pronounced, which is a big part of their visual appeal. Each box contains 12 main tiles (covering 48 square feet) plus a single blank edge tile intended for borders. The tiles are thin and lightweight—easy to carry up a ladder with one hand—and they have enough flex to maneuver without cracking. PVC is a smart choice here: it shrugs off humidity, it’s easy to wipe clean, and it doesn’t corrode or warp. The surface arrives bright white and paint takes well if you need to color match or kill sheen.
One practical note: the edges are white through-and-through. If you’re butting them as glue-ups, the tiniest misalignment can leave a faint white line in the shadows of the pattern. I’ll share how I handled that under finishing.
Installation in a drop ceiling grid
In the office, I dropped these right into a standard 15/16-inch T‑bar grid. The tiles sit nicely on the ledge and don’t telegraph imperfections the way paper-faced panels can. The pattern looks clean and consistent across the room once you orient all tiles the same way.
Where you need to plan ahead is clearance. The 3D relief is deeper than a flat panel. If your plenum is already crowded with ductwork or low-hanging can lights, you may not have enough room to angle the tile in. In my case, a run of flex duct made two bays tight. I solved it by temporarily removing a cross tee, slipping the tile up flat, then reinstalling the tee—an extra step but manageable. Around ceiling speakers or fire sprinklers, expect more careful trimming and possibly spacers or trim rings.
There’s also the matter of borders. You get one blank edge tile in the box, which is a nice gesture, but most rooms need multiple perimeter pieces. I ended up ordering additional flat border tiles to finish the edges cleanly. If you try to cut the 3D tiles down for the perimeter, you’ll run into awkward partial patterns and a fussy fit against the grid.
Glue-up installation on a flat ceiling
For the bathroom, I adhered the tiles directly to a skim-coated ceiling. The key is surface prep: the smoother the substrate, the better. Because the tile face is patterned, the contact patch is on the ridges. A chalky, textured, or uneven surface means less adhesive coverage and more fight. I sanded, vacuumed, and primed for good measure.
Adhesive choice matters. A fast-grab construction adhesive or panel adhesive rated for PVC works best. I applied beads to the high points on the back of the tile, pressed it in place, and held it for 10–15 seconds to tack. On a couple of stubborn areas, a piece of painter’s tape from corner to corner provided temporary support while the adhesive cured. Layout is like tile work: snap a centerline, dry-fit your first row, and keep the pattern square to the room.
Because these are so light, you can work solo. I cut around a fan grille and a sprinkler escutcheon using a utility knife and aviation snips; the material cuts cleanly without chipping. The thinness is a plus here—it’s easy to score and snap straight cuts with a metal straightedge.
Cutting and finishing details
- Straight cuts: Score several passes with a sharp utility blade and snap over a clean edge. A sanding block knocks down any fuzz quickly.
- Curves and notches: Use aviation snips for tight arcs. Support the panel to avoid creating a crease.
- Edge treatment: For glue-up seams, a small artist brush and a color-matched acrylic paint make short work of any hairline white that peeks through. Spraying edges before install also works if you have the setup.
- Borders: In both install types, dedicated flat edge pieces yield a more professional perimeter than trimming through the 3D pattern. Budget for them.
Day-to-day performance
The tiles have been easy to live with. Moisture from showers hasn’t affected them; there’s no swelling, no sag, and no staining. Cleaning is simple: a damp microfiber cloth takes care of dust or the odd fingerprint. The Snow White finish looks bright but not plasticky. I haven’t noticed any yellowing under LED downlights, though I’d avoid placing them directly over high-heat fixtures or bare incandescent cans.
They don’t add any meaningful weight to the grid, which is great for older suspended systems. There’s no shedding, no chalky residue, and installation leaves almost no mess compared to cutting mineral fiber.
Acoustics and clearance trade-offs
Two considerations to weigh:
- Acoustics: PVC tiles like these are not acoustic absorbers. If you’re replacing soft fiber tiles, expect the room to sound livelier. In my office I slipped thin acoustic pads above a few strategic bays to tame the echo. Alternatively, consider mixing in acoustic panels if sound control is a priority.
- Clearance: That attractive 3D relief eats up some plenum space. If you have very shallow clearance—tight ducts, low joists, or bulky devices—the maneuver to insert tiles can be challenging, and in extreme cases you may not have the depth at all. Measure the tallest point of the pattern against your available space before committing.
Aesthetics and customization
Out of the box, the Snow White reads modern and clean. The pattern casts subtle shadows that give the ceiling some dimensionality without looking busy. If you want a custom look, the PVC takes paint well. I sprayed a test panel with a high-adhesion primer and satin topcoat; coverage was excellent and the pattern stayed crisp. For walls, these also make a convincing wainscot or full accent—just mind seam alignment and use a level to keep courses straight.
Durability
Flexing the tiles during installation didn’t stress the material, and I didn’t experience any cracking at cutouts. The corners are thin, so don’t throw them around, but normal handling is forgiving. Heat and humidity swings in the bathroom haven’t moved them. I appreciate that they’re 100% recyclable; while that doesn’t solve end-of-life logistics by itself, it’s better than landfilling brittle mineral fiber.
Buying and planning advice
- Coverage: Each box covers 48 sq ft with the 12 patterned tiles. The included single blank edge tile is helpful but not sufficient for a full perimeter—plan to buy additional border pieces.
- Waste factor: Order 10–15% extra to account for offcuts and future repairs, especially if your layout has multiple penetrations.
- Grid fit: Verify you have a 15/16-inch T‑bar grid, not a narrow profile. Dry-fit one tile before committing to a full install.
- Adhesive: For glue-up, choose a fast-grab adhesive compatible with PVC and a smooth, primed substrate.
The bottom line
Art3d’s 2x2 PVC ceiling tiles deliver a quick, attractive upgrade with minimal mess and a friendly install curve. They shine in spaces where moisture resistance and easy cleaning matter—bathrooms, basements, utility rooms—and they bring a crisp, modern look to dated drop ceilings. Cutting is straightforward, the material is forgiving, and the ability to glue up or drop in gives you flexibility across projects.
They’re not a cure-all. If your ceiling has tight plenum clearance, the patterned depth can be a real constraint. And if acoustic performance is important, you’ll need to supplement with absorptive materials. Also budget for proper border pieces; trying to fake borders from patterned tiles rarely looks right.
Recommendation: I recommend these tiles for homeowners and pros who want a clean, moisture-resistant ceiling with a modern profile and an easy installation. They’re especially suitable for standard grid ceilings and smooth glue-up surfaces where aesthetics, low maintenance, and speed matter more than sound absorption. With a little planning for borders and clearance, they deliver a high-impact finish with minimal fuss.
Project Ideas
Business
Custom Painted Tile Kits
Sell pre-painted or DIY kits: tile panels matched to trending colorways (farmhouse, industrial, mid-century). Include instructions, sample paints, and adhesive strips. Market to renters who want temporary upgrades and to DIY home stagers.
Ceiling Tile Installation Service for Small Commercials
Offer quick-install packages for small offices, salons, or cafés: supply tiles, cut-to-fit border tiles, and install into existing 15/16" T-bar grids or glue-up for exposed ceilings. Emphasize moisture resistance for basements and kitchens and fast turnaround at a lower price than traditional ceilings.
Upcycled Home Decor Line
Turn offcuts and whole tiles into finished products: wall-mounted organizers, decorative trays, mirror frames, and lamp shades. Sell on Etsy or at craft markets as lightweight, water-resistant decor with custom paint/stencil options.
Workshops & How-To Classes
Host in-person or online classes teaching techniques: painting, cutting, creating accent walls, and building fixtures (headboards, light shades). Charge per attendee and sell tile packs and tool kits as add-ons.
Staging & Short-Term Rental Refresh Packs
Create turnkey refresh kits for Airbnb hosts and real estate stagers: a selection of tiles, adhesive, trim pieces, and an instruction sheet to quickly update ceilings or walls between guests. Offer subscription or per-property pricing for repeat clients.
Creative
3D Accent Wall
Create a full feature wall by arranging tiles in a repeating or staggered pattern. Cut tiles to fit around outlets and trim edges with the blank border tile. Paint with primer + latex or spray paint to match your palette for a lightweight, moisture-resistant textured wall that looks like plaster or metal.
Decorative Headboard / Bed Backdrop
Make a custom headboard or bedroom backdrop by mounting a grid of tiles to a plywood panel or directly to the wall. Add foam backing and upholstery tacks for a padded look, or paint in metallic tones for a modern focal point that’s cheap, light, and easy to change.
Custom Light Diffusers & Pendant Shades
Cut tiles into circular or geometric shapes to fashion low-cost pendant shades and lamp panels. The PVC diffuses light nicely when painted with translucent finishes; reinforce edges with spray-bond adhesive or thin wooden rings for stability.
Modular Closet / Pantry Shelving Backsplash
Use cut tiles as durable, washable backing on closet or pantry walls to protect against moisture and scuffs. Their lightweight profile makes them easy to glue in place; paint or stencil them for a decorative, wipeable surface behind open shelving.
Outdoor Art Panels & Planter Boxes
Because the tiles resist moisture and corrosion, use them to line the backs of shallow planter boxes or create weather-resistant wall art for covered patios. Seal paint with outdoor varnish and mount tiles on treated wood frames for colorful, lightweight garden panels.