Features
- Stylish, Affordable, Easy And Quick Assembly, Vented Heat Resistant Interlocking Tiles Will Cover Any Shape Or Size Radiator!
- Fits Most Large Size Radiators - Each Tile Measures 7x7 Inches And Connect Both Straight And At a Right Angle - Measure the Front, Sides, And Top Of Your Radiator To See How Many Tiles You Need.
- Decorative Tile Design Will Look Great In Any Room
- Great For Child Safety - Baby Proof Any Room By Creating A Barrier Between your Little Ones And The Hot Radiator.
- Vented Tile Design Allows Heat To Pass Through Easily While Staying Cool To The Touch. Tiles will Keep their Shape And Not Discolor. This Product Is To Be Used As a Steam Heat Cover NOT FOR PORTABLE ELECTRIC HEATERS *Patent Pending
Specifications
| Color | White |
Related Tools
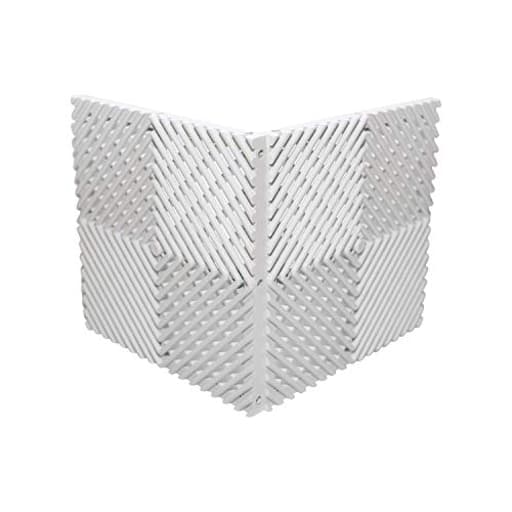
A radiator cover composed of 48 vented, heat-resistant interlocking tiles (7 x 7 in.) that assemble quickly to cover the front, sides and top of most large steam radiators, with tiles that connect straight or at right angles. The vented design allows heat to pass through while staying cool to the touch, provides a barrier for child safety, and is intended for steam heat radiators only (not for portable electric heaters).
Ready Covers - Radiator Cover Heating Cabinet For Your Home And Office Fits Most Large Size Radiators: WHITE - 48 Tiles! Review
Why I tried a modular radiator cover
Old steam radiators are wonderful for heat and terrible for everything else: they’re bulky, hot, and often an eyesore. I wanted something I could assemble quickly, keep my toddler’s hands away from the hot metal, and still let heat circulate. Custom wood covers can look great but are pricey, heavy, and not renter-friendly. That’s what led me to the Ready Covers radiator tiles—a modular, vented system that snaps together into a three-sided cover with a lid.
What you get and how it’s built
The tiles are 7-by-7-inch heat-resistant plastic panels with a lattice design. Each tile has integrated tabs that let you connect straight across to form flat panels or at right angles to create corners and a top. The concept is smart: you’re essentially building a lightweight, vented box around the radiator. There are no metal fasteners, hinges, or dedicated corner pieces—just tiles snapping into tiles.
In my set, a few tiles arrived already paired. Separating them wasn’t difficult, but it does take a deliberate wiggle to avoid stressing the tabs. I measured several pieces with calipers; mine were right at 7 inches square, and the fit between tiles was consistent.
Planning the layout (and getting your tile count right)
Before you click a single tab, measure your radiator’s front face, both sides, and the desired top overhang. Because the system builds in 7-inch increments, you’ll want to round up on each dimension and accept a little extra coverage rather than falling short. For example, my front face was roughly 42 inches wide by 28 inches tall—a 6-by-4 tile panel fit neatly, with a smidge of overhang on either end. The sides were a single column of four tiles, and the top was a 6-by-1 run to create a lid.
It’s important not to block valves or bleed screws. I left a couple of vents unobstructed by using shorter side panels and a slight gap in the top panel where the valve sits. The tiles are not designed to be cut, so plan your panel grid to accommodate protrusions.
Assembly: fast once you get the hang of it
Assembly took me about 30 minutes from first click to final placement. A few observations:
- The first connections require firm, even pressure. After a handful of joins, it becomes second nature. A rubber mallet is handy for stubborn tabs, but I got by with hand pressure and a towel to protect my palms.
- Build flat panels on the floor (front, two sides, and the top), then snap the panels together at right angles. It’s much easier than trying to build the box in midair.
- The right-angle joins are surprisingly rigid. I could lift the three-sided shell without it twisting apart.
- Snapping pieces back apart is possible but not effortless. Plan your grid carefully to minimize rework.
Overall, the system is clever and genuinely quick. If your radiator footprint is straightforward, you can go from cardboard box to clean-looking cover in the time it takes to make coffee.
Stability and safety
There are no feet, bases, or pre-made corners—structure comes purely from the interlocking tiles. On a medium-height radiator, the assembled shell sat stable on the floor in a U-shape around the unit, with the lid tying it together. For a very long, low radiator, you’ll want to widen the footprint with deeper side panels and a full-length lid; the top panel adds meaningful stability.
A few practical tips that helped:
- Build a shallow “return” along the back edge at the bottom—a single row of tiles that doesn’t touch the radiator but rests on the floor—just to square the frame. It adds rigidity without enclosing the back.
- If you need extra security (say, in a playroom), you can discreetly tether the cover to the wall with adhesive hooks and a thin cord. Do not attach anything to the radiator itself.
- Avoid placing weight on the top panel. A small plant or frame is fine; anything heavy or leaning on it is not.
From a safety standpoint, the vented tiles remained cool to the touch during full steam cycles. I tested at several points across the surface; they were warm at most, never hot. The lattice openings are small enough that fingers can’t easily reach the radiator fins, and the front-to-radiator distance creates a decent buffer.
Important: this system is for steam heat radiators only. It’s not appropriate for portable electric heaters or other radiant appliances that need clearances specified by the manufacturer.
Heat performance
Because the entire surface is vented, heat distribution stayed essentially unchanged in my rooms. I didn’t measure a noticeable delay in warm-up time after installing the cover, and the ambient temperature reached setpoint as usual. The lid does a nice job of redirecting rising heat forward into the room rather than straight up a wall, which actually felt slightly more comfortable near seating.
Aesthetics and fit
The look is clean and contemporary—white lattice panels that read as a deliberate design choice instead of a workaround. If your radiator is tucked into a nook or under a window, the modular grid makes even awkward spaces look tidier. It won’t pass for built-in millwork, and seams at each tile are visible. On larger builds the grid pattern becomes part of the visual statement; I found it modern and unobtrusive, but tastes will vary.
Fit is where you trade perfection for modular convenience. Because you’re working in 7-inch increments, you may end up with a little extra width or height, or need to leave a small gap to accommodate valves. You can’t shave a half-inch off a tile, so plan for a clean overhang rather than a forced cram.
Durability and maintenance
Over a heating season, the tiles didn’t warp, yellow, or loosen. The tabs felt as tight at the end as on day one. I wouldn’t make a habit of tearing the cover down and rebuilding it every month—the tabs are sturdy, but repeated disassembly will eventually take a toll. Dusting is simple: a microfiber cloth or a quick pass with a vacuum brush through the vents keeps things clean.
The plastic has a matte finish that hides fingerprints and blends well with white baseboards and trim. If you need a different color, the material could theoretically take a plastic-safe spray paint, but I didn’t test that and would be cautious around heat.
Where it shines and where it falls short
What I liked:
- Genuinely fast, tool-free assembly
- Safe, cool-to-touch barrier without strangling heat output
- Modular flexibility for odd radiator shapes and placements
- Light, renter-friendly, and easy to move or adjust
- Easy to clean; no rust, no paint chips
What could be better:
- No dedicated base or corner components—stability depends on your layout
- Tile increments mean you can’t achieve millimeter-perfect fits
- Disassembly requires care; the tabs can be stubborn
- The “grid” aesthetic isn’t for everyone
- Not suitable for electric heaters or units that require specified clearances beyond what you can safely provide
Buying and setup advice
- Measure twice in three directions: front width/height, side depth/height, and planned top overhang.
- Plan panel counts on paper first. Build a mock grid on the floor to visualize valve cutouts and clearances.
- Start with a U-shaped base (front and two sides), then add the lid last for squareness.
- Keep at least a couple of inches of clearance from hot metal components and don’t block controls.
- Use a rubber mallet or a folded towel under your palm for those first few snaps.
Verdict
I went looking for a fast, safe, and decent-looking way to cover steam radiators without committing to custom carpentry, and these radiator tiles delivered. They aren’t a forever, furniture-grade solution, but they are a remarkably effective middle ground: quick to assemble, kinder on the eye, and much safer for curious hands. Heat output stayed strong, the tiles stayed cool, and the room looked tidier instantly.
Recommendation: I recommend the Ready Covers radiator tiles for renters, parents, and anyone wanting a practical, modular cover for steam radiators. They’re especially good when you need a quick, adjustable solution that won’t damage walls or require tools. If you’re after a permanent, perfectly tailored, furniture-style cover—or you have an electric heater—this isn’t the right fit. For most steam radiator setups, though, it’s an affordable, functional upgrade that works as promised.
Project Ideas
Business
Radiator Cover Installation & Styling Service
Offer a local handyman/styling service that measures radiators, assembles interlocking tiles on-site, customizes finishes (paint, decal, fabric overlays), and installs cushions or shelving. Target landlords, busy homeowners, and families wanting childproofing. Revenue streams: measurement/installation fees, custom finishing charges, and add-ons like cushions or plant trays.
Home Staging & Realtor Package
Create a staging package for realtors and photographers that quickly modernizes rooms using white vented tiles (or painted panels) to cover unsightly steam radiators. Emphasize quick assembly, neutral aesthetic, and baby-proof benefit for family-targeted listings. Sell as a per-property rental or flat staging fee with optional seasonal refresh service.
Custom Decorative Tile Kits (E‑commerce)
Design and sell pre-decorated or DIY kits: painted sets, printed motif packs, or child-themed panels sold online. Include how-to videos and measurement guides. Upsell customization (monograms, fabrics) and bundle with cushions, trays, or mounting hardware. Target apartment dwellers, new parents, and boutique hotels.
Subscription Seasonal Decor & Maintenance
Offer a subscription where customers receive seasonal panel sets and an optional swap-and-install service every quarter. Include cleaning, tile replacement for wear, and minor repairs. This creates recurring revenue and appeals to businesses (coffee shops, B&Bs) that want fresh interiors without managing inventory.
B2B Safety Retrofit for Childcare / Senior Facilities
Market a child-safety/senior-safety retrofit service to daycare centers, preschools, and assisted-living facilities: measure fleets of radiators, install vented covers to meet safety guidelines, and provide maintenance contracts. Sell bulk pricing, on-site training for staff, and inspection certificates to demonstrate compliance.
Creative
Modular Radiator Planter Shelf
Use the interlocking vented tiles to build a shallow shelf and boxed surround above the radiator that supports small potted plants. The vented design lets heat and humidity benefit humidity-loving plants (succulents not recommended directly on top). Add a thin waterproof tray and felt pads under pots to protect tiles. Create tiers by stacking tiles at right angles to make staggered plant platforms.
Child-safe Reading Nook / Bench
Assemble tiles into a low front-and-top cover that doubles as a bench or window seat backrest while keeping little hands away from hot surfaces. Add a custom cushion on top and attach corner tiles at right angles for a built-in look. The venting keeps heat flowing while the tile barrier provides childproofing and a decorative focal point.
Interchangeable Seasonal Panels
Paint, decal, or decoupage individual tiles with seasonal patterns (holiday motifs, floral spring, minimalist winter). Because tiles interlock, you can quickly swap out sections for seasonal refreshes or photo-shoot props. Use removable clips or magnets to attach small accent pieces for a layered look.
Geometric Wall Art / Headboard
Lay tiles flat in a honeycomb or geometric arrangement and paint a gradient or lacquer finish to create a lightweight, heat-resistant headboard or wall art panel. Mount several assembled tiles as one piece on drywall with French cleats. The right-angle connectors let you design dimensional art that subtly vents behind the piece if desired.
Pet-safe Radiator Barrier with Toy Storage
Build a front radiator cover that includes a shallow storage cubby or slots for pet toys and grooming supplies. The vents maintain airflow so the cover won’t overheat, and the cover prevents pets from touching hot radiator surfaces while keeping toys organized and off the floor.