Features
- Compact, lightweight design suitable for use in tight areas
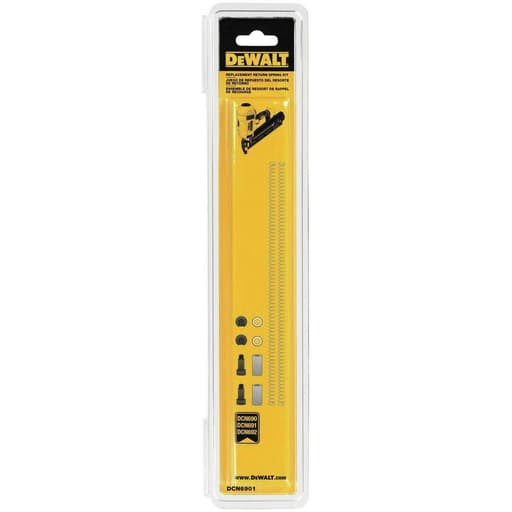
- Complete kit for return-spring replacement
- Allows end-user field servicing of the tool
- Restores bump-fire and sequential-fire functionality on compatible models
Specifications
| Number Of Pieces | 8 |
| Includes | 1 pair of return springs; 1 pair of washers; 1 pair of bumpers; 1 pair of shoulder screws; 1 Loctite sachet; 1 instruction sheet |
| Compatible Models | DCN690, DCN692 |
| Brand | Stanley |
Related Tools
Related Articles

Service kit to replace the return springs in cordless framing nailers. The kit restores return-spring function and enables bump-fire and sequential-fire modes where supported. It is intended for field servicing so the tool can be returned to operation without shipment to a service center.
DeWalt Replacement Return Spring Kit for Cordless Framer Review
Why I keep a return spring kit in the truck
A cordless framing nailer is only as good as its ability to reset the driver after every shot. When the return springs tire out, you start chasing intermittent misfires, half-cycles, and dead triggers that slow a job down to a crawl. I installed this return spring kit on a well-used DeWalt cordless framer and got it back to consistent bump-fire and sequential operation without having to ship the tool off to a service center. For a field-fix kit, it’s thoughtfully put together and—importantly—complete.
What’s in the box and how it’s packaged
The kit arrives as a small, lightweight pack with everything you need to handle a return-spring swap:
- Pair of return springs
- Pair of washers
- Pair of bumpers
- Pair of shoulder screws
- Single-use Loctite sachet
- Instruction sheet
The “number of pieces” can sound confusing at first glance because the sheet counts pairs as single items. In practice, the assortments match what the nailer requires. The hardware quality is on par with the OEM fasteners I pulled out, and the springs themselves are properly tempered with consistent coil geometry—no sharp edges or uneven winding that you sometimes get with off-brand replacements.
You’ll see the Stanley name in some documentation. That’s not a red flag; DeWalt sits under Stanley Black & Decker. My kit was packaged and labeled for DeWalt, and the parts fit the compatible DeWalt guns without any fuss.
Compatibility and intent
This kit is intended for DeWalt’s DCN690 and DCN692 cordless framers. That’s the official fitment, and that’s the platform I serviced. If you’re running a different DeWalt framer, don’t assume cross-compatibility—springs are carefully spec’d to a tool’s driver mass and stroke. Always verify by model before you open up the head unit.
The purpose of the kit is straightforward: restore the return-spring function so the driver resets reliably and the tool can run both sequential and bump modes as designed. If your framer is double-cycling, hanging the driver, or losing pace in bump-fire, fatigued return springs are high on the list of likely culprits.
Installation: realistic time, tools, and gotchas
Plan on 30–45 minutes if you’ve never been inside one of these, 20 minutes if you have. I needed only:
- Torx drivers for the nose/cover screws
- A small pick or scribe to help with spring placement
- Needle-nose pliers
- Blue shop towels and a nylon brush
- Safety glasses
My steps looked like this:
- Remove battery and nails, lock out the trigger, and retract the contact tip.
- Pull the nose cover and access the driver channel.
- Note the orientation of the existing springs and bumpers before removal. A quick phone photo saves guesswork.
- Clean debris from the driver track and the surrounding pocket. Resin and fines accumulate here and can mask the benefit of new springs if you skip this step.
- Install the new bumpers and washers, then seat the springs. They have a natural “set” direction—follow the instruction sheet so the coils don’t bind at full stroke.
- Install the shoulder screws with a dab of the included Loctite. Snug is enough; overtightening can distort the shoulder interface and add friction to the reset.
- Cycle the driver by hand (tool still powered off) to confirm smooth travel.
- Reassemble and test on scrap in sequential, then in bump-fire.
The only tricky part is managing spring preload and ensuring the coils sit correctly during reassembly. A pick helps nudge the coil into its pocket while you align the shoulder screws. Take your time and keep the area clean; grit is the enemy of a smooth reset.
Results after the swap
Before the replacement, my DCN692 would occasionally fail to reset in bump-fire, particularly at the end of a long run. After installation, the reset was back to crisp and immediate. The driver returned fully every cycle, and the tool kept pace in bump mode without hesitation. Trigger feel improved as well—the vague halfway “dead” point disappeared once the springs were doing their job.
Noise and vibration didn’t meaningfully change, but the overall rhythm of the tool did. When a framer is resetting correctly, you can hear and feel the cadence tighten up, and that was the case here. Paper-tape 3-1/4s went in like they should, and I didn’t need to babysit the nose to coax it through a firing sequence.
Durability and maintenance considerations
Return springs are wear items. Their fatigue life depends on fastener length, wood density, and how aggressively you run in bump-fire. If you’re using the framer as a primary production tool, expect to replace springs periodically. The upside of this kit is you can schedule that service during downtime instead of shipping the nailer out and waiting weeks.
A few small practices extend the life of the new springs:
- Keep the driver track clean. Blow out the nose and brush away fines; abrasive dust accelerates wear.
- Avoid dry-cycling. Firing without fasteners is a quick way to spike internal forces.
- Don’t overtighten the shoulder screws. A slightly bound driver makes the springs work harder than necessary.
After several weeks of framing and sheathing with the new springs, reset performance held steady. There’s no perceptible sagging or loss of pace, and the tool remained reliable in both modes.
What I appreciate about the kit
- It’s complete. I didn’t have to hunt for threadlocker or reuse tired bumpers.
- The instruction sheet is clear enough for a competent DIYer or pro to follow without a service manual.
- The parts quality feels OEM, and the fit is exact on the supported models.
- It’s compact and easy to stash. On a multi-week job, I can keep a kit on hand and avoid downtime.
Where it could be better
- A torque spec for the shoulder screws on the instruction sheet would be a nice touch. “Snug” works, but a number is better.
- A small diagram calling out spring orientation in larger print would help when you’re working in less-than-ideal lighting.
- Model compatibility could be highlighted more boldly on the packaging. These kits are small and easy to mix up on a shelf.
Who this kit is for
- Pros running a DCN690 or DCN692 as a daily driver who can’t afford a service-center wait.
- Facilities and maintenance teams standardizing on DeWalt cordless framers.
- Serious DIYers comfortable opening the nose assembly and following basic service steps.
If you’re not comfortable disassembling a nailer, you can still buy the kit and have a local service shop install it; they’ll appreciate that you brought the exact parts.
The bottom line
The return spring kit does exactly what it’s supposed to do: it restores reliable driver reset and brings a tired DeWalt framer back to full function in both sequential and bump-fire modes. The parts are complete, the install is approachable, and the value lies as much in saved downtime as in the hardware itself.
Recommendation: I recommend this kit for owners of the DCN690 and DCN692 who are experiencing reset issues or planning preventative maintenance. It’s an OEM-quality, field-ready solution that keeps your cordless framer working on your schedule rather than a service center’s.
Project Ideas
Business
Mobile Framing Nailer Tune-Up Service
Offer on-site spring replacement and inspection for DCN690/DCN692 crews. Flat-rate per tool includes springs, bumpers, screws, Loctite, cleaning, and a test-fire in both modes. Add a dated service sticker and a 30-day performance check to build trust and recurring bookings.
GC Crew Preventative Maintenance Plans
Sell quarterly PM subscriptions to general contractors. You visit jobsites, swap return springs proactively, replace worn bumpers, apply threadlocker, and function-test. Include downtime tracking to show ROI and keep a small kit stock on each foreman’s truck for emergencies.
Rental Shop/Fleet Partnership
Partner with equipment rental stores to rehabilitate their DCN690/DCN692 inventory. Provide batch servicing, serial-number logs, pass/fail reports, and a quick-user handout on bump-fire vs sequential use. Bundle in discounted kits for their counter staff to upsell to customers.
Refurbish-and-Flip Nailer Resale
Source “won’t return” cordless framers, replace springs and related wear parts, clean and test, then resell with a short warranty and a video proof-of-function. Market as jobsite-ready with restored bump/sequential modes to capture value from tools others write off.
Hands-On Maintenance Workshops
Host paid classes for trades schools, tool libraries, and small contractors teaching field servicing with the kit. Participants bring their own DCN690/DCN692; you provide kits and guidance. Monetize through tuition plus kit sales and follow-up service packages.
Creative
Framing Nailer Revival + Test Rig
Use the kit to bring a sluggish DCN690/DCN692 back to life, then build a small 2x4 test wall and a simple return-speed gauge (a marked board you rapid-fire into) to verify smooth return and both bump-fire and sequential modes. Document before/after performance and keep a maintenance log inside the case.
Weekend Shed Build Blitz
Service the nailer with new return springs, washers, bumpers, and Loctite, then frame an 8x10 shed or lean-to in a weekend. Use sequential mode for plates and corners and bump-fire for sheathing to showcase the restored cycling speed and consistency.
Basement Partition Wall Precision Build
After replacing the return springs, install a straight interior partition with a pre-hung door. Rely on sequential-fire for accurate stud placement and nail spacing, showing how a properly returning driver reduces double-fires and misfeeds during precise work.
Raised Garden Bed Production Run
Tune up the nailer and batch-build multiple raised beds from reclaimed 2x lumber. Use a simple jig and bump-fire to assemble sides quickly, leveraging the restored return action for consistent depth and fast repetition.
Pallet Wood Accent Wall Sprint
Restore the nailer and then install a pallet-slat feature wall. Pre-mark stud locations and use bump-fire to secure slats rapidly, demonstrating how fresh springs and shoulder screws eliminate sluggish rebounds that cause jams.