Features
- 20× magnification (approx. 200 ft range)
- ±1/4" accuracy per 100 ft
- Transit function for determining vertical angles
- 360° horizontal circle with vernier scale for angle measurement
- Protected leveling vial for jobsite durability
- Heavy-duty leveling base designed for quick setup
- Includes 8 ft aluminum grade rod and aluminum tripod with quick-adjust legs
Specifications
| Color | Yellow |
| Leveling Type | Manual |
| Housing Material | Aluminum |
| Number Of Pieces | 3 |
| Product Weight (Lbs) | 22.6 |
| Product Weight (Oz) | 361.6 |
| Magnification | 20x |
| Objective Aperture | 22 mm |
| Minimum Focus | 5 ft |
| Stadia Ratio | 1:100 |
| Transit Capabilities | Yes |
| Tripod Thread | 5/8" x 11" |
| Leveling Head | 3 screws |
| Vertical Scale Accuracy | ±1° |
| Horizontal Circle Accuracy | ±1° |
| Range | 200 ft |
| Instrument Weight (Instrument Only) | 4 lbs |
| Instrument Weight (With Case) | 7 lbs |
| Accuracy | +/- 1/4" at 100 ft |
| Includes | Aluminum tripod with quick-adjust legs; 8 ft aluminum grade rod (feet-inches-eights) |
| Warranty | 3 Year Limited Warranty; 1 Year Free Service; 90 Days Satisfaction Guaranteed |
| Upc | 02887747394 |
Related Tools

Related Articles

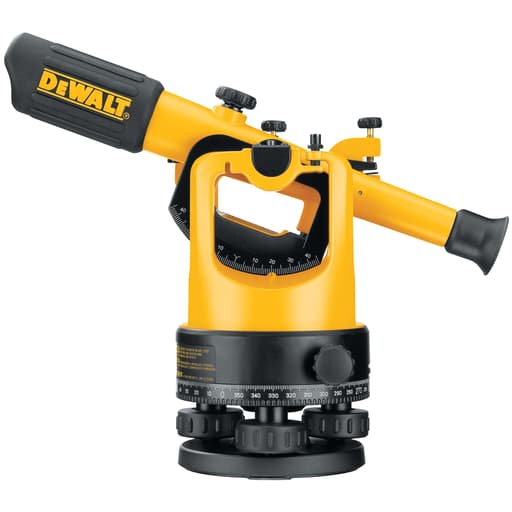
Optical transit level with 20× magnification and a usable range of about 200 feet. The instrument has transit capability for measuring vertical angles and a manual leveling system on a heavy-duty base. It is supplied with an aluminum tripod and an 8 ft aluminum grade rod.
DeWalt 20x Transit Level Package Review
First impressions and setup
I took the DeWalt 20x transit level out to a small site job to check form elevations and establish a couple of reference lines. The kit comes ready to work: instrument, aluminum tripod with quick-adjust legs, and an 8-foot aluminum grade rod marked in feet, inches, and eighths. The instrument mounts to the tripod via the standard 5/8"-11 thread, and the three-screw leveling base is familiar territory for anyone who’s used a builder’s level or transit.
This is a manual level, meaning there’s no automatic compensator. You center the bubble vial and keep it centered for every shot. That’s not a deal-breaker, but it does demand more discipline and time than an auto-level. After a few minutes of letting the optics acclimate to the outdoor temperature, I leveled up and started with a quick two-peg check to see where calibration stood.
Build and ergonomics
The instrument body is aluminum, and the protected bubble is easy to see. The focusing action is smooth enough, and the horizontal clamp and tangent allow usable fine adjustment in azimuth. The vertical motion—what you use to “transit” and read vertical angles—works, but on my sample the tilt lock needed to be tighter than I’d like to hold a set angle. Tightening it that far made the vertical movement feel sticky and imprecise. You can work around it, but it’s not confidence-inspiring if you plan to set and hold angles frequently.
The leveling base looks the part, but the screws on my unit had noticeable play. They level the instrument, but the feel is coarse, and small adjustments have a tendency to overshoot. That makes fine leveling a little fussier, and you’ll spend an extra few moments coaxing the bubble to center.
The case is light and keeps dust off the optics. The entire kit is reasonably portable; the instrument itself weighs about 4 pounds and roughly 7 pounds with the case, with the tripod and rod bringing the whole package into “grab-and-go” territory for short projects.
Optics and readability
At 20x magnification through a 22 mm objective, the image is bright enough in daylight and stays crisp on targets out to the advertised range. Minimum focus at 5 feet is handy when you’re working close to forms or doing interior checks. The crosshair includes stadia lines with a 1:100 ratio, so quick distance estimates are possible: a 0.50-foot spread between upper and lower stadia reads as about 50 feet to rod.
The horizontal circle runs a full 360° with a vernier, and the instrument includes a vertical scale as well. Both are graded for ±1° accuracy at best, which is fine for general direction checks or rough slope angles, but not a replacement for a theodolite when you need tight angle layout. The vernier markings are legible in shade; in full sun they’re workable but not high-contrast.
One practical note: the rod being in feet, inches, and eighths is common for carpentry. If you’re accustomed to 10ths (common in civil/site work), you’ll be doing mental conversions, which slows you down.
Leveling and accuracy in the field
DeWalt claims ±1/4 inch at 100 feet. On a calm morning, with careful bubble work, I ran a short level loop with foresights and backsights around 80–100 feet. My closing error over two legs worked out to roughly 3/16 inch—within the spec. Pushing the shots to 150–180 feet, the error crept toward 3/8 inch, which is still reasonable given the instrument type and the extra time needed to keep the bubble dead center.
Where I hit friction—literally—was in bubble stability and the leveling screws’ feel. With a manual instrument, any sag in the bubble during a reading can move your line of sight. A stable, smooth leveling base helps you keep that bubble rock-solid. Here, the screws’ coarseness added a bit of drift. It’s manageable if you adopt a routine: pre-load the tripod firmly, use light finger pressure on the leveling screws, and take the rod reading immediately after confirming the bubble. But compared to an auto-level, you’ll work harder for the same precision.
For anyone new to optical leveling, a quick two-peg test before an important run is non-negotiable. Set two points about 100 feet apart, shoot from near each point, and check that the computed difference matches in both setups. My sample showed a small collimation error out of the case, correctable in the field with the appropriate adjustments. If you’re not comfortable making those tweaks, plan to have a repair shop check it or budget the time to learn the process.
Transit and angle work
The “transit” in this transit level lets you pitch the telescope and read vertical angles. As a tool for general vertical angle awareness—checking a roof pitch or estimating slope—it’s fine. If you intend to set and hold a specific angle for layout, know that the tilt lock and vertical motion don’t invite finesse. The ±1° reality of the scale limits you to coarse angle work, and the vertical movement stiffens when the lock is tight. You can split degrees by eyeballing between marks, but repeatability isn’t on par with dedicated angle instruments.
Horizontal angle measurement via the 360° circle and vernier is more comfortable thanks to the smoother azimuth tangent. Again, think of it as a “bearing awareness” tool, not a survey-grade angle setter.
Tripod and rod performance
The aluminum tripod is light, which is nice in transit and less nice in gusty wind. Stomp the feet and hang a weight from the center to add stability. The leg clamps hold position once set, but the head’s flatness and the tripod’s torsional stiffness are only average, so take care when leaning into the instrument during leveling.
The 8-foot rod is adequate for checking slab forms, patios, and short runs. If you’re aiming at larger grade differences, you’ll want a 13-foot rod. The rod sections lock cleanly, and the face is easy to read at 20x out to a couple hundred feet, assuming good light and a steady holder.
Durability and quality control
The protected vial and metal housing are positives, and the kit survived transport without optical damage. That said, the combination of coarse leveling screws, the finicky tilt lock, and the need for early calibration hints at a product that benefits from careful handling and thorough pre-job checks. This isn’t a toss-it-in-the-truck bed instrument. Treat it like the optical tool it is: keep it cased, avoid shocks, and verify calibration frequently.
Warranty coverage is solid on paper (three-year limited, one-year service, 90-day satisfaction). If you buy one, I’d recommend bench-testing it immediately: run a two-peg test, check the bubble sensitivity, verify the stadia reads true, and inspect the leveling screws and tripod hardware for play. Catching issues early makes use of the warranty straightforward.
Who it’s for
- Occasional leveling on small jobs: checking forms, setting slopes for walks and patios, short-range elevation transfers.
- Crews comfortable with manual leveling routines who don’t need tight angle layout and can invest the time to verify and maintain calibration.
Who it’s not for:
- Daily professional use where speed and repeatability matter. An automatic builder’s level will be faster and more forgiving.
- Precision angle layout. A theodolite or a rotating laser with a grade function will do better.
- Long runs where cumulative error and bubble discipline become the limiting factor.
Practical tips to get the most from it
- Preload the tripod and let the instrument thermally stabilize before calibrating.
- Do a two-peg test at the start of the week (and after any bumps).
- Keep shots balanced (similar foresight and backsight distances) to cancel residual collimation error.
- Use a sunshade or position the instrument so glare doesn’t wash out the bubble or vernier.
- If the tilt lock needs to be tight, set the angle slightly low, tighten, then creep up to your mark to take up play.
Recommendation
I wouldn’t recommend this DeWalt transit level for full-time professional use. While the optics are serviceable and the kit is complete, the manual leveling, coarse feel of the leveling screws, and finicky vertical lock slow the workflow and make consistency harder than it should be. If you’re an occasional user who’s comfortable with manual leveling and willing to verify calibration frequently, the kit can get small jobs done. But for most contractors and site crews, a basic auto-level or an entry rotating laser will be faster, more forgiving, and more reliable day to day.
Project Ideas
Business
Home Drainage & Grading Tune-Up
Offer fixed-price yard assessments to solve puddling and foundation water issues. Shoot elevations around the property, specify 1–2% slope targets, mark cut/fill stakes, and deliver a concise report with before/after readings for contractors or DIYers.
Fence, Deck, and Driveway Leveling Checks
Provide a mobile ‘straight and true’ service for long runs. Verify post heights, deck joist elevations, stair pitch (via vertical angles), and driveway fall to street. Document compliance within ±1/4" at 100 ft with photos and rod notes.
Pre-Pour Slab Verification
Serve shed, garage, and patio projects by checking form elevations and slab thickness before the truck arrives. Establish a benchmark, shoot corners and mid-spans, and flag any deviations. Include a quick as-built sketch signed and timestamped.
Retaining Wall Layout & Batter Audit
Lay out base grades, step-ups, and drainage fall for segmental walls. During construction, verify wall batter/lean using the vertical circle and ensure consistent cap elevation across long runs. Provide a punch-list with measured corrections.
Solar Rack Tilt & Row Alignment
Support small PV installers and DIYers by setting tilt angles within ±1° and aligning rows straight over 200 ft. Verify ground slope beneath arrays and mark anchor points using the horizontal circle and stadia distance for quick, accurate setup.
Creative
Terraced Pollinator Garden
Design and build contoured garden terraces with precise 1–2% swales for water infiltration. Use the 20× scope and 8 ft grade rod to mark contour lines, step heights, and pathway cross-slope so beds drain evenly without erosion.
Backyard Mini Amphitheater
Lay out curved seating tiers and a slightly raked lawn stage. Use the 360° horizontal circle to stake smooth arcs and equal radii, then use the transit function to set consistent rise/run between tiers for clear sightlines.
Sundial & Meridian Plaza
Create a patio sundial with a correctly tilted gnomon. Set the gnomon angle to local latitude via the vertical angle scale, level the plinth, and mark hour lines and a true north-south meridian using solar noon shadows and the horizontal circle.
Neighborhood Micro-Topo Map
Survey local sidewalks, parks, and yards to produce a simple contour map. Shoot backsight/foresight elevations and use the 1:100 stadia ratio to estimate distances without a tape, then compile a printable map for trail planning and flood awareness.
Anamorphic Street Art Layout
Establish a single viewing point and use the instrument’s angle scales to transfer a distorted grid onto pavement or a wall. From the chosen vantage, the artwork resolves perfectly, thanks to precise sight lines and level references.