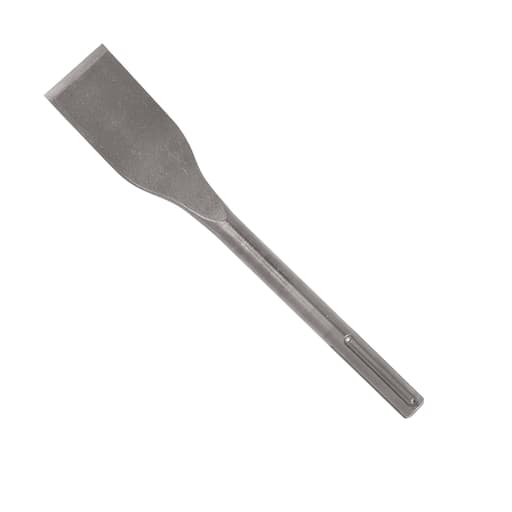
Features
- Compatible with SDS-max rotary hammers (fits tools from Bosch and other brands that accept SDS-max shanks)
- Flat point for scraping and tile removal
- One-piece steel construction
- Manufactured using a heat‑treat process for improved durability
Specifications
| Sku | HS1915 |
| Chisel Cutting Edge | 2 in |
| Overall Length | 12 in |
| Shank Type | SDS-max |
| Shank Size | 45/64 in |
| Point Type | Flat |
| Cutting Direction | Right hand |
| Material | Steel |
| Finish | Bright |
| Applicable Materials | Concrete, masonry, tiles |
Related Tools
Related Articles

Tile chisel designed for use with SDS-max rotary hammer drills. Intended for scraping or removing tile from floors and walls and for use on concrete and masonry surfaces. Constructed from steel with a flat chisel point.
Bosch Hammer Tile Chisel Review
First impressions and setup
I pulled this tile chisel out for a bathroom gut, where I had a mix of 12x24 porcelain on thinset and some stubborn ceramic backsplash over old mastic. It snapped into my SDS‑max hammer with a reassuring click, no slop in the shank, and the flat edge seated squarely against the tile as I oriented it with the tool’s chisel position lock. This is a straightforward design—a one‑piece, heat‑treated steel chisel with a 2-inch cutting edge and 12-inch overall length—and that simplicity is a strength. There are no gimmicks to fuss with, and it feels like the kind of accessory you can toss in a gang box without babying.
Compatibility is exactly what you’d expect: it fits any SDS‑max rotary hammer that accepts standard SDS‑max shanks, not just Bosch’s. If you’re running an SDS‑plus tool, this isn’t for you; skip the adapter as it bottlenecks impact energy and can damage both tool and bit. This chisel wants a proper SDS‑max hammer with rotation stop and a chisel orientation feature so you can clock the flat to your preferred angle.
Design choices that matter in the field
- Cutting edge: 2 inches is a smart width for tile work. It’s narrow enough to get under edges and into tighter spots, yet wide enough to lift tile cleanly without punching through.
- Length: At 12 inches, it’s compact and controllable. You can keep the hammer close to the work when you’re on a ladder or crouched by a toe kick. The tradeoff is reach—more on that later.
- One‑piece, heat‑treated steel: It’s built to take blows. After several days of use, I saw no mushrooming or bending, and the edge kept its bite longer than most generic spade bits I’ve used.
The bright steel finish looks clean out of the box, but it will pick up surface rust if stored damp. A quick wipe with oil after wet cutting or dusty demo goes a long way.
Performance on tile and thinset
On floor tile, the chisel performs best when you work at a shallow angle, letting the flat ride beneath the tile. With a mid‑sized SDS‑max hammer, I could shear off ceramic cleanly and lift larger porcelain tiles in sheets once I broke the bond at an edge. For set-in-thinset floors, the 2-inch edge allows good control across grout lines; I toggled the hammer’s chisel lock to keep the edge parallel to the grout and moved tile by tile.
On walls, the shorter length helps considerably. You can keep your stance close and apply consistent pressure without the tool feeling front‑heavy. The flat’s profile is thin enough to sneak behind backsplash without shredding the substrate more than necessary. Expect to skim some mastic or thinset after—this isn’t a miracle scraper—but it leaves a manageable surface.
Where the chisel shines is around transition zones: toe kicks, toe‑kicks near cabinets, tub flanges, and corners where wider spades struggle. Being able to sneak that 2-inch edge under the tile without prying against finished surfaces saves rework.
For thinset removal, it will scrape but not nearly as fast as a wider spade or a dedicated scaling chisel. I used it to knock down ridges and prep a small bathroom floor; for larger rooms, a broader blade or a floor scraper attachment will be faster.
Concrete and masonry tasks
Although labeled for tile, the chisel is equally useful on masonry. I used it to:
- Knock off a parge coat from a block foundation.
- Chip away a high spot in a slab before setting a threshold.
- Clean up a pool coping repair where old mortar needed to be removed without chewing into the concrete beneath.
The heat treatment is doing its job: the edge didn’t roll, and the body of the chisel stayed straight even under full hammer energy. That said, the 2-inch width means you’re trading coverage for control. If your day involves scaling large sections of concrete or removing thick overlays, move to a 3–4 inch spade or a scaling chisel to cover ground.
Control and ergonomics
Control is excellent. The 12-inch length keeps the mass of the hammer close to the work, and the flat edge makes it easy to keep a shallow attack angle. I rarely had the chisel “dive” into substrate unless I got greedy with blow energy or increased the angle too much. The compact length also makes ladder work safer; you’re not extending a long lever that can kick.
The flip side is reach. On floors, especially if you’re hoping to work more upright, 12 inches means more time on your knees. In tight mechanical rooms or under cabinetry, I appreciated the compact size. On open floors, I wished for a 16–18 inch option to reduce crouching and to give a bit more leverage to peel tile and thinset in broader passes.
Durability and maintenance
Over multiple demo sessions, the edge held up better than many house‑brand chisels I’ve abused. It will eventually dull, especially if you’re driving it into concrete or hitting the occasional hidden screw. The steel takes a touch‑up on a bench grinder without issue—keep the edge square and don’t overheat it. Because there’s no coating, wipe it down after wet or dusty use; surface rust is purely cosmetic but avoid pitting over the long term.
The shank fit stayed tight, with no peening or deformation at the detents. That matters: sloppy shanks rattle, waste energy, and wear the hammer. Here, the fit and finish are high quality.
Technique tips for best results
- Let the tool do the work. Keep the angle shallow (10–20 degrees) and maintain steady forward pressure; avoid prying motions that stress the edge.
- Clock the flat. Use your hammer’s chisel position lock to keep the edge aligned with grout lines or the direction you want to lift.
- Start at an edge. Break the bond at a threshold, floor vent, or transition strip and work inward for faster, cleaner lifts.
- Manage dust. Pair with a vac or mist lightly; thinset dust adds up fast. Protect bearings and switchgear from heavy dust exposure.
- Keep it sharp. A quick touch‑up restores speed and reduces the tendency to gouge.
- Don’t overdo impact energy. High blow rates can bounce the chisel; moderate energy with consistent pressure tends to lift tile cleaner.
Limitations and alternatives
- Reach: The 12-inch length is awesome in tight spaces, less so on open floors. If you need to work more upright, consider a longer tile chisel or a floor scraper attachment.
- Coverage: At 2 inches wide, this is surgical rather than bulldozer. For big floors with thinset removal, a wider spade will be faster.
- Tool ecosystem: This is SDS‑max only. If your hammer is SDS‑plus, use an SDS‑plus tile chisel designed for your tool size; avoid adapters.
Value
This is a no‑nonsense, well‑made chisel that trades fancy features for consistent performance. The heat‑treat is right, the shank fit is precise, and the edge life is solid. In use, those things translate to smoother tile lifts, fewer stalls, and less wandering into the substrate. It’s not the only tile chisel you’ll ever need—pair it with a wider spade for big areas—but it’s the one I reach for first on detailed demo, corners, and any situation where control matters.
Who it’s for
- Pros and remodelers who already run an SDS‑max hammer and want a compact, durable tile chisel for controlled removal.
- Trades working in mixed environments—bathrooms, kitchens, pool decks—where the ability to switch from tile to light masonry scraping is useful.
- DIYers tackling a bathroom or kitchen demo who’ve rented an SDS‑max hammer; just be aware of the shorter reach and plan for knee pads or a kneeling creeper on floors.
Recommendation
I recommend this tile chisel. It delivers reliable, controlled tile removal with a durable, heat‑treated edge and a compact length that excels in tight spaces and on wall work. The 2-inch width strikes a smart balance between access and lifting power, and the SDS‑max fit is solid across multiple hammer brands. Its main compromise is reach; for large floor areas or extended sessions where posture matters, a longer chisel or a wider floor scraper will be faster and easier on your body. If you value control, durability, and clean results—and you’re already in the SDS‑max camp—this chisel belongs in your kit.
Project Ideas
Business
Dust‑Controlled Tile Removal Service
Offer rapid tile and thinset removal with an SDS‑max hammer + flat chisel paired to a HEPA vacuum shroud. Market to homeowners and contractors who want fast demo with minimal substrate damage and dust.
Concrete Floor Prep for Epoxy/LVP
Specialize in scraping thinset, mastic, and leveling ridges from slabs to spec so epoxy coaters and LVP installers can start immediately. Bill per square foot with add‑ons for crack chase and patch.
Weekend Tile Demo Kit Rental
Rent out an SDS‑max rotary hammer, this chisel, PPE, and a HEPA vac. Include a quick‑start guide and on‑call support. Tier pricing by day and add fees for extra chisels/consumables.
Reclaimed Materials Microbusiness
Partner with remodels to carefully lift tiles and clean bricks using the flat chisel. Bundle and resell reclaimed materials online or to designers, monetizing both demo labor and resale margins.
48‑Hour Kitchen/Bath Demo for Realtors & Flippers
Offer fixed‑price, fast‑turn demolition focused on tile floors, backsplashes, and showers. Use the SDS‑max chisel for efficient removal and substrate cleanup so the next trade can start immediately.
Creative
Reclaimed Backsplash Mosaic
Use the 2 in flat SDS-max chisel to lift an old backsplash and scrape off thinset, salvaging intact tiles. Arrange the best pieces into a framed mosaic or a new tabletop, then grout and seal for a custom art piece.
Exposed Brick Feature Wall
Carefully strip plaster or tile from a masonry wall using the flat point to skim and lift without gouging the brick. Clean residual mortar, seal the brick, and add lighting for a rustic feature wall.
Geometric Entryway Inlay
Selectively remove a section of plain floor tile with the chisel’s broad edge to create a recessed area. Inlay contrasting tiles in a geometric pattern, using the cleaned concrete substrate for a strong bond.
Upcycled Brick Bookends and Stands
Harvest old masonry bricks and use the chisel to remove stuck mortar and smooth faces. Turn them into bookends, plant stands, or shelf supports paired with reclaimed wood for industrial-chic decor.
Garden Stepping Stones from Old Tiles
Lift intact floor tiles with the flat chisel, scrape off old adhesive, and set them into mortar on concrete pavers. Grout the gaps to create durable, patterned garden steppers.