Features
- Zero-clearance anti-splinter edge to reduce tear-out
- Outboard strip that mounts on underside of track rails
- Compatible with TrackSaw cutting systems
- Black rubber construction (as listed)
Specifications
| Model Number | DWS5029 |
| Color | Black |
| Material | Rubber |
| Compatible With | TrackSaw cutting system |
| Is It A Set? | No |
| Number Of Pieces | 1 |
| Product Length (In) | 118 |
| Product Height (In) | 18.9 |
| Product Width (In) | 27-2/7 |
| Product Weight (Lbs) | 0.05 |
| Product Weight (Oz) | 0.8 |
| Alternate Dimensions (Listed On One Source) | 118 in L x 3/4 in W x 1/10 in H |
| Warranty | 90 Day Limited Warranty |
Related Tools
Related Articles

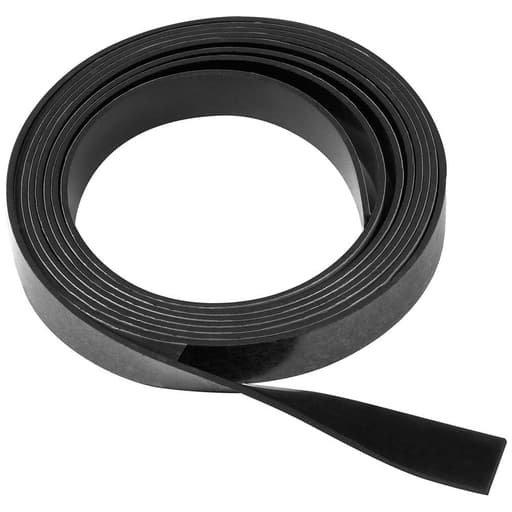
Replacement zero-clearance anti-splinter strip designed to mount on the underside of a track saw guide rail. Provides a reduced gap at the blade line to minimize tear-out and supports outboard edges to help produce cleaner cuts.
DeWalt Replacement Zero-Clearance Anti-Splinter Strip Review
A small strip that makes a noticeable difference
In my shop, it’s often the small consumables that quietly influence cut quality more than the headline tools. The DeWalt splinter strip falls squarely into that category. It’s a replaceable, black rubber edge that installs on the underside, outboard side of a track-saw rail. Its job is simple: support the fibers on the waste side of the cut, close up the gap at the blade line, and help keep veneers from blowing out on the bottom face. Used alongside the rail’s top splinter guard and a sharp blade, it tightens up edge quality in a way you can see and feel.
What it is and how it fits into a tracksaw setup
Think of the splinter strip as an underside, zero-clearance helper. The top guard on the rail defines your cut line and controls chipout on the show face. This underside strip supports the bottom veneer and the offcut edge, especially on cross-grain cuts. On sheet goods like prefinished ply and melamine, the outboard support is meaningful—reducing fuzz and chips where the blade exits the work.
The strip I installed came as a single, long length (listed at 118 in). That’s enough to outfit a 102-in rail in one piece, or to do a 59-in rail with a good amount left over. I used one to re-line a well-used DeWalt rail and kept the remainder for a shorter auxiliary rail. It’s not a kit—you get one piece—so plan accordingly if you’re refreshing multiple rails.
Installation: prep is everything
Rubber strips with pressure-sensitive adhesive can be fussy if you rush them. I got the best results with a methodical approach:
- Clean the underside groove and mating surface thoroughly. I scraped any old adhesive residue with a plastic scraper, then wiped with isopropyl alcohol until a white cloth stayed clean.
- Dry-fit the strip to understand its orientation and where the thin edge should sit relative to the blade line. There’s a right way around.
- Apply in one steady pass without stretching the rubber. I started at one end, working 8–12 inches at a time, keeping the lip uniformly proud of the rail edge.
- Use a J‑roller or a wood block to burnish it down with firm, even pressure.
- Let it sit. I leave PSA-backed rubber for a few hours—overnight is best—before making cuts.
On a brand-new rail, everything bonded strongly. On my older rail with a few dings and anodizing wear, I had a couple of short sections that wanted to lift after the first hour. A second clean, a little extra pressure, and a dot of adhesive in two stubborn spots solved it. If you’re rehabbing a beat-up rail, don’t be surprised if you need to coax it into staying put.
A couple of practical notes:
- Temperature matters. These adhesives like moderate shop temps. If your rail lived in a cold truck, let it warm up first.
- Don’t crowd the blade line. The underside lip should kiss the workpiece as the saw passes, but you don’t want any interference with the blade or the saw’s glide.
Performance on real materials
I judge splinter control on three usual suspects: prefinished birch ply, melamine, and MDF. With a 42–48T fine crosscut blade, the underside strip plus the top splinter guard produced crisp crosscuts in birch ply. On the bottom face, tear-out along the offcut side was reduced from “noticeable fuzz” to “minor dusting that wipes off with a fingernail.” On melamine—always a tough test—the improvement was still visible. I could skip a scoring pass on many cuts when grain direction and support were ideal, though for money cuts on glossy white I still prefer a light scoring pass or a triple-chip blade. MDF, as expected, looked clean on both faces.
Rip cuts in hardwoods benefit too. I broke down 8/4 and 4/4 maple with the rail on spacers, and the exit fibers on the underside were better controlled than with a worn strip or no strip at all. It’s not a miracle for careless technique, but it removes one more variable. Where I saw the biggest value was in repeat breakdown work: batching cabinet parts from veneered ply, every cut edge was consistently cleaner, which reduces sanding and edge repair time.
Compatibility and cross-brand use
This is designed for DeWalt-style track profiles, and that’s how I primarily used it. I also tried a length on a “Festool-style” rail in the shop out of curiosity. The fit was snug and functional, though the channel tolerances aren’t identical. With careful alignment it worked, but I did a bit of trimming at a connector to keep the lip straight. My takeaway: if you’re running DeWalt rails, it’s a straight fit; if you want to use it on another brand’s profile, expect to test-fit and potentially fettle. The black rubber itself is unremarkable in a good way: compliant enough to seal to the work, firm enough to avoid smearing or dragging.
One subtle consideration is visibility. Clear top guards on some systems let you see your pencil line through the guard as you align. Because this strip lives underneath and is black, it doesn’t aid visibility—but it doesn’t get in the way either. Your top guard still defines the cut line; the underside strip is there purely for support, not sighting.
Durability and maintenance
After weeks of use—think dozens of sheets and a mix of hardwood breakdown—the lip shows some light scoring and a couple of nicks where debris got trapped. That’s expected. The material hasn’t chunked out, and it continues to seal well to workpieces. The bond held after the initial curing period, including in a warm jobsite environment.
A few maintenance tips:
- Keep the underside of the rail clean. Embedded chips are what scar the lip.
- If the strip gets contaminated with pitch or adhesive, a gentle wipe with mineral spirits followed by alcohol brings it back.
- Avoid dragging the rail across rough concrete; the exposed lip is the first thing to get abraded.
When it does wear, replacement is straightforward—and at this price point, I treat it like other consumables.
Quirks and cautions
- Adhesion is the make-or-break factor. Clean thoroughly, avoid stretching, and use a roller. If an area lifts, a tiny spot of contact adhesive or CA gel, applied sparingly, will tack it down. Primer (like 3M 94) also helps on scuffed rails, though I haven’t needed it routinely.
- The listed length is generous. Plan your cuts so seams don’t land where you join rails or at your most-used section of the track.
- Don’t assume it will perfectly fit every non-DeWalt rail. Check the profile and test on a small section first if you’re mixing systems.
Value
I look at value in terms of time saved and predictability gained. This strip is inexpensive compared to the cost of sheet goods and certainly compared to reworking chipped edges. If you’re already running a track saw for furniture-grade work, it’s an easy upgrade. It’s not flashy; you’ll only notice it in the absence of problems—fewer fuzzy edges and fewer surprises on the bottom face.
Who benefits most
- Cabinetmakers and installers breaking down veneered sheet goods who want cleaner undersides without always resorting to a scoring pass.
- DeWalt TrackSaw users refreshing tired rails.
- Cross-brand users comfortable with a little fitting if their rails share a compatible profile.
If you’re doing mostly rough breakdown or you always flip and finish on a table saw afterward, the gains are more modest.
Recommendation
I recommend the DeWalt splinter strip for anyone running a compatible track who cares about edge quality. It reliably reduces tear-out on the underside and offcut edge, it’s easy to install if you prep properly, and it’s priced like the consumable it is. The two caveats are adhesion on older, scarred rails—plan to clean thoroughly and be ready to spot-glue a stubborn inch or two—and uncertain fit on non-DeWalt profiles. Neither is a deal-breaker in my view.
Used alongside a sharp blade and the top splinter guard, this little strip punches above its weight. It’s not a cure-all for poor technique, but it tightens up the system, making good cuts more repeatable with less fuss. For the small investment, the payoff shows up in cleaner edges and less sanding, which is exactly what I want from a consumable like this.
Project Ideas
Business
On-Site Prefinished Panel Breakdown
Offer a mobile service to designers and cabinet shops to dimension prefinished plywood and melamine on location. The zero-clearance strip ensures splinter-free edges, reducing waste and eliminating the need for edge-banding touch-ups.
Premium Miter and Scribing Cuts
Specialize in chip-free 45s, bevels, and scribe cuts for countertops, built-ins, and closet systems. Market guaranteed tear-out-free cuts on HPL, melamine, and veneer using tuned track rails with fresh anti-splinter strips.
Track Saw Optimization Workshops
Run paid classes for contractors and hobbyists on achieving clean cuts: rail setup, maintenance, strip replacement, blade selection, and cut sequencing. Sell replacement strips and maintenance kits as add-ons.
Precut Strip Kits & Subscription
Operate an e-commerce micro-brand selling pre-cut replacement strips sized for popular rails, bundled with install tools, cleaning wipes, and a quick-start guide. Offer discounts and scheduled replacements via subscription.
Content + Affiliate Channel
Build a niche content series benchmarking tear-out reduction across materials and blades with fresh vs. worn strips. Monetize with affiliates, sponsorships, and downloadable cut checklists and setup guides.
Creative
Waterfall-Miter Plywood Console
Build a console with continuous wood grain flowing over 45-degree waterfall miters. Use the zero-clearance strip to cut prefinished veneer plywood without chip-out, scribing perfect miters along the blade line for tight, splinter-free joints.
Geometric Marquetry Wall Art
Create intricate inlay patterns from thin veneers and HPL laminates. The anti-splinter edge supports delicate outboard edges so small triangular and hexagonal pieces fit crisply, minimizing sanding and filler.
Premium Picture Frames
Produce museum-quality frames from brittle species (e.g., wenge) or melamine-wrapped stock. The strip yields chip-free miters and clean reveal lines on prefinished faces, reducing touch-ups before finishing.
Shoji-Inspired Room Divider
Rip thin, narrow lattice slats from plywood or basswood cleanly, then frame translucent acrylic or paper panels. The zero-clearance strip prevents fuzzing and tear-out on fragile edges, keeping slats uniform.
Acoustic Slat Panels
Batch-cut uniform slats from veneered MDF for modern acoustic walls. Chip-free edges from the strip mean less sanding and consistent spacing, delivering a high-end look with fast installation.