Features
- Heavy‑duty 20 A AC/DC switch
- Designed to extend the service life of worm‑drive saws
- Replacement for SKIL worm‑drive models SHD77 and SHD77M
- Plastic construction
Specifications
| Current Rating | 20 A |
| Type | AC/DC switch |
| Material | Plastic |
| Compatible Models | SHD77, SHD77M |
| Tool Height | 1.1 in |
| Tool Length | 6 in |
| Tool Width | 12 in |
| Tool Weight | 0.25 lb |
| Model Number | 95105L |
| Upc | 039725034359 |
Related Tools

Related Articles

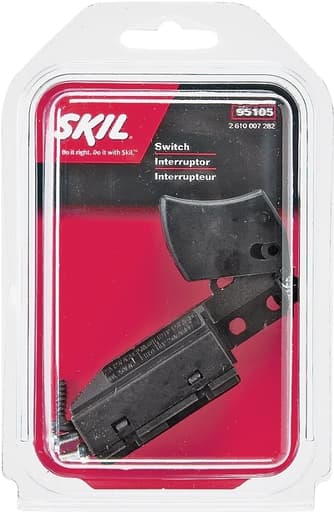
Replacement heavy‑duty AC/DC switch intended for worm‑drive saws. Rated for 20 amps and designed to extend the operating life of compatible worm‑drive saw models.
Skil Switch Kit Review
Why I Replaced My Worm‑Drive’s Switch
After years of service, the trigger on my well‑used Skil worm‑drive finally started acting up—occasional hesitation on start, the odd flicker under load. Nothing tanks productivity like an unreliable trigger, so I picked up Skil’s switch kit, model 95105L. It’s a heavy‑duty, 20‑amp AC/DC replacement designed specifically for the SHD77 and SHD77M saws. I installed it on my SHD77M and put it straight to work on framing and subfloor cuts to see how it held up.
What You’re Getting
This isn’t an aftermarket gamble. It’s an OEM‑style switch built to the electrical and mechanical geometry of Skil’s worm‑drive handles. The spec sheet is straightforward: 20‑amp current rating, compatible with AC or DC circuits, plastic housing, and a compact, lightweight package—about a quarter pound. The compatibility note matters: this switch is intended for the SHD77 and SHD77M. If you’re running a different Skilsaw (or a different brand’s worm drive), check your parts diagram before you buy. “Almost fits” doesn’t cut it with switches.
The 20‑amp rating is the standout here. Most worm‑drive saws draw around 15 amps under load, so that extra headroom adds a bit of margin when you’re pushing through wet lumber or ripping dense framing stock. AC/DC rating is common for universal‑motor tools and simply means the contacts are built to handle either current type.
Installation: What It Takes
The install was straightforward and took me about 20 minutes, taking my time to keep things neat. If you’re comfortable with basic tool repair—switches, cords, brushes—you’ll be fine. Here’s what worked well for me:
- Unplug the saw. Sounds obvious, but it’s step zero.
- Remove the handle screws and carefully split the handle halves. Note cable routing and strain relief.
- Photograph the existing switch wiring before you disconnect anything. The orientation of line and load matters.
- Transfer each spade connector one at a time to the new switch to avoid cross‑wiring.
- Inspect the cord clamp and strain relief; re‑secure if it’s loosened over time.
- Seat the switch fully in its pocket so the trigger lines up cleanly with the handle’s actuation lever.
- Button it back up and torque the handle screws evenly so the halves don’t pinch the cord.
The new switch dropped into the handle pocket cleanly on my SHD77M with no trimming or shimming. Mine included the necessary mounting screws, which saved me from reusing old hardware that had seen better days. The trigger alignment was spot‑on; there was no binding, and the trigger travel felt immediate once everything was tightened down.
If you’re tackling this for the first time, two extra tips: blow out the handle cavity with low‑pressure air while you’re in there (sawdust packs in around the switch), and mark the line/hot wire. Misrouting hot and neutral won’t necessarily prevent the saw from running, but proper wiring is a safety must.
Switch Feel and Ergonomics
A good worm‑drive trigger gives you confident, repeatable starts—no mush, no wobble, and a predictable actuation point. The new switch feels crisp and deliberate. There’s a defined click as contacts close, and the travel is consistent across the lever. It doesn’t change the saw’s ergonomics or balance—it’s a switch, not a handle redesign—but it restores the trigger feel I expect from a production‑grade worm drive. The plastic housing is standard fare for these components and keeps weight down, which contributes to that light, responsive trigger action.
Performance Under Load
I ran the saw through a typical day’s mix: ripping 2x PT, trimming subfloor, and breaking down LVL. Starts were immediate, and there was no flicker or hesitation, even when I intentionally stalled the blade to check recovery. After extended cutting, the switch body stayed cool to the touch—no telltale warmth that can hint at contact resistance. That 20‑amp rating isn’t magic, but it does mean the switch isn’t sweating at the tool’s typical 15‑amp draw.
An AC/DC rating doesn’t change the saw’s behavior, but it’s a sign the contacts are built to tolerate arcing well. In real use, what that translates to is clean starts and consistent holding power. I didn’t notice any chatter or intermittent cutouts when bumping the trigger repeatedly, which is often the first way aging switches show their age.
Durability and Dust
Worm drives live in dust. Lots of it. While this switch isn’t advertised as sealed, the fit inside the handle keeps the worst of the debris out, and the housing closes up cleanly with no obvious gaps when installed. The best durability move is preventative: blow out the handle cavity when you service the saw, ensure the cord strain relief is tight, and avoid over‑spraying lubricants near the trigger—oil attracts dust and can gum up the lever.
Given the contact rating and the robust feel of the actuation, I expect a long service life under typical framing use. Of course, no switch enjoys being dropped or whacked—protect the handle if you’re tossing the saw into the truck.
Fit and Compatibility Notes
- Confirm your model: this kit targets SHD77 and SHD77M. If you’re running an older 77 variant or a different brand, verify part numbers.
- Handle tolerances matter: if your handle halves are cracked or warped, a new switch won’t fix misalignment. Replace damaged handle parts first.
- Wire length and routing: the connectors on my saw reached cleanly without strain. If yours feels tight, re‑check the routing channels molded into the handle.
One thing to watch: some aftermarket switches resemble this one but have different mounting bosses or trigger heights. They can create subtle misalignment that leads to a mushy feel or partial actuation. The Skil unit fits like it should.
Safety and Best Practices
- Only work on the saw unplugged.
- Photograph wiring and move one lead at a time.
- Inspect the cord; a frayed cord next to a fresh switch is a missed opportunity.
- Don’t overtighten handle screws—warped plastic can pinch the trigger lever.
- Test the saw before reassembling fully: close the handle halves by hand and squeeze the trigger to ensure smooth, full travel.
If you’re uneasy with electrical repairs, a service shop can do this quickly. But for most pros and handy DIYers, it’s a very approachable fix that keeps a good saw in service.
Value
Replacing a switch is a fraction of the cost of replacing a worm‑drive saw, and it’s one of the most common wear‑item repairs besides cords and brushes. The 95105L earns its keep by restoring reliable starts and extending the life of tools that still have strong motors and straight shoes. The lightweight build and OEM fit make it an easy choice over no‑name options that may compromise feel or longevity.
The Bottom Line
The Skil switch kit does exactly what a replacement trigger should: it installs cleanly, restores crisp actuation, and holds up under day‑to‑day framing demands. The 20‑amp rating provides comfortable headroom for a 15‑amp saw, and the AC/DC spec speaks to robust contact design. It’s not a universal fit—nor should it be—but for SHD77 and SHD77M owners, it’s a practical, high‑confidence fix.
Recommendation
I recommend this switch kit for anyone maintaining a Skil SHD77 or SHD77M worm‑drive saw. It’s an OEM‑style part with the right electrical rating, solid trigger feel, and straightforward installation. If you’re outside those two models, verify compatibility first; a mismatched switch can create more problems than it solves. But if you’re running one of the supported saws and your trigger is getting flaky, this kit is a simple, reliable way to keep a proven workhorse on the job.
Project Ideas
Business
Mobile Worm-Drive Repair Service
Offer on-site diagnostics and switch replacement for SHD77/SHD77M saws, stocking multiple 20 A switch kits for fast turnaround. Bundle switch swaps with cord inspections, brush checks, and basic cleaning for a premium uptime package.
Refurbish-and-Resell Program
Buy used SHD77/SHD77M saws, replace worn switches with this kit, certify performance, and resell with a limited warranty. Market as reliable ‘job-ready’ units to contractors who want trusted worm-drive saws at a discount.
Contractor Fleet Maintenance Plans
Set up recurring service contracts for crews, proactively replacing high-wear parts like switches and cords on a schedule. Offer inventory tracking, pick-up/drop-off, and emergency swap-outs to minimize downtime.
DIY Switch Replacement Kit Bundle
Sell a curated kit that includes the 20 A switch, compatible hardware, strain relief, and clear labeling aids, plus access to an installation walkthrough video and support chat. Offer volume pricing to shops.
Rental Yard Partnership
Partner with tool rental companies to handle periodic switch replacements and inspections on their worm-drive fleets. Provide predictable pricing, quick turnaround, and documentation to help them maintain safety records.
Creative
Vintage Skilsaw Revival
Source worn SHD77/SHD77M worm-drive saws and restore them with fresh bearings, cords, and this 20 A switch kit. Create a before/after showcase wall or video series highlighting the lifespan extension and performance gains from a proper switch replacement.
Industrial-Style Power Control Box
Build a rugged, enclosure-mounted control box using the heavy-duty AC/DC switch to control jobsite work lights, fans, or heaters. Emphasize tactile, industrial aesthetics and clear labeling for a clean, functional addition to a workshop.
Interactive Light Sculpture
Use the high-current switch as the tactile centerpiece of a large-format light sculpture or sign installation that toggles multiple LED drivers or fixtures, blending utilitarian tool parts with art-gallery flair.
Apprentice Training Demo Board
Create a clear-front demo panel that safely illustrates switch rating concepts, AC/DC usage differences, and tool maintenance best practices. Use the switch kit as the focal teaching component for shop classes or safety meetings.
Jobsite Master Power Pedestal
Design a freestanding, durable power pedestal for temporary sites where the heavy-duty switch controls a bank of outlets for chargers and small tools, making central power management obvious and intuitive.