Features
- Manifold stem repair kit for all conical style valve stems
- Kits include all necessary parts to service one manifold valve
- To replace stems on both valves order two kits
Specifications
| Color | Golden |
| Unit Count | 1 |
Related Tools

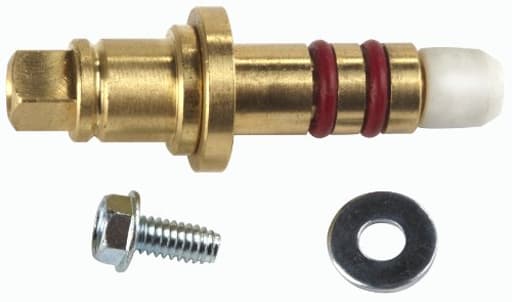
A manifold stem repair kit for conical-style valve stems, containing the parts required to service one manifold valve. The kit includes all necessary internal components to replace a single valve stem. To replace stems on both valves, two kits are required; components have a golden finish.
Robinair 40232 Manifold Stem Repair Kit for All Conical Style Valve Stems Review
Why I reached for this kit
My manifold gauge set has been a reliable shop companion for years, but recently both valve stems started weeping under vacuum and showing a faint oil halo around the packing. The handles felt gritty, seating was inconsistent, and getting a stable deep vacuum took longer than it should. Rather than retire a perfectly good manifold, I opted to rebuild the valves with the Robinair stem repair kit. I’m glad I did—the difference was immediate.
What you get
The repair kit is designed to service a single conical-style valve on a manifold. Inside are the internal parts you need to rebuild one valve stem—fresh seals, the stem assembly, and associated internals. The components have a golden finish that makes them easy to identify during assembly and later at a glance. Note that the kit count is one; if you plan to rebuild both high and low side valves, you’ll need two kits.
Build quality and compatibility
The machining and finish quality are excellent. Threads are clean, the stem rides smoothly, and the sealing surfaces are crisp with no burrs. The kit is purpose-built for conical-style stems—if your manifold uses a cone seat (as many Robinair sets do), this is a drop-in solution. If your manifold uses a different seat style (ball or flat), this kit won’t be the right fit. A quick way to check: with the valve removed, the seat in a conical design looks like a tapered pocket, not a flat deck.
I’ve used it on a well-worn manifold from the 1990s and the tolerances lined up perfectly. The stem threads engaged cleanly in the body, and the new seals seated without drama. That said, older or non-Robinair manifolds sometimes have thread oddities; verify the stem type before ordering.
Installation: quick, clean, and straightforward
From teardown to test, plan on 10–15 minutes per valve if you’ve done this before, 20–25 if it’s your first time. Here’s the general process I followed:
- Depressurize and clean: Ensure the manifold is disconnected, depressurized, and wiped down. Wear eye protection; a tiny residual burst of refrigerant oil will find your eyes if you don’t.
- Remove the handle and packing nut: Back off the handle fully and remove it. Crack the packing/retainer nut and back it out. Keep note of orientation as you disassemble.
- Extract the old stem and seals: A seal pick helps lift out old O-rings and packing washers. Take care not to scratch the bore.
- Clean the bore: I swab with lint-free patches and a little isopropyl alcohol to remove varnish and grit.
- Prep the new parts: Lightly coat the new O-rings and the stem threads with high-vacuum grease or a compatible silicone grease. Don’t overdo it—thin film only.
- Reassemble: Install components in the correct order (the kit mirrors the original layout), thread in the new stem, and snug the packing nut. Do not over-tighten; you’re compressing seals, not torquing lug nuts.
- Function check: Turn the handle through its full range. It should feel smooth with a positive seat at closed. Small adjustments to the packing nut can fine-tune feel and sealing force.
Tools I actually used:
- Small adjustable wrench or appropriately sized open-end wrench
- Seal pick set
- Lint-free swabs/patches
- Isopropyl alcohol
- High-vacuum grease (recommended)
A note on lubrication: A thin coat of high-vacuum grease on seals makes a big difference. It prevents O-ring twist during assembly, reduces wear, and improves both pressure and vacuum sealing. General-purpose petroleum grease isn’t ideal around refrigerant oils and can swell certain elastomers—stick to vacuum-compatible products.
Performance after the rebuild
The change was immediately measurable. Valve feel went from scratchy to buttery, with a clear, solid stop at full close. Under vacuum, I saw faster pull-down and, more importantly, a stable hold. Prior to the rebuild, my vacuum would creep up after shutting off the pump, pointing to a small internal leak past the stems. Post-rebuild, the system held steady overnight within the noise of my gauge.
On the pressure side, static pressure checks no longer produced the faint oil mist around the packing. The handles now require less effort to seat, and throttling flow while charging is smoother and more predictable. If you regularly meter refrigerant by valve feel, you’ll appreciate the restored control.
Durability and maintenance
Rebuild kits are only as good as the seals and the surface finish. After several weeks of daily shop use—cycling from deep vacuum to high-side pressures—the stems remain smooth and leak-free. Maintaining that performance requires a couple of habits:
- Keep the stem threads lightly lubricated; a touch of vacuum grease every few months is enough.
- Don’t overtighten the handle. A firm seat is all that’s needed; cranking hard just compresses seals and shortens their life.
- Keep caps on your service hoses and store the manifold in a clean, dry spot to avoid grit in the valve bores.
Given how inexpensive and accessible a rebuild is, I’m comfortable planning to service the stems again in a few years as routine maintenance rather than waiting for a leak to force the issue.
What I liked
- Fit and finish: The parts drop in and line up as they should, with quality threads and clean sealing surfaces.
- Real-world improvement: Faster, more stable vacuum and no packing seep.
- Predictable handle feel: Smooth rotation with a clear seat; easy to fine-tune with the packing nut.
- Targeted kit: All the internals for one valve are included, so you aren’t hunting for oddball O-rings.
Where it could be better
- One-valve packaging: The single-valve kit makes sense, but many of us rebuild both valves at the same time. A two-valve option would be convenient.
- Price perception: It’s not cheap for a small packet of parts. That said, it’s far more cost-effective than replacing a quality manifold.
- Compatibility clarity: “Conical style” covers a lot of ground. A simple compatibility chart by manifold model would help users confirm fit in seconds.
Value versus replacement
Replacing a good manifold gauge set purely because of tired valve stems is wasteful. With this kit, I restored performance for a fraction of the cost of a new manifold. If you bill your time, the quick install still wins out—there’s no learning curve, no recalibrating to a different set, and minimal downtime.
Tips for a first-time rebuild
- Photograph each step during disassembly. It makes reassembly foolproof.
- Replace both valves if they’re of similar age; if one is leaking, the other usually isn’t far behind.
- Inspect the conical seat in the manifold body with a flashlight. If it’s gouged or pitted, no kit will seal perfectly until the body is addressed.
- After rebuilding, pressure-test with dry nitrogen and soap solution, then perform a vacuum hold test before putting the set back into service.
Who it’s for
- Technicians with aging but otherwise solid manifolds showing packing seep or vacuum creep
- DIYers maintaining their own HVAC/R tools and comfortable with light mechanical work
- Anyone who prefers rebuilding and maintaining tools rather than replacing them outright
If your manifold is severely corroded, has damaged seats, or uses a non-conical stem design, this kit isn’t the solution. In those cases, a different repair approach—or replacement—makes more sense.
Recommendation
I recommend this repair kit. It restored my manifold to reliable, leak-free operation with minimal effort, improved both vacuum integrity and valve feel, and extended the life of a trusted tool. While the cost may raise an eyebrow for a small kit, the value is clear when you compare it with replacing a good manifold gauge set. Just confirm you’ve got conical-style valves, pick up a small tub of high-vacuum grease, and set aside 30 minutes. You’ll likely end up with a smoother, tighter, and longer-lived manifold for years to come.
Project Ideas
Business
Upcycled Hardware Jewelry Line
Create a small-batch jewelry brand that repurposes manifold repair parts into steampunk and industrial-chic accessories. Source kits in bulk, combine components with quality chains and findings, and position products on Etsy, Shopify, and craft fairs. Offer customization (patina, plating, engraved tags) and package pieces with a short card explaining the upcycling story to appeal to eco-conscious buyers.
Maintenance Supply Upsell Kits
Partner with HVAC, refrigeration, or industrial valve suppliers to offer the manifold stem repair kit as an upsell in service contracts. Package the kit with quick-reference replacement guides and a short training video for technicians. Offer volume discounts and branded kits for recurring customers—this reduces downtime for clients and creates a recurring revenue stream for your distribution business.
Workshops & Maker Classes
Host hands-on workshops teaching participants how to convert manifold repair components into functional art (lamps, jewelry, desk toys). Market toward maker spaces, community centers, and corporate team-building events. Charge per participant and sell starter kits at the session. Workshops promote your products, generate local PR, and build a customer base for finished goods or future classes.
Corporate Promotional Gifts
Produce custom-branded desk accessories or novelty valve sculptures made from the golden stem parts as corporate gifts for engineering firms and mechanical suppliers. Laser-etch or affix a logo to a wooden base and offer box packaging. These unique, industry-relevant giveaways can command premium pricing and open B2B sales channels with trade shows and supplier networks.
Creative
Steampunk Pendant & Bracelet Set
Use the golden manifold internals as focal beads and mechanical accents in steampunk jewelry. Drill or epoxy small eye pins through the hollow sections, combine with watch gears, brass chain, and leather cords to create pendant necklaces and bracelets. The golden finish gives an industrial-luxe look; make matching earring pairs by trimming stems and adding jump rings. Sell as limited-run sets or gift them in small craft markets.
Miniature Pipe Lamp Accent
Incorporate the conical valve stems as decorative collars and finials on a small desk or bedside lamp made from copper pipe. Slide a stem onto the lamp’s threaded rod as a decorative spacer or use several as stacked rings under the bulb socket. The golden finish contrasts with aged copper and adds a custom, reclaimed feel. This project requires basic wiring and pipe fittings and produces a distinctive upcycled home accessory.
Kinetic Desk Toy (Spinning Valve)
Build a small kinetic sculpture that uses the stem parts as bearings, spacers, and visual weights. Mount a trimmed stem on a slim dowel or stainless rod to act as the rotating centerpiece; attach thin brass disks or gear faces to either side and balance for smooth spin. Add a wooden base with a hidden magnet or bearing to stabilize. These make tactile executive desk toys or conversation pieces for makers markets.
Micro-Architectural Diorama Elements
Use the golden components as columns, chimneys, or mechanical details in architectural miniature builds and dioramas. Glue stems upright to represent industrial vents or ornamental pillars, paint selectively for patina, and combine with reclaimed circuit board pieces for a futuristic cityscape. This is great for model makers, tabletop gaming terrain, or gallery-ready mixed-media pieces.