Measuring and marking wood accurately is the foundation of successful woodworking. Mistakes in these steps can lead to wasted materials, extra costs, and poorly fitting pieces. Here's what you need to know:
- Measure Twice, Cut Once: Double-check measurements to avoid errors.
- Use the Right Tools: A tape measure, combination square, sharp pencil, marking knife, and story stick are essential for precision.
- Account for Saw Width: Always cut outside the marked line to ensure correct dimensions.
- Mark Clearly: Use sharp tools for clean, precise lines, and mark the waste side to avoid cutting errors.
- Prepare the Wood: Start with a straight edge for accurate measurements.
- Avoid Common Mistakes: Cutting on the wrong side, using dull tools, or ignoring wood expansion can ruin your project.
DIY Basics - Learn How to Mark, Measure and Cut Wood | The Home Depot
Tools You Need for Measuring and Marking Wood
To make straight cuts and good marks, you need the right tools. You do not need to buy lots of tools - just a few that work well will help you with jobs big or small. Bad tools make mistakes, good ones make your job much easier right from the start. Let’s see which tools you need for making good marks and cuts.
Tape Measure: The Main Tool for Measuring
A tape measure is the tool you will grab most. It helps you get the right size, so buy one that does not break and is easy to use. The marks should be easy to read and should show both inches and the small bits of inches. The tape must be strong, not too thin, and the lock should click in place when you use it.
A 25-foot tape measure is long enough for most jobs, but still easy to hold in your hand. Look at the end of the tape - the metal hook should move just a bit. This is not a problem; it helps you get the right size whether you hook it to wood or push it against the edge.
Use one tape measure for the whole job. If you switch, tiny changes can make your cuts wrong. Keep your tape clean and do not let it snap back too fast. Hard bends can make the tape hard to read.
When you pull the tape, hold it tight but do not stretch. Try to keep it flat and read your mark with your eyes looking straight at it, not at an angle. These simple things will help your lines be in the right place.
Combination Square: For Straight and Angled Lines
A combination square is needed if you want to make straight lines at 90 degrees and lines at 45 degrees. It has a metal ruler and a handle that slides. Use the handle on the wood edge and mark along the ruler for a line at the right angle. Always check your square is straight by using it on an edge you know is flat. Even small bends can make cuts not fit.
A square is not only for marking; you can also use it to check how deep something is or to mark 45-degree edges for angle cuts. This makes the tool very handy, and you need this for jobs like making tables or shelves where the fit must be just right.
Marking Tools: Pencil, Knife, and Story Stick
To draw on wood, a sharp pencil works for normal marks, but for thin and neat lines use a knife that makes tight marks. Knife marks are very thin - only 1/64 of an inch, while pencil marks are 1/50. This is good for close fits. Also, a knife cuts the wood just a little, which helps keep lines neat when you cut the wood.
Story sticks seem old, but they are great for marking the same size more than once. If you need to do this, mark it once on a stick and use it to copy the length without using your tape every time. This means you will not mess up the size by measuring too often.
With these simple tools, you will get good marks every time and your cuts will be right for your job.
Say you need to cut many shelves to be the same size. Take a stick and mark where you want the cut to be. For each board, line up the stick and draw a mark at both ends. This way, every shelf will be the same. No need to measure each time. It saves you time and keeps things even.
| Tool | Best Use | How Well It Works | When to Pick |
|---|---|---|---|
| Pencil | Draw lines, quick marks | Fair | Good for fast marks you can rub off |
| Knife | Small cuts, sharp lines | Very good | Best when lines must stay and be exact |
| Stick | Same size over and over | Really good | Pick when you need many like pieces |
To do your best work, keep your tools sharp and clean. Pencils that write well, good knives, and straight sticks will help you make sure your marks are clear and right every time.
If you have lots of jobs or you own many tools, sites like Toolstash make it easy to sort your stuff. You can set notes to check your tools, find help for how to use them, and learn more about keeping them in great shape.
How to Measure Wood Right
To do wood work well, you must measure wood the right way. This helps you stop mistakes. You will not cut wrong, use too much wood, or need to fix things. This is how you get your job to look neat and good.
Make One End Straight First
First, make sure one end of the wood is straight. This gives you a good spot to start to measure from. Take a square tool, put it on the long side of your wood, and see if it lines up with the end. If you see any space, cut the end so it is flat and straight. Shelves and doors need this to look nice and fit well.
Check Your Numbers Two Times
People say, "measure twice, cut once." In wood work, this is true. Always measure from the end that is straight. Note the number, then check again from the same end to be sure it matches. Most times, problems come from bad numbers, not the cutting. If you check two times, you save time and do not get mad or waste wood.
Think About the Saw Width
Saws will cut out a thin slice, called the blade width. This matters a lot. A saw can take off about one-eighth inch. If you want a piece to be twelve inches, do not cut on the line. Place the blade so it cuts wood that will not be used, not the line you marked. Always cut outside the line to make sure your piece is the right size.
For big work, use a tool list or app to keep track. It helps you write down all your numbers, cut list, and set times to check again. With this, you keep things ordered and stop mistakes that cost you time and money for all wood pieces.
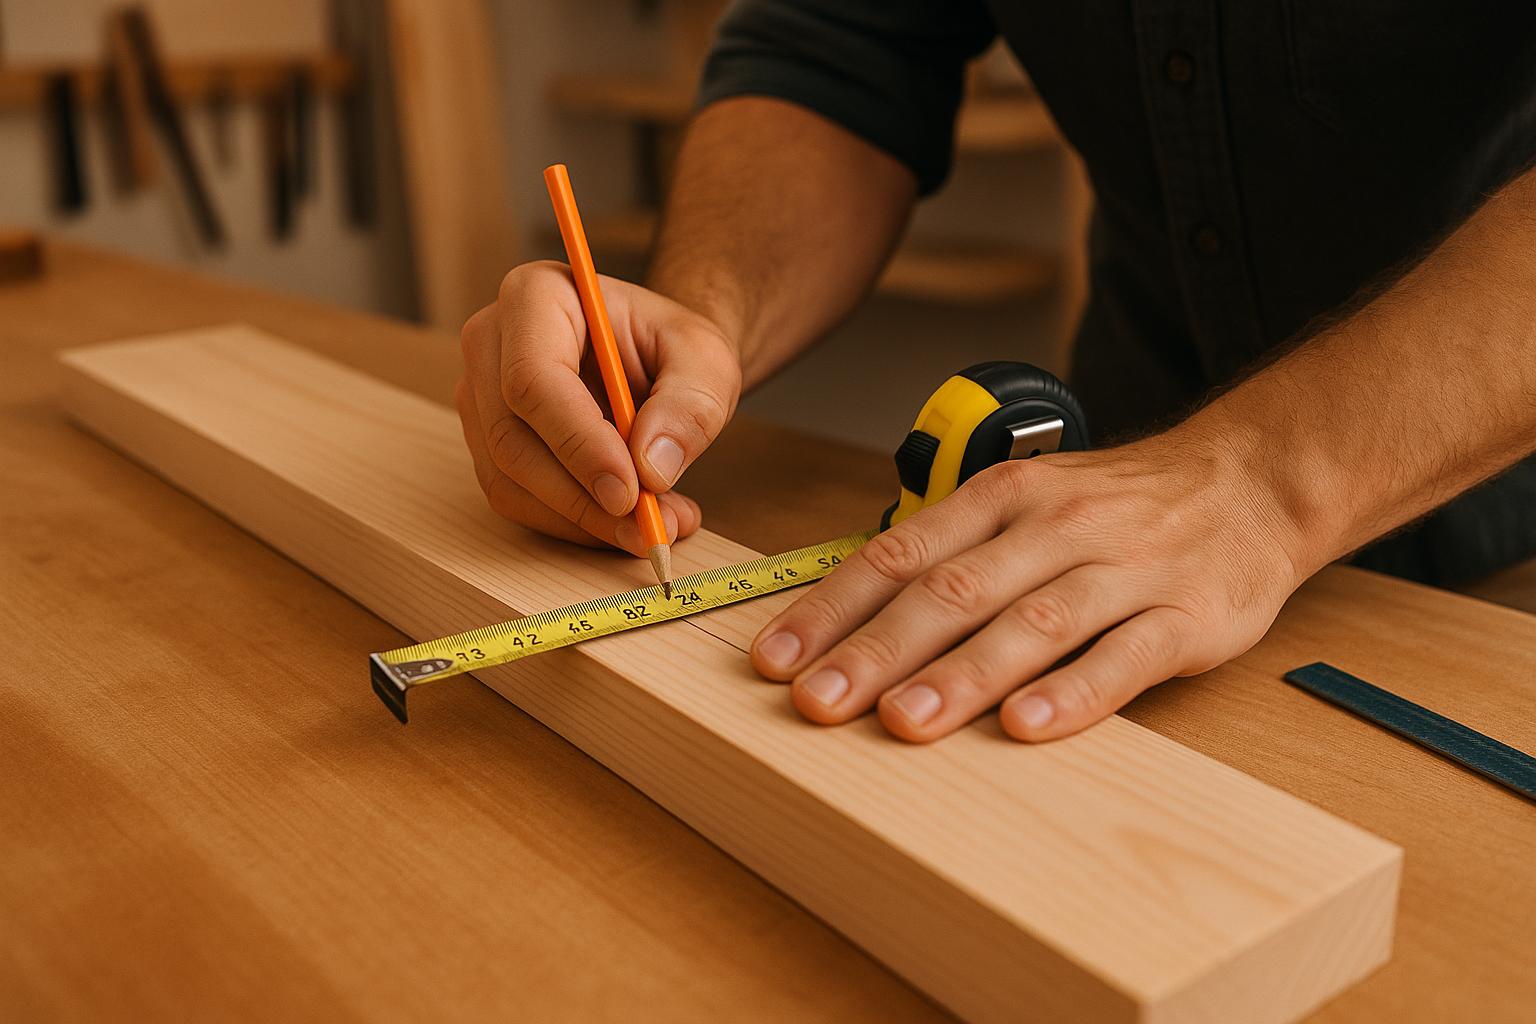
How to Mark Wood Before Cutting
Getting your markings right can make all the difference between a clean, precise cut and a messy one. After measuring your wood accurately, proper marking ensures you know exactly where to cut, leading to better-fitting joints and a polished final project.
Use Sharp Tools for Precise Markings
Sharp tools are key to creating thin, clear lines that are easy to follow. A dull pencil can leave thick, blurry marks that might throw off your accuracy. To avoid this, keep your pencil tip sharp with a sharpener or sandpaper. Alternatively, consider using a marking knife for an ultra-thin and precise guide.
A marking knife creates a fine groove in the wood that stays visible even after handling. This groove also helps guide your saw blade and can reduce the risk of splitting as you cut. Whether you’re using a pencil or a knife, sharpness is crucial for clear and reliable marks.
Once you've made these precise marks, you’ll need to turn them into accurate reference lines across your wood.
Create Reference Points and Extend Lines
Start by marking the measured spot with a small, precise tick using your sharp tool. Then, use a combination square or try square to draw a straight line across the board. This line will serve as the boundary for your cut.
Hold the square firmly against the edge of the board, and draw your line by running your tool along the square's blade. For wider boards, reposition the square as needed to ensure the line stays consistent all the way across. Make sure your line extends to both edges of the board - an incomplete line can lead to guesswork and uneven cuts.
Use Story Sticks and Symbols for Repetitive Tasks
For projects involving multiple pieces of the same size, story sticks can save you time and minimize errors. A story stick is simply a straight piece of scrap wood marked with your required measurements. Instead of measuring each piece individually, you can align the story stick with your board and mark your lines quickly and consistently.
To create a story stick, use a straight piece of scrap wood and mark all the necessary lengths. Label each mark with its purpose, like "shelf depth" or "door width", so you can keep track of what each measurement represents. This method ensures you only measure once but can mark multiple pieces accurately.
Additionally, use symbols like an 'X' or an arrow to speed up your process. For example, marking an "X" on the waste side of the line reminds you which part to cut away. An arrow can indicate the direction of an angled cut. These simple visual cues reduce confusion and help you work more efficiently.
| Marking Tool | Best Use | Line Width | Mark Longevity |
|---|---|---|---|
| Sharp Pencil | General woodworking | Thin when sharp | Short-term precision |
| Marking Knife | Precision work, joints | Very thin | Stays clear longer |
| Story Stick | Repetitive measurements | Varies | Depends on material |
If your lines start to fade, retrace them before cutting. Dirt and oils from your hands can blur markings over time, so keeping them clear is essential for consistent results.
For larger projects with multiple pieces, platforms like Toolstash can help you manage your cut lists and keep your marking tools organized. They also provide DIY guides with extra tips for marking and measuring wood effectively.
Common Mistakes and How to Avoid Them
Even seasoned woodworkers can stumble on measurement and marking errors that derail a project. Avoiding these mistakes is key to preserving the precision you worked hard to establish earlier. Let’s look at three common issues and how to sidestep them.
Cutting on the Wrong Side of the Line
Cutting on the wrong side of your mark can either remove too much or too little material. This happens because saw blades have a thickness, and cutting on the incorrect side disrupts your dimensions, potentially throwing off the entire project.
To prevent this, always mark the waste side clearly before making any cuts. Use an "X" or another obvious symbol on the section of wood you intend to discard. This simple visual cue keeps you on track, especially for intricate projects requiring multiple cuts.
And here's a good rule of thumb: you can always trim off more material if needed, but once it’s cut, you can’t put it back.
Now, let’s talk about the tools you use for marking and why their condition matters.
Using Dull Tools for Marking
A dull pencil or marking knife can create blurry, imprecise lines that obscure your cutting location. Errors as small as 1/16 inch can make a big difference, especially in tight joints or detailed work. Dull tools also tend to tear wood fibers, leaving splintered edges that look unprofessional.
Instead, keep your tools sharp and ready. A marking knife, for example, creates crisp, clean lines that guide your saw blade and minimize splintering during cuts. Store tools in a protective container or roll to avoid damage - no one wants to work with a pencil with broken lead or a knife with a bent tip.
Here’s a quick reference for marking tools and their uses:
| Tool Type | Line Thickness | Best Application | Maintenance Needed |
|---|---|---|---|
| No. 2 Pencil | ~1/16 inch | Rough carpentry, framing | Regular sharpening |
| Mechanical Pencil | <1/32 inch | General woodworking | Replace lead promptly |
| Marking Knife | <1/64 inch | Fine joinery, precision work | Periodic honing |
Ignoring Wood Movement and Its Effects
Wood naturally expands and contracts with changes in humidity and temperature, especially solid wood. If you overlook this, you may end up with misaligned joints or warped panels - problems that are particularly noticeable on larger pieces like tabletops or cabinet doors.
Most wood movement happens across the grain, not along its length. To handle this, acclimate your wood to your workspace for a few days before marking it. This allows the material to adjust to the environment, reducing surprises later. For wide panels or assemblies, leave small gaps for expansion or use joinery methods like floating tenons or elongated screw holes to accommodate movement.
If you’re working with plywood or engineered lumber, you’ll face much less of an issue since these materials are designed to stay stable. But for solid wood projects, factoring in seasonal changes is crucial for long-term durability.
For added guidance, platforms like Toolstash offer resources to track tool condition and provide tips for dealing with challenges like wood movement, helping you achieve precise and lasting results.
Tips for Better Precision and Consistency
Achieving precise measurements and consistent results in your projects requires the right tools, thoughtful techniques, and efficient workflows. These methods will help you work with greater accuracy and save time on repetitive tasks.
Invest in Reliable Measuring Tools
The accuracy of your work starts with the tools you use. High-quality measuring instruments, like dependable tape measures, squares, and gauges, can significantly improve your precision. For example, a loose combination square won’t give you accurate 90-degree angles, and a tape measure with faded or unclear markings can lead to small errors that add up over time.
When choosing tools, look for etched graduations instead of printed ones, as etched markings won’t wear off with use. Metal-bodied squares are more durable and maintain accuracy better than plastic ones. Also, ensure tape measures and adjustable squares have sturdy locking mechanisms to prevent slipping during use.
For marking, a sharp marking knife is your best bet for creating fine, precise lines. While imperial measurements are standard in the U.S., some woodworkers prefer tools that include both imperial and metric scales for added flexibility.
To keep your tools in top shape, inspect them regularly for damage or wear. Store them in a dry, organized space to prevent rust or warping. Even a small bend in a tape measure or a dropped square can throw off your measurements, often without you noticing until it’s too late.
Use Jigs and Templates for Consistency
Once you’ve got reliable tools, jigs and templates can take your precision to the next level. These aids help standardize cuts and markings, reducing human error and ensuring uniformity across multiple pieces.
For example, a straight 2x4 can act as a simple saw guide for square cuts. More advanced options, like crosscut sleds for table saws, hold materials at a perfect 90-degree angle to the blade, allowing for repeated, identical cuts.
Drilling templates are another game-changer. A pre-drilled template ensures consistent spacing and alignment, whether you’re working on shelf pin holes or other repetitive drilling tasks. Similarly, using a story stick - a strip of wood marked with key measurements - eliminates the need to measure each piece individually. This not only reduces errors but also saves time.
Although creating jigs and templates requires an initial time investment, they quickly pay off when working on projects with multiple identical components. Even simple, shop-made guides can dramatically enhance both accuracy and efficiency.
Direct Transfer Methods for Irregular Shapes
When dealing with curved or irregular shapes, traditional measuring techniques often fall short. Direct transfer methods let you capture these shapes accurately and transfer them to your workpiece, eliminating the guesswork involved with complex curves or angles.
For straightforward curves, a flexible strip of wood or cardboard can be bent to match the desired shape and used as a guide - perfect for trim that needs to follow uneven contours.
For more intricate shapes, materials like hardboard or plywood are ideal for creating templates. Refine the template until it’s just right, then use it to mark out multiple identical pieces. This is especially helpful for decorative elements or components that need to fit snugly against irregular surfaces.
When cutting irregular shapes, always cut slightly outside the marked line. It’s easier to remove excess material during final shaping than to fix an overcut. Tools like band saws or jigsaws offer the precision and control needed to follow curved lines effectively.
For particularly complex shapes, consider breaking them down into smaller, manageable sections and creating multiple templates. This reduces material waste and gives you greater control over the final result.
To stay organized, platforms like Toolstash can help you track your jigs, templates, and measuring tools. Keeping everything cataloged and easy to find ensures smoother workflows and less time spent hunting for tools in a busy workshop.
Conclusion: Key Points for Accurate Measuring and Marking
Getting precise measurements and markings in woodworking boils down to using the right tools, applying reliable techniques, and steering clear of common mistakes. Let’s recap the essentials.
First, invest in quality tools. A dependable tape measure, a combination square, and sharp marking tools are non-negotiable. Make sure these tools are accurate and kept in top condition.
Next, focus on precision and technique. Always double-check your measurements, account for the saw kerf, and cut just outside the mark to leave room for adjustments - because once material is removed, there’s no putting it back.
Finally, avoid common errors that can derail your work. Cutting on the wrong side of the line, using dull tools, or ignoring the natural movement of wood can all lead to costly mistakes, even with careful planning.
Don’t overlook tool maintenance. Ensure tape measures retract smoothly, squares stay true, and marking knives remain sharp. Even minor wear or damage can throw off your accuracy, so regular upkeep is essential for consistent results.
FAQs
What mistakes should I avoid when measuring and marking wood for cutting?
When working with wood, precision matters. Getting your measurements and markings right is crucial for achieving clean, accurate cuts. Here are some tips to help you avoid common pitfalls:
- Measure carefully (and twice!): Always double-check your measurements before marking or cutting. A quick recheck can save you from costly errors.
- Choose the right tools: Equip yourself with a reliable tape measure, a square, and a sharp pencil. These tools are essential for creating straight, accurate lines.
- Make clear marks: Use sharp pencils or marking tools to leave precise, visible lines. Faint or smudged marks can lead to mistakes.
- Consider the blade kerf: Saw blades have a thickness, known as the kerf. When marking your cut line, account for this to ensure the final piece is the correct size.
By taking your time and following these steps, you’ll set yourself up for success and achieve results that look polished and professional.
How can I keep my marking tools sharp and accurate for precise measurements?
Keeping your marking tools in great shape is essential for precision work. Regularly cleaning them helps prevent dust and debris from accumulating, which can dull their edges. For metal tools like marking knives, proper storage is just as important - keep them in a dry, secure spot to avoid rust or accidental damage. And don't forget to sharpen them periodically with the right sharpening stones or files. This ensures your tools deliver clean, precise lines every time. With a little care, your tools will remain reliable and contribute to consistently accurate cuts.
Why should you consider wood expansion and contraction when planning woodworking projects?
Wood has a natural tendency to expand and contract as temperature and humidity levels shift. Overlooking this can result in warping, splitting, or even loose joints over time. To make sure your project stays sturdy and functional, it’s important to plan for these changes. Leave space for movement in your design and use joinery methods that account for wood’s behavior. For instance, when crafting tables or cabinets, you can include small gaps or use specialized hardware designed to handle wood movement. Paying attention to these details ensures your projects can handle seasonal changes and stand the test of time.