Getting a smooth drywall finish is all about using the right tools for your project, skill level, and desired outcome. Whether you're patching a small hole or finishing an entire house, selecting the right tools can save time, reduce effort, and improve results. Here's what you need to know:
- Small Repairs: Use basic tools like a 6-inch taping knife, mud pan, and sanding sponge.
- Medium Projects: Add tools such as 10- and 12-inch taping knives, corner trowels, and a pole sander for larger areas.
- Large Jobs: Invest in advanced tools like automatic tapers, flat boxes, and power sanders to handle big surfaces efficiently.
Key Tips:
- Beginners should stick to hand tools for better control.
- Professionals can benefit from automatic tools to speed up the process.
- High-quality tools, like stainless steel taping knives, last longer and deliver better finishes.
- Organize and maintain your tools to avoid delays and maximize their lifespan.
The right tools not only ensure a polished finish but also make the job easier and more efficient.
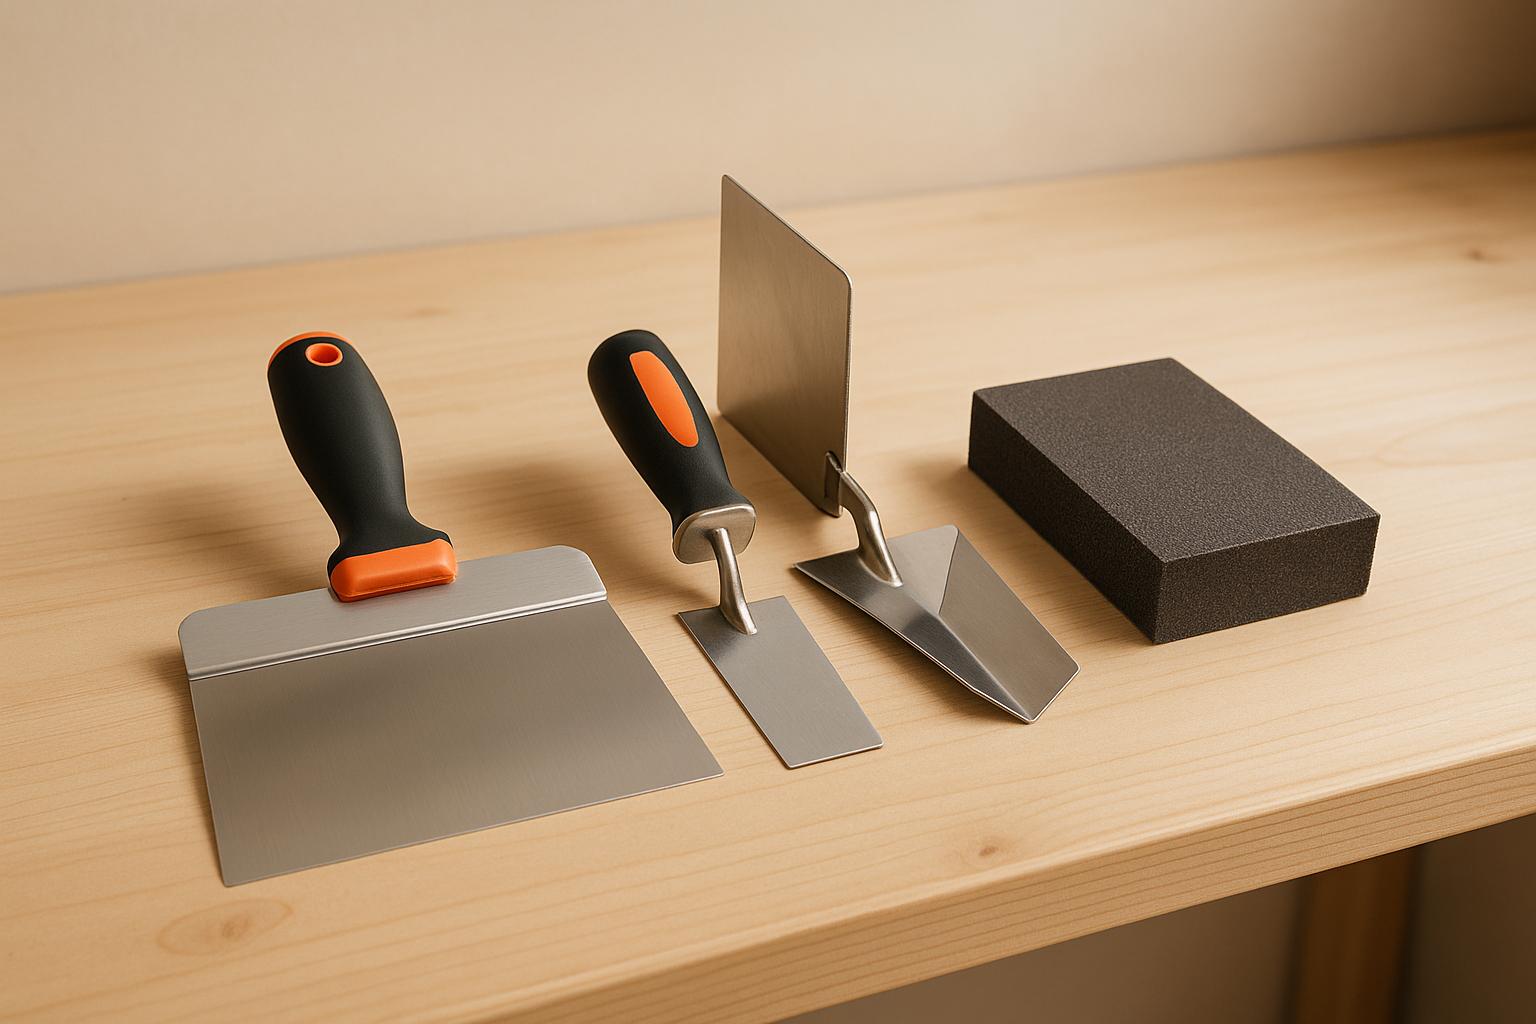
Drywall Taping Beginner Tool Set
Understanding Your Drywall Project Requirements
Before diving into a drywall project, it’s essential to assess your needs. The size of the project, your skill level, and the type of finish you’re aiming for will dictate whether you can stick to basic tools or need professional-grade equipment.
Project Size and Scope Assessment
The scale of your project plays a big role in determining which tools you’ll need.
For small repairs, like patching nail holes or fixing minor damage, a few simple tools will do the trick. A 6-inch taping knife, a mud pan, and a joint knife are usually sufficient for these tasks [3][4].
When tackling medium projects - such as finishing a single room or a basement - you’ll need a more diverse toolkit. This might include taping knives in various sizes (6-inch, 10-inch, and 12-inch), a corner trowel for inside corners, a pole sander for hard-to-reach spots, and a drywall saw for cutting. These tools help ensure smooth compound application and neatly feathered edges across larger surfaces [2][4].
For large jobs, like finishing an entire house or a commercial space, investing in advanced tools can save you time and effort. Professionals often use equipment like automatic tapers (bazookas), flat boxes, corner applicators, drywall lifts, and dustless sanding systems alongside their basic hand tools [1][2][4]. These tools can cut taping and finishing time in half while ensuring consistent results across expansive areas [1][2].
Keep in mind the physical demands of the work. While manual tools are fine for smaller projects, automatic tools can help reduce fatigue when working on larger surfaces by maintaining consistent pressure.
Skill Level Evaluation
Your level of experience with drywall tools is another critical factor.
If you’re a beginner, stick to basic tools like stainless steel taping knives, mud pans, and joint knives. These are affordable, easy to handle, and forgiving as you learn the ropes [4].
For intermediate DIYers - those who’ve successfully completed a few projects - it’s worth adding tools like corner trowels and skimming blades to your collection. These help create smoother transitions and more polished finishes.
Experienced users and professionals can take advantage of advanced tools like automatic tapers, banjos, and flat boxes. While these require some practice to master, they significantly boost speed and consistency [1][4]. For instance, a professional might use a drywall bazooka to tape seams quickly, whereas a beginner might find manual taping knives easier to control. Be realistic about your skills - using tools you’re not ready for can lead to uneven compound application and extra work [1][4].
Finish Type Selection
The finish you want for your drywall also determines the tools you’ll need.
For smooth finishes, precision is key. Taping knives, skimming blades, and quality sanding tools are essential to achieve a flawless surface [2][4]. A Level 5 smooth finish - the highest standard - requires high-quality skimming blades and pole sanders to eliminate even the smallest imperfections [5][7].
Textured finishes, such as skip trowel or slap brush techniques, require specialized tools like texture brushes, stomp brushes, or trowels [5]. These finishes can hide minor flaws, making them a bit more beginner-friendly. For example, creating a swirl texture involves circular motions with a wide brush or trowel, which is very different from the linear strokes used with taping knives.
For decorative finishes, like custom patterns, you may need additional specialized tools. The complexity of these finishes varies; smooth finishes demand more precision and a broader range of tools, while textured finishes are often easier for DIYers to manage [4][5].
| Project Type | Primary Tools | Best For | Efficiency Level |
|---|---|---|---|
| Small Repairs | 6-inch taping knife, mud pan, joint knife | Patch work, nail holes, tight corners | Manual, slower |
| Medium Projects | 6-inch, 10-inch, & 12-inch taping knives, corner trowels, skimming blades | Single room finishing, multiple coats | Manual, moderate |
| Large Jobs | Automatic tapers, banjos, bazookas, flat boxes | Entire house, production work | Automatic, high speed |
Core Drywall Finishing Tools and Their Functions
Knowing how each drywall finishing tool works can make your projects smoother and more efficient. Every tool plays a specific role, from applying joint compound to achieving a polished surface. Here's a closer look at the essential tools and their functions, helping you get that flawless finish.
Taping Knives and Mud Pans
Taping knives are the backbone of drywall finishing. These versatile tools come in different sizes, with a 6-inch knife being your go-to for the first coat of joint compound and embedding tape. Start with smaller knives for precision work, then switch to wider blades for blending and smoothing. Stainless steel taping knives are especially popular because they resist rust and last longer.
Joint knives, which are shorter and sturdier than taping knives, are great for filling nail or screw holes and handling tight spots where larger knives can’t fit.
Mud pans work hand-in-hand with taping knives. They hold the joint compound, keeping it easily accessible while helping you maintain a cleaner workspace.
| Knife Type | Best Use | Blade Width | Application Stage |
|---|---|---|---|
| Joint Knife | Tight spaces, nail holes | 2–4 inches | All stages |
| 6" Taping Knife | Initial compound application | 6 inches | First coat |
| 10" Taping Knife | Mid-stage finishing | 10 inches | Second/third coat |
| 12" Taping Knife | Final smooth finishes | 12 inches | Final coat |
Skimming Knives and Corner Tools
Skimming knives, sometimes called skimming blades, are wider and more flexible than taping knives. These are perfect for applying a thin, even layer of joint compound across large areas - essential for achieving a high-quality, Level 5 finish. While taping knives handle seams and tape, skimming knives focus on creating a smooth, uniform surface.
Corner tools are another game-changer. Inside corner trowels let you apply joint compound to both sides of an internal corner at the same time, giving you clean, sharp lines with minimal effort. For external corners, specialized tools help form crisp edges, especially when working with metal or paper-faced corner beads.
Sanding and Cutting Tools
Sanding tools are a must-have for smoothing surfaces once the joint compound has dried. Manual sanding blocks and sponges are great for detailed work in small areas, while pole sanders make it easier to handle large surfaces like walls and ceilings. Many professionals prefer dustless sanding systems to minimize airborne dust and keep the workspace cleaner.
Cutting tools are just as essential. Utility knives are your main tool for scoring and snapping drywall sheets, trimming edges, and cutting tape. For more precise or complex cuts - like openings for outlets or light fixtures - jab saws or drywall saws are the tools to use. Keeping your blades sharp is key to achieving clean cuts and reducing extra finishing work.
Building Your Toolkit
The right combination of tools depends on the size of your project. For small repairs, a basic kit with a 6-inch taping knife, a mud pan, a sanding sponge, and a utility knife will often do the trick. Medium-sized jobs might call for additional tools like 10- and 12-inch knives, a pole sander, and corner tools. For large-scale projects, professionals often bring in automatic taping tools - like banjos or bazookas - alongside their full set of hand tools to save time and achieve a high-quality finish.
Tool Selection Based on Project Type
Choosing the right tools for your project depends on its size and the level of finish you need. By aligning your toolset with the scale of your repair or renovation, you can save time, money, and effort while achieving better results. Here's a breakdown of the tools best suited for small, medium, and large projects.
Small Repairs: Basic Hand Tools
For minor tasks like patching holes, fixing small cracks, or touching up a single room, you won’t need much. A simple kit with a 6-inch taping knife, mud pan, and sanding sponge will do the trick. These tools are both affordable and effective, with a total cost typically ranging from $30 to $120.
The 6-inch knife is perfect for precise control, making it ideal for smaller repairs. However, for more extensive work, you’ll need to expand your toolkit.
Medium Projects: Expanded Tool Set
If you’re tackling a larger project, such as finishing a basement, working on multiple rooms, or addressing bigger wall sections, an expanded toolset will make the job easier and improve the final result. Expect to spend between $50 and $200, depending on the quality and brands you choose.
For medium projects, your toolkit should include taping knives in multiple sizes - 6-inch, 10-inch, and 12-inch - to handle different stages of applying joint compound and ensure smooth feathering. An inside corner tool is a must-have for creating clean, sharp corners without extra hassle. Additionally, a sanding pole will save you time and effort when working on larger surfaces like walls and ceilings, reducing the need for constant repositioning.
Large Jobs: Advanced Tool Options
Big projects - like new home construction or commercial renovations - require professional-grade tools to maintain speed and consistency. While the upfront cost can range from $300 to $1,500 or more, these tools can cut finishing time by up to 50% compared to manual methods[1][6].
For large-scale jobs, automatic taping tools are a game-changer. A drywall banjo, for instance, applies tape and compound simultaneously, while a bazooka (automatic taper) handles the first coat with uniform pressure and coverage. Flat boxes ensure smooth, even coats across wide surfaces with minimal effort, and power sanders equipped with dust collection systems speed up prep work while keeping the workspace cleaner.
If you don’t plan to use advanced equipment regularly, renting these tools can be a cost-effective option.
| Project Scale | Essential Tools | Investment Range | Best For |
|---|---|---|---|
| Small Repairs | 6-inch taping knife, mud pan, sanding sponge/block | $30–$120 total | Patching holes, minor repairs |
| Medium Projects | 6-inch, 10-inch, 12-inch taping knives, inside corner tool, sanding pole | $50–$200 total | Basements, multiple rooms, larger walls |
| Large Jobs | Automatic taper, drywall banjo, flat box, power sander | $300–$1,500+ | New construction, commercial work |
The bottom line? Choose your tools based on how often you’ll use them and the size of the project. Occasional DIYers can stick to quality basics, while professionals handling frequent large-scale work will benefit from investing in advanced equipment.
Important Features in Drywall Finishing Tools
When it comes to drywall finishing tools, the key factors to consider are material quality, comfort, and durability. These elements play a huge role in ensuring your tools meet the demands of your project and your skill level. By understanding these features, you can make smarter choices, save money, and achieve smoother finishes.
Material and Build Quality
The material of your taping knives and mud pans directly affects their lifespan and performance. For most drywall finishing tools, stainless steel blades are the top choice. They resist corrosion and hold their edge well, making them perfect for regular use or humid spaces like basements[4].
Carbon steel blades, on the other hand, are known for their sharpness and lower upfront cost. However, they’re prone to rust and demand more care. If you go with carbon steel, it’s essential to clean the tools immediately after use and apply oil as needed to prevent corrosion[4].
Durability is another critical factor. Tools with solid construction maintain their shape and sharpness over time, which directly impacts the quality of your finish. Poorly made tools can warp, rust, or even break, leading to uneven results and additional costs for replacements[2].
| Material | Durability | Corrosion Resistance | Edge Sharpness | Maintenance | Cost |
|---|---|---|---|---|---|
| Stainless Steel | High | Excellent | Good | Low | Moderate-High |
| Carbon Steel | Medium | Poor | Excellent | High (requires care) | Low-Moderate |
| Composite/Plastic | Medium | Excellent | Fair | Low | Low-Moderate |
Beyond blade materials, the handle design significantly influences your comfort and performance.
Comfort and Handle Design
The handle design of a tool becomes especially important during long projects. Poorly designed handles can lead to hand fatigue, slowing you down and affecting the quality of your work. Ergonomic handles with non-slip grips and cushioned surfaces are a game-changer. They provide better control and reduce strain during extended use[4].
Look for handles with soft, contoured designs that fit comfortably in your hand. These features help prevent blisters and reduce strain, making them ideal for all-day tasks[2]. Adjustable handles can also be a great option, as they allow you to customize the fit for maximum comfort.
For example, the Level 5 stainless steel taping knives are highly rated on Amazon, with a 4.8/5 score from over 2,000 reviews. Users frequently highlight their balance, comfort, and durability, underscoring how a well-designed handle can enhance your overall experience[4].
Maintenance and Cost Considerations
Stainless steel tools are relatively low-maintenance. A simple routine of cleaning them with water and drying thoroughly is usually enough to prevent residue buildup and extend their lifespan[4]. Carbon steel tools, however, require more attention. They need to be cleaned immediately after use and oiled to prevent rust[4]. For automatic tools, make sure to lubricate any moving parts as needed[1].
Costs for drywall tools vary based on material and features. Basic stainless steel taping knives typically cost between $8 and $20, while mud pans range from $10 to $25[4]. Corner tools and specialty blades can cost anywhere from $15 to $40[4]. While higher-priced tools often come with better materials and features, they also tend to last longer and deliver better results.
Investing in quality tools can save you money in the long run by reducing replacements and ensuring a polished finish. Common issues with poorly maintained or low-quality tools - like rust, dull blades, loose handles, or residue buildup - can lead to uneven finishes, extra labor, and even tool failure[4].
If you’re a casual DIYer, you can stick to reliable basics within the $30 to $120 range. However, professionals who frequently tackle drywall projects may find it worthwhile to invest in premium tools. Though they come with a higher upfront cost, these tools deliver superior performance and durability over time.
Organizing and Managing Your Drywall Tools
Once you've selected the right drywall finishing tools, keeping them organized is key to working efficiently and extending their lifespan. Without a proper system, you risk delays, added costs, and unnecessary frustration. Whether you're a DIY enthusiast or a seasoned contractor, a well-thought-out organization strategy can save you time, energy, and headaches on every project.
Why Keeping a Tool Inventory Matters
Having a detailed inventory of your tools can make drywall projects run much smoother. Did you know that misplaced tools can cost workers up to 30 minutes a day? That’s time you could be using to get the job done[2]. A good inventory system lets you quickly see what tools you have, which ones need repair, and what might need replacing - helping you avoid unnecessary downtime and extra expenses. For professionals, this can directly impact jobsite efficiency and profitability.
Contractors who adopt digital inventory systems have seen tool loss drop by 25% and project completion times improve by 15%[2]. Knowing exactly where your taping knife or sanding tool is stored means less time searching and more time working.
Practical ways to organize your tools include using labeled bins for different categories, setting up pegboards, or dedicating shelves for items like mud pans and sanding tools. On larger jobsites, a check-in/check-out system can help reduce loss and boost accountability. Regularly auditing your tools also helps spot damaged items before they slow you down. For instance, one drywall contractor cut tool loss by 30% in just six months after switching to a digital inventory system. They reported faster project setups and fewer delays caused by missing equipment[2]. These traditional methods are now being enhanced with digital solutions.
How Toolstash Simplifies Tool Management
Toolstash takes tool management to the next level with its user-friendly digital platform, designed for both professionals and DIYers. One standout feature is AI Snap, which lets you add tools to your inventory by simply snapping a photo. The system identifies and categorizes your tools automatically, saving you from tedious manual entry.
The platform organizes tools into logical groups, making it easy to find what you need - whether it’s a taping knife, mud pan, or sanding block. With its location tracking feature, you’ll always know where each tool is stored, whether in a workshop or scattered across multiple jobsites. You can even assign and update storage locations as needed.
Another handy feature is the lending and borrowing tracker. It keeps tabs on tools you’ve shared with coworkers or friends, ensuring they’re returned in time for your next project.
Here’s a quick look at how Toolstash stacks up against manual tracking:
| Feature | Manual Tracking | Toolstash Digital |
|---|---|---|
| Tracking Accuracy | Low | High |
| Time Efficiency | Low | High |
| Categorization | Manual sorting | AI-powered |
| Location Tracking | Memory/notes | GPS/Smart tags |
| Lending Management | Paper/verbal | Automated |
| Data Security | Low | Cloud-based |
Toolstash also offers project planning tools tailored to drywall work. Its AI chat feature provides instant advice based on your current inventory, making it a helpful resource for both beginners and experts. The platform tracks purchase dates, maintenance schedules, and usage history, so you can plan replacements and budgets with ease. All your data is stored securely in the cloud, with privacy settings that let you share information only with trusted contacts.
Just like using the right tools is critical for achieving a smooth drywall finish, managing those tools effectively is essential for keeping projects on track. For contractors, the advanced features in Toolstash can lead to noticeable improvements in productivity and cost management, offering a practical solution to the everyday challenges of tool organization in construction.
Conclusion: Making the Right Choice for Your Drywall Finishing Tools
Choosing the right drywall finishing tools comes down to three main things: understanding your project needs, picking tools suited to your skill level, and maintaining them properly to ensure they last.
For small repairs, you’ll typically need just a 6" taping knife, a mud pan, and a sanding sponge. Medium-sized projects, like finishing a single room, benefit from adding tools like skimming blades and corner tools, which can help you work faster and achieve a cleaner finish. For large-scale jobs or commercial projects, investing in automatic tools like tapers and flat boxes can make a huge difference - they can boost taping speed by as much as 300% compared to manual methods[4]. If you’re a beginner, stainless steel hand tools are a great starting point because they’re easier to handle and more forgiving[4]. For seasoned pros, semi-automatic tools can save time and effort.
When building your toolkit, focus on quality over quantity. Look for tools made from stainless steel with ergonomic handles, as these are designed to reduce hand strain during long periods of use[4][2]. Whether it’s a skimming blade for that perfect final coat or knives tailored to each stage of the process, investing in the right tools ensures consistent, professional results[4].
Don’t underestimate the value of proper tool care and organization. Cleaning your tools right after use prevents compound buildup and extends their lifespan[1]. Keeping your tools organized - whether through labeled bins or platforms like Toolstash - saves time and minimizes the chances of losing or damaging equipment.
Having quick access to clean, well-maintained tools can make all the difference. Whether you’re a DIY enthusiast fixing up your home or a contractor juggling multiple projects, investing in durable tools and managing them effectively helps cut down on waste, rework, and unnecessary labor time[2][4].
FAQs
What are the advantages of using automatic drywall finishing tools for larger projects?
Automatic drywall finishing tools are a game-changer when it comes to saving time and energy, especially on larger projects. These tools are built to apply joint compound evenly and efficiently, cutting down on manual work while delivering a smooth, professional finish.
With automatic tools, you can ensure consistent results across expansive surfaces, reduce mistakes, and speed up the entire process. Although the initial cost might be higher, the boost in productivity and the reduction in physical strain make them a smart investment for contractors or even DIY enthusiasts working on sizable tasks.
How do I choose the right drywall finishing tools for my skill level and project?
Choosing the right drywall finishing tools boils down to your skill level, the project's scope, and the finish you’re aiming for. If you're just starting out, stick to basic essentials like a taping knife, mud pan, sanding sponge, and joint compound. These tools are straightforward to handle and ideal for small fixes or simple finishes.
For those with more experience or tackling bigger projects, specialized tools can save time and improve precision. Tools like a corner trowel, drywall sander, or a drywall banjo can make a noticeable difference in efficiency and results. Before diving in, make sure you're comfortable with the tools and take time to practice. Opting for high-quality tools can also make the job easier and help you achieve a polished, professional look.
How can I maintain and organize my drywall finishing tools to make them last longer?
To keep your drywall finishing tools in top shape, it's essential to clean them thoroughly after every use. Use water and a brush to remove any leftover drywall compound or debris, and make sure they are completely dry before storing them. This simple step helps prevent rust and other damage.
Store your tools in a dedicated toolbox or a specific storage area to keep them organized and protected. Using labeled compartments or racks can make it easier to find what you need quickly. Take a moment to regularly check your tools for any signs of wear or damage. Repair or replace anything that's no longer in good working condition to ensure both safety and efficiency.
By taking these steps, you'll not only extend the life of your tools but also make your projects run more smoothly. A little care and organization go a long way in keeping your workflow hassle-free.