Features
- Bates Paint Tray Liners Are Convenient For Switching Between Paint Colors, Ensuring A Faster Job
- Paint Tray With Form-Fitting Design That Resists Cracking And Helps To Prolong The Life Of Your Paint Tray
- Its Made Of Plastic, Eye-Catching Color Makes It A Stylish Addition To Your Collection
- No Need To Clean Up After Painting, Simply Wipe Out Excess Paint And Lift Out
Specifications
| Color | White |
| Size | 10 Pack 9 Inch |
| Unit Count | 20 |
Related Tools
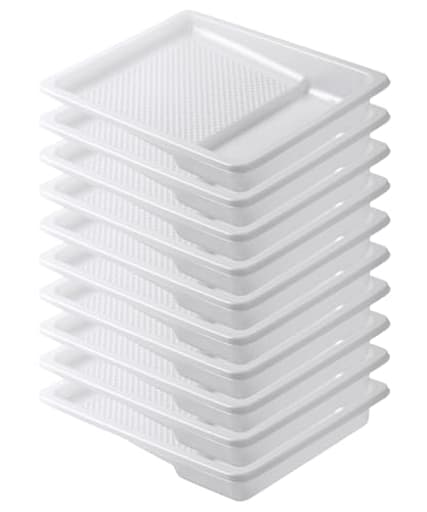
Disposable 9-inch plastic paint tray liners (10 per pack) designed to fit standard 9-inch roller trays and protect the tray from paint. The form-fitting liners resist cracking and help reduce wear on the tray, and they simplify color changes and cleanup—wipe out excess paint and lift the liner away. The liners are white.
Bates Choice Bates- Paint Tray Liner, 9 Inch, 10 Pack, Paint Roller Tray, Disposable Plastic Paint Trays, Paint Pans Trays, Paint Supplies for House Painting, Roller Tray Review
I picked up the Bates 9-inch tray liners for a weekend of trim and wall refresh, mostly to avoid the sink-scrubbing ritual my metal trays usually demand. After several gallons of latex, a couple of color changes, and a mix of 3/8-inch and 1/2-inch nap rollers, here’s how they performed and where they stumble.
What they are and how they fit
These are disposable, white plastic liners sized for standard 9-inch roller trays, sold in a 10-pack. They nest snugly together out of the bag and slide into a typical stamped steel tray with minimal fuss. In one of my older metal trays (classic chevron-ramp style), the liner seated well and stayed put. In a slightly larger plastic tray I also use, the liner was a touch short lengthwise and had a tendency to creep under harder rolling pressure.
Two quick fixes helped:
- A small strip of painter’s tape under the lip at the front (the shallow end) to anchor the liner to the tray.
- Stacking two liners together for extra stiffness when I knew I’d be rolling aggressively with a fuller nap.
Both tricks take seconds and eliminate most shifting, but it’s worth noting: if your tray is oversized or nonstandard, expect some play. For standard stamped metal trays, the fit was essentially turnkey.
Rolling performance
The ramp has molded ribs that do what they’re supposed to: pull excess paint off the roller and even out the load before you hit the wall. With wall paint (interior acrylic latex), the roller picked up cleanly, and the ribbing helped avoid the heavy edges you get when the well is too smooth. Overfilling any tray will defeat the ridge geometry, so I stuck to a modest fill level—enough to submerge 1/3 to 1/2 of the roller circumference at most—then worked up the ribs to even things out.
I did notice two quirks:
- If you really lean on the roller—say, chasing stipple into a textured ceiling—the liner can shift slightly in a tray that isn’t a perfect dimensional match. Anchor it and you’re fine.
- With oil-based coatings, the surface feels slicker. It’s not unusable, but the combination of slick paint and thin plastic makes a firm hand more important. I found the best approach was lighter pressure and more passes on the ribs.
In normal interior wall work with latex, loading and rolling felt familiar and predictable.
Material and durability
These liners are on the thinner side, which is typical for disposable trays. They’re not brittle; I had no cracking, even when I flexed the corners to pop them out with dried residue. But they are clearly designed to live inside a rigid tray. Don’t try to carry a full paint load by the liner alone. Always support the weight with the underlying tray.
For short breaks (a lunch run or a same-day room switch), I sealed the liner and roller under a plastic sheet and pressed the air out; everything stayed workable for hours. For multi-day pauses, I prefer swapping to a fresh liner, but you can keep using the same one if it’s the same color and you seal it properly. If paint dries in the liner, it releases fairly easily with a little flexing, but you’ll shorten the liner’s life—these are meant to be tossed.
Cleanup and disposal
The core value proposition is simple: wipe down the excess, lift the liner, and your tray is clean. That’s exactly what I experienced. On bigger color changes, I scraped excess paint back into the can with a plastic putty knife and used a rag to remove the last skim. I let residual paint dry in the liner before disposal and followed local guidelines for dried latex. If you work with oils or alkyds, don’t store strong solvents in the liner; decant what you need, then dispose of the liner appropriately after the job.
One side benefit: because your metal tray doesn’t meet water and soap repeatedly, it avoids rusting and stays flatter over time. That matters if you’ve ever had a tray warp or develop a permanent wobble after a vigorous clean-out.
Visibility and color control
The white plastic is more than cosmetic. I found it easier to judge paint tint and contaminants (a stray bristle or dried chip) against a white background. It also makes it obvious when you’ve fully purged a previous color before switching.
Fit notes and best practices
- Check your tray: “9-inch” refers to the roller width, not a universal tray footprint. If you’ve got a jumbo or deep-well tray, expect a looser fit.
- Anchor lightly: a strip of painter’s tape on the underside lip or a small spring clip on the back edge keeps everything locked without damaging the tray.
- Avoid overfilling: thicker paint levels can float the liner slightly. Keep the well filled modestly and use the ramp to meter the load.
- Stack for rigidity: nesting one extra liner under the one you’re using stiffens the floor and minimizes flex. This is helpful with heavier nap rollers or textured surfaces.
- Don’t carry by the liner: always support the tray itself when moving with paint.
Where they shine
Fast color changes are the main win. I flipped from wall color to trim and back again without a sink trip, and it made working in tight rooms simple—no splashy washouts in a tiny powder bath. They also shine on patch-and-paint days where you’re in and out of spaces quickly. If you’re a homeowner working through several rooms in a weekend, the minutes saved at each reset compound into real time.
Where they struggle
These aren’t heavy-duty liners. If your work calls for high-pressure rolling with thick, textured coatings (block filler, epoxy floor paint) or you use oversized deep-well trays, you’ll want a heavier-gauge liner or a molded hard plastic tray you don’t mind cleaning. Similarly, oil-based coatings make the surface feel slicker; it’s manageable with technique, but not ideal.
Value
On a per-liner basis, the cost is low enough that the break-even versus tray cleanup happens after a single use for most people, especially if you value time and don’t have a utility sink near the work area. For pros, the ability to switch colors without contamination and move straight to the next task is the bigger advantage. For DIYers, it’s the mental load reduction: no end-of-day cleanup dread.
Pros
- Fits standard 9-inch metal trays well; quick to swap in and out
- Ribbed ramp meters paint evenly and helps prevent heavy edges
- Cuts cleanup to seconds; keeps your tray essentially new
- White color improves visibility for tint and debris
- Affordable for multi-room or multi-color projects
Cons
- Thin-walled; relies on the tray for structure and can flex if overfilled
- Can slide in oversized or nonstandard trays without a small anchor
- Feels slicker with oil-based paints; requires a lighter touch
- Not ideal for deep-well or jumbo trays and very heavy coatings
The bottom line
The Bates liners do exactly what I hoped: they convert a paint tray from a tool I have to scrub into one I essentially never clean. In standard 9-inch metal trays with latex paints, the experience is smooth and efficient, and the ribbing and visibility are genuinely helpful. The trade-offs are straightforward—these are disposable and thin, so anchor them if your tray is roomy, don’t overfill, and don’t expect them to behave like a rigid pan on their own.
Recommendation: I recommend these liners for DIYers and pros working with standard 9-inch trays who prioritize fast color changes and minimal cleanup, especially with interior latex. If you primarily use oil-based coatings, oversized or deep-well trays, or you roll with a very heavy hand on textured substrates, consider a heavier-gauge liner or a reusable hard tray. For everyone else, these are a simple, inexpensive upgrade that keeps projects moving and trays clean.
Project Ideas
Business
Fast-Change Painter Service
Build a painting business focused on quick color changes for commercial and short-turn residential jobs by using disposable 9" liners. Market the service as faster, cleaner, and lower-downtime—clients appreciate minimal mess and faster turnover. Buy liners in bulk to reduce per-job costs and emphasize professionalism (no color contamination, quick cleanup).
Workshop & Party Kits
Create and sell DIY workshop or party kits for paint-pouring, resin-making, or kids’ craft parties that include a tray liner per participant. Position kits as turnkey: liners provide hygienic, easy cleanup stations so hosts don’t worry about mess. Offer themed kit bundles (holiday, wedding favors, kids’ birthday) and supply branded liners for repeat marketing.
Contractor Bulk Supply + Branding
Offer co-branded or bulk-packaged tray-liner bundles to local contractors, decorators, and property managers. Sell by the case with volume discounts and optional printed branding on the outer packaging. Emphasize the liners’ ability to extend tray life, reduce labor time for cleaning, and prevent color contamination—sell the cost-savings per job.
Etsy Craft Supply Packs
Bundle liners into craft-supply packs targeted to small makers (resin artists, soap makers, candle makers). Position liners as essential single-use tools for tidy production runs. Include usage guides showing how to use liners as resin trays, pigment palettes, or mixing wells. Sell in themed quantities (e.g., ‘Party of 10’ or ‘Studio Pro 50-pack’) and upsell with complementary supplies like disposable stir sticks.
On-Site Color Sample Service
Start a color-sampling business where you bring small test panels and pre-lined trays for clients to try multiple paint colors in a single visit. Use the liners to rapidly switch paints without cross-contamination—ideal for designers and real-estate staging. Charge per visit or per room and emphasize professional presentation and fast cleanup as selling points.
Creative
Disposable Pour-Paint Palettes
Use a 9" liner as a disposable palette for acrylic pour or fluid art experiments. The pre-textured surface and shallow well hold paint mixtures, and when a color is finished you simply lift and discard the liner—no cleanup. The white background helps you judge color opacity and blending. Cut the liner into smaller sections to make single-use cups for paint-pouring mini canvases or coasters.
Resin Casting Dish
Turn a tray liner into a low-cost, single-use resin pouring tray for small pieces (pendants, magnets, coaster blanks). The liners resist cracking, so they hold up while resin cures, and because they’re disposable you avoid sticky cleanup. The white color makes it easy to spot bubbles or color shifts. Use heat-gun passes over the liner to pop bubbles and then peel away the cured resin when ready.
Kid-Friendly Paint Stations
Create individual child paint stations for classroom or party crafts by taping a liner down to a table as the paint surface. Each child gets a liner to mix colors and rinse brushes; at the end you lift and toss. The liners save towels and stop spills from reaching the tabletop, and the white backdrop helps kids see true colors while mixing.
Patterned Pour Molds (Textured Prints)
Use the liner’s form-fitting, textured surface as a printing matrix for monoprints or texture-pour pieces. Spread paint or ink in the liner, press paper or thin wood veneer into it to pick up the texture, then remove and discard the liner. This is a fast way to get repeatable textured backgrounds for greeting cards, mixed-media art, or scrapbooking.
Temporary Hardware & Parts Organizer
When doing small craft builds (model kits, jewelry, or furniture assembly), lay down a liner and use its shallow wells to separate screws, beads, or small parts by step or color. After the project you fold and toss the liner—no lost parts on the floor and minimal cleanup. The bright white makes it easy to spot tiny items.