Features
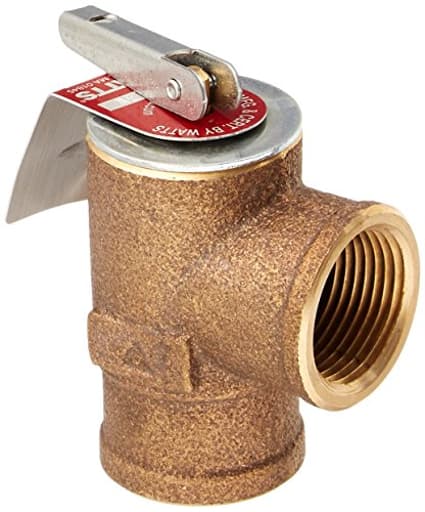
- Female pressure relief valve
- Inlet (in): 3/4
- Outlet (in): 3/4
- BTU: 510,000
- Pressure (psi): 30
- BTU: 510,000
- Inlet (in): 3/4
- Outlet (in): 3/4
- Pressure (psi): 30
Specifications
| Unit Count | 1 |
Bronze pressure relief valve with 3/4-inch female inlet and outlet connections, set to open at 30 psi. It protects closed hydronic or boiler systems by discharging excess pressure and is sized for systems up to 510,000 BTU.
Watts 0342691 30 PSI Pressure Relief Valve, Bronze, 3/4" 335 M2-030 Review
Why I chose this relief valve
I replaced a tired boiler relief valve last heating season after noticing a slow, persistent drip at the discharge line. My hydronic system is conventional: closed-loop, 30 psi design, and 3/4-inch safety relief tapping. I wanted a straightforward, bronze-bodied valve without extras—a part that would thread in, hold tight, and open at the correct set pressure. The Watts valve checked the boxes: 30 psi set pressure, 3/4-inch connections, and a generous 510,000 BTU rating that easily exceeds the input of most residential and light commercial boilers.
Beyond specs, I liked that it’s a no-frills, serviceable design. Relief valves aren’t a place for gimmicks; they’re a place for predictable operation and clean reseating. That’s exactly what I’ve seen in use.
Build quality and design
The body is bronze, with clean machining on the threads and a positive-feeling test lever. The spring action feels stout but not sticky—when you work the lever during maintenance, it opens decisively and snaps back cleanly. The bonnet and lever components are robust; nothing about it feels flimsy or like it would loosen up with normal handling.
The valve I installed is female 3/4-inch on both inlet and outlet. This meant I used a short brass nipple to mate it to my boiler’s tapping and then attached a full-size discharge tube to the outlet. The form factor is compact enough to fit in tight boiler jackets, though you’ll still want to check lever clearance against flue pipes, cabinet panels, or nearby air separators. The outlet is oriented for a straight run of discharge piping down to a floor drain, which keeps installation tidy.
Installation and setup
I swapped the valve as part of a routine service call, and the process was straightforward:
- Shut down power and fuel, let the boiler cool, and isolate the system.
- Drain the system to drop the water level below the relief valve tapping, and bleed pressure to zero.
- Remove the old valve with a backup wrench on the boiler fitting to avoid twisting the casting.
- Prep the threads. I used PTFE thread tape on the male nipple—enough wraps to seal without bunching. You can use tape or a compatible pipe sealant, but keep it off the first couple threads so you don’t push debris into the valve body.
- Thread in the nipple, then the valve, ensuring the valve is installed vertically with the spring chamber upright and the outlet pointing down.
- Install a full-size (3/4-inch), unobstructed discharge line to a safe, visible termination (no valves, no reductions), typically within a few inches of the floor or over a floor drain.
- Refill, purge air, and bring the system back online. I then watched for leaks and checked the boiler gauge as the system warmed.
Everything sealed on the first try with tape alone. No weeping at the threads and, more importantly, no “seat chatter” or post-cycle drips from the valve itself.
Performance under normal operation
Under normal heating cycles, my system tops out around 20–22 psi at temperature. The valve stayed quiet and dry through repeated firing cycles. I look for two things with a relief valve: it shouldn’t be a chronic weeper, and if it ever has to lift, it should reseat and stay sealed.
During annual maintenance I did a controlled lift using the test lever after confirming clean water and a clear discharge line. The valve opened promptly with a firm pull, discharged cleanly, and then reseated without any persistent drip. That smooth reseat is what separates a valve you forget about for years from one that becomes a nuisance a week after installation.
A note from experience: if your hydronic water is dirty—rust, magnetite, or other debris—it’s easy for grit to lodge on the seat after a lift. If you think your water quality is questionable, flush the system or the valve outlet before testing with the lever. I also like to check the expansion tank precharge and condition at the same time; a failed expansion tank is a common culprit behind frequent relief valve openings.
Sizing and compatibility
This valve is set to 30 psi and has a 3/4-inch inlet and outlet, making it suitable for standard hot-water (hydronic) boiler systems—not steam. The 510,000 BTU capacity is more than enough for the vast majority of residential boilers and many light commercial units. When sizing, make sure:
- The set pressure (30 psi) matches your boiler’s design and nameplate.
- The connection size (3/4-inch) matches the boiler tapping.
- The relief capacity (BTU rating) is equal to or greater than your boiler’s input rating.
In my case, pairing this valve with a ~120,000 BTU boiler was a non-issue. If your boiler’s input is higher, confirm the capacity—this model’s rating gives plenty of margin.
Day-to-day reliability
I installed the valve mid-season and ran it through a full heating cycle as well as shoulder-season operation. It’s stayed bone dry with no intermittent weeping. Pressure readings have been consistent, and it hasn’t chattered or lifted unexpectedly. That’s how a relief valve should behave: invisible until you need it, and drama-free afterward.
It’s also held up well physically. The lever action remains crisp, and the finish hasn’t oxidized beyond the normal bronze patina. I don’t expect to touch it again until the next annual service.
Safety and best practices
A few practical reminders from the field:
- Install vertically with the discharge pointed down.
- Use a full-size discharge tube, no valves or restrictions, and terminate in a visible, safe location.
- Don’t reduce the discharge size; keep it 3/4-inch all the way.
- Keep sealants out of the valve inlet threads to avoid fouling the seat.
- If you manually test the lever, do it during maintenance, and only when you’re prepared to flush out any debris. Avoid “just to see” tests in the middle of the season.
- If the valve lifts, investigate root causes: expansion tank issues, overfilling, a failed pressure reducing valve, or an overheated boiler.
What I liked
- Simple, reliable operation with a clean reseat
- Bronze construction and good machining on threads
- Generous 510,000 BTU capacity for broad compatibility
- 3/4-inch connections that match common boiler tappings
- Easy installation and no fuss sealing with PTFE tape
What could be better
- The test lever can be a knuckle-scraper in tight compartments; plan your clearances.
- Female inlet means you’ll likely need a short nipple; not a problem, but one more fitting to have on hand.
- As with any relief valve, dirty system water can cause post-lift weeping—address water quality before testing.
Who it’s for
If you’re maintaining a standard closed-loop hot water heating system that calls for a 30 psi safety relief, this is a sensible, right-sized option. It’s well suited for homeowners comfortable with basic hydronic maintenance and pros who need a reliable, off-the-shelf replacement. It’s not for steam boilers or systems requiring a different set pressure.
Recommendation
I recommend this Watts relief valve. It’s a straightforward, well-built part that installs easily, opens at the right pressure, and—most importantly—reseats without nagging drips. The 510,000 BTU rating covers a wide range of boilers, and the 3/4-inch connections make for a clean, code-compliant installation with standard fittings. If you match the set pressure and capacity to your boiler, pipe the discharge correctly, and keep up with system maintenance, this valve should provide years of quiet, dependable service.
Project Ideas
Business
Boiler safety replacement service
Offer a local service specializing in inspecting and replacing 30 psi relief valves and other hydronic safety components. Package the valve with installation, leak testing, and a small maintenance plan—market to homeowners with older boilers and small commercial properties. Emphasize compliance with local codes and provide documentation.
Boutique steampunk fixtures line
Design and sell a line of lighting and bathroom fixtures built around authentic bronze relief valves and matching fittings. Create product photos showcasing finished pieces in vintage and modern interiors, sell through an online shop and craft marketplaces, and offer custom finishes (polished, aged, lacquered).
DIY hydronic safety kits
Assemble plug-and-play safety kits for DIYers and small contractors that include a 30 psi relief valve, necessary fittings, clear installation instructions, and a troubleshooting guide. Position them as time-saving, code-aware solutions for common closed-loop hydronic systems—sell kits in multiple sizes and include optional on-call phone support.
Upcycled home-decor brand
Source surplus/used pressure relief valves, clean and patina them, and create a branded line of upcycled home goods: lamps, hooks, fountain kits, and tabletop sculptures. Use storytelling about reclaimed industrial parts in marketing and sell via Etsy, local boutiques, and craft fairs.
Small-farm irrigation & greenhouse protection
Develop pressure-management packages for small farms and greenhouses that protect drip irrigation and small heating loops. Include the 30 psi relief valve as part of a system that prevents line damage, plus installation, periodic inspections, and seasonal tune-ups. Offer on-site assessments and recurring maintenance contracts.
Creative
Steampunk desk lamp
Turn the bronze pressure relief valve into the base and visual centerpiece of an industrial-style lamp. Mount an Edison bulb socket to the valve body, use the inlet/outlet threads to attach decorative pipe arms, and repurpose the relief lever as an on/off toggle. The bronze finish already gives an authentic antique look—add a patina or polish depending on the style.
Mini tabletop fountain spout
Use the valve body as a decorative spout on a small recirculating fountain. Feed a low-pressure pump into the inlet and route water out the outlet so the bronze valve becomes an elegant nozzle. Seal or lock the internal relief mechanism for decorative use only and include a small catch basin and pump housing for a compact desktop fountain.
Industrial hardware & hooks
Mount the valve to a wooden or metal backplate to create heavy-duty coat/towel hooks or drawer pulls. The valve's solid bronze body and threaded ports make attractive, durable accent hardware for bathrooms, mudrooms, or barn-style cabinetry.
Kinetic sculpture / mechanical art
Combine several valves with pipe, gears, and reclaimed machine parts to build a mechanical sculpture or rotating art piece. Use the valve shape and lever as visual elements; the weight and finish of the bronze make for striking industrial sculptures suitable for galleries or office lobbies.
Gravity-fed garden pressure safety feature
Integrate the valve as a visible pressure-safety device on a gravity-fed rainwater or small-pump garden system. Plumb it so any overpressure vents safely to a visible drain, giving both function and an industrial aesthetic. Note: install without modifying the safety internals and keep the discharge directed to a safe location.