Features
- 【Application】All parts work for Febco 765 EBV 1" & 1-1/4" Backflow Preventer and Vacuum Breaker. Maximum working pressure: 150 psi. Perfectly replace for Febco OEM 905-212, 905-052 & 300-089. Replacement part for Febco 765-1 Repair Kit.
- 【905-212 Bonnet and Poppet Repair kit】Used to replace the broken Bonnet and Poppet and make your sprinkler system working again. Kit includes bonnet, O-ring, spring, E-ring, washer, stem, rubber disc, poppet.
- 【905-052 Check Valve Assembly Repair Kit】Part of the backflow protection device to prevent contaminated water from entering the clean water supply system. Contains 1*Holder, 1*Screw, 1*Disc And 1*Guide.
- 【Canopy/Bell Cover】Place the canopy on top of the metal screw and tighten the small nut just enough to hold the metal bell on the device and still rotate by hand with some tension. Notice: Don't overtighten.
- 【Material】Made of ABS and Steel , it is lightweight, hard and durable . Canopy is consturcted from Aluminum alloy with Anodized finish. With stable performance and reliable use and longer service life. Perfect replacement for febco 765 repair kit.
Specifications
| Size | 1.25 Inch |
Related Tools
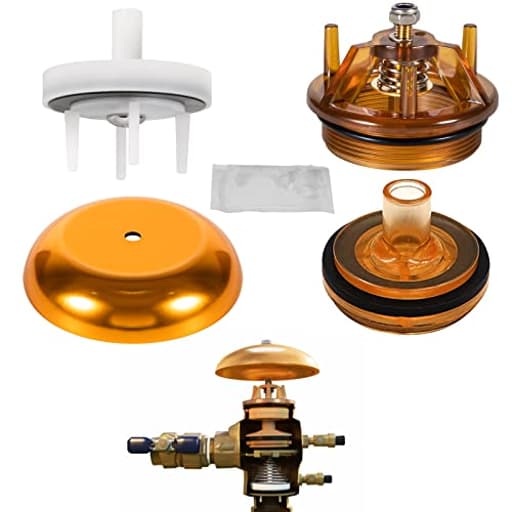
Repair kit containing replacement bonnet/poppet, check valve assembly and canopy components for 1" and 1-1/4" backflow preventers and vacuum breakers to restore valve sealing and anti-backflow function. Components are made of ABS, steel and anodized aluminum and include O-rings, springs, discs, stem, holder and fasteners; suitable for systems up to 150 psi.
Sunluway For Febco 765-1 Repair Kit, 905-212 Bonnet Poppet Repair Kit & 905-052 Check Valve Assembly & Canopy for Febco 765-1 inch & 1-1/4 inch Backflow Preventer and Vacuum Breaker Review
Why I reached for this kit
A cracked bell cover and a weeping bonnet on my Febco 765-1 vacuum breaker kicked off my spring irrigation checkup. I didn’t want to re-plumb an entire backflow preventer, so I tried the Sunluway repair kit—a bundled replacement for the bonnet/poppet, check valve assembly, and canopy that fits the 1-inch and 1-1/4-inch models. It promised a straightforward refresh of the moving parts and seals, and after using it, I’m convinced it’s the right approach for most homeowners and maintenance techs facing the same failure modes.
I’ll walk through what’s in the box, installation, where it shines, and where to be careful.
What’s included and what isn’t
The kit I received included:
- Bonnet/poppet assembly with O-ring, rubber disc, stem, spring, washer, and E-ring
- Check valve assembly (holder, disc, guide, and screw)
- Aluminum canopy (bell cover) with hardware
- O-rings pre-installed on the bonnet components
- Small packets of waterproof grease
You will reuse a couple of parts from your existing assembly:
- The retainer clip (the U-shaped keeper inside the body that centers the check assembly)
- The large stainless check spring that sits above the check (common on 765 units)
That’s not a drawback; those parts are typically stainless and outlast the wear components. Still, it’s worth noting so you’re not surprised mid-repair.
Fit and compatibility
This kit is sized for the Febco 765 EBV in 1-inch and 1-1/4-inch. The replacement parts matched my casting perfectly—bonnet threads, poppet travel, and check alignment all seated as they should. If you’re unsure of sizing, look for the embossed size on the valve body and the “765” marking. This is not for the 3/4-inch variant or other Febco models.
The 150 psi rating far exceeds what most residential irrigation systems see. I tested my system at 70–75 psi static; the new bonnet seal and check valve held without any weeping at the vent or test cocks.
Build and materials
- Bonnet/poppet and check components: ABS and steel. The ABS here feels dense and well-finished with clean molding lines. The stainless hardware is appropriately corrosion-resistant for outdoor wet environments.
- Canopy: Anodized aluminum, not plastic. It’s a nice upgrade over brittle old covers, and the anodizing should shrug off UV and weather better than painted pot metal.
The machining and molding tolerances were accurate. Threads started smoothly and O-rings sat flush in their grooves without rolling or pinching.
Installation: 20 minutes, a clean rag, and basic hand tools
My process looked like this:
1. Shut off upstream water and open test cocks to bleed pressure. If there’s a downstream shutoff, open a sprinkler zone briefly to relieve residual pressure.
2. Remove the canopy remnants. The kit includes a new bell cover, so don’t worry about salvaging a cracked one.
3. Back out the bonnet. The Febco bonnet can usually be loosened with a large flat screwdriver across the top slot or by carefully using slip-joint pliers. I prefer a flat screwdriver and steady pressure to avoid marring the body.
4. Note the order of internal parts as you pull the bonnet/poppet. Inside you’ll see the retainer clip that centers the check assembly—press it in, rotate, and it releases.
5. Lift out the stainless check spring and remove the check assembly.
6. Clean the internals. I used a nylon brush and a rag to wipe debris from the body, threads, and the O-ring seat. A light stainless brush helps on the retainer clip if there’s scale, but go gently to avoid gouging.
7. Grease sparingly. I used silicone plumber’s grease on the O-ring groove and threads. The included grease packets work too; avoid petroleum products that can swell rubber.
8. Drop in the new check assembly, reinstall the original retainer clip, and set the original check spring on top.
9. Install the new bonnet/poppet assembly and snug it down by hand until seated; then give it a firm final set. It shouldn’t require brute force.
10. Add the canopy. The small nut should be tightened just enough to secure the bell but still allow hand rotation with slight resistance. Over-tightening can bind or distort the cover.
11. Restore water slowly and check for leaks at the bonnet O-ring and the vent. If you see drips, stop, depressurize, and verify the O-ring isn’t twisted and that no debris sits on the sealing surfaces.
Tools that helped:
- Large flathead screwdriver or slip-joint pliers
- Nylon brush and a small stainless brush
- Silicone plumber’s grease
- Clean rag and a catch pan
From first shutoff to full pressure test, I spent under 20 minutes.
Performance and day-to-day use
The immediate goal was to stop the bonnet leak and restore proper check function. After install, the unit purged briefly during refill (normal) and then sealed. No weeping at the vent. Zone pressure returned to normal, and the system held static pressure without losing a pound overnight. Under cycling, the poppet travel is smooth and quiet—no chattering or sticking.
A month in, I popped the canopy to inspect the bonnet shaft. The silicone film was still intact, and there was no sign of abrasion on the new disc. The anodized bell hasn’t chalked or loosened. This is exactly what you want: a set-and-forget repair that brings the 765 back to baseline.
What I liked
- Accurate fit and complete core components. The combination of bonnet/poppet and check assembly covers the typical failure points.
- Quality materials for the price. ABS and stainless where it counts, and an aluminum canopy that won’t shatter like aged plastic.
- Straightforward DIY. No special tools, no pipe cutting, no re-plumbing.
- Thoughtful guidance in practice. The parts are oriented in a way that reduces installation errors (e.g., disc alignment and guide engagement are intuitive).
Where it could be better
- Clarity on reuse parts. The kit doesn’t include the internal retainer clip or the large check spring, and the packaging doesn’t call that out. Those parts are usually fine to reuse, but a note would prevent confusion.
- A touch more grease would be welcome. The packets are small; if your unit is dry and you want to coat threads, O-ring seats, and shafts, you’ll appreciate having your own silicone paste on hand.
- Instructions are minimal. Anyone comfortable with basic valve maintenance will be fine, but first-timers might appreciate a simple diagram showing the order of parts.
Tips to avoid callbacks and leaks
- Clean everything. Most post-install leaks come from debris trapped at the bonnet O-ring or on the check disc seat.
- Use silicone-based grease only. Petroleum products can degrade elastomers and swell O-rings.
- Mind the retainer clip orientation. It must seat with the prongs facing up to engage the lip in the body; if it’s upside down, the check won’t center correctly.
- Don’t overtighten the canopy nut. It should still rotate by hand with a bit of tension.
- Verify size and model before you start. This kit is for 1" and 1-1/4" Febco 765 EBV units.
Value and longevity
Bundling the bonnet/poppet and check assembly in one kit represents solid value compared with buying OEM components individually. Given the common failure modes—aged rubber, worn discs, UV-damaged covers—this kit hits the right parts. ABS/stainless/anodized aluminum is a sensible material mix for longevity outdoors. I can’t speak to multi-year durability yet, but the fit, finish, and early performance track with parts that should easily get you through multiple seasons.
One important note: Depending on your jurisdiction, annual backflow testing may be required by a licensed professional. While this kit restores function, compliance testing is a separate box to check.
Who it’s for
- Homeowners maintaining irrigation systems with a Febco 765-1 or 765 1-1/4
- Facility or grounds staff looking to refresh leaking units without re-plumbing
- Anyone whose canopy is broken, bonnet is leaking, or check valve is failing to seal
If your valve body is cracked, corroded through, or cross-threaded, no repair kit will save it—replace the entire assembly. But for intact castings with worn internals, this kit is ideal.
Recommendation
I recommend the Sunluway repair kit for owners of 1" and 1-1/4" Febco 765 units who want to restore proper sealing and backflow protection without replacing the whole assembly. It fits correctly, uses sensible materials, installs quickly with basic tools, and addresses the most common failure points. Just plan to reuse the internal retainer clip and the large check spring, have silicone grease on hand, and take a few minutes to clean the valve body before reassembly. The result is a reliable, cost-effective repair that brings an aging 765 back to spec.
Project Ideas
Business
On-call backflow quick-repair service
Offer a local, flat-rate repair service focused on Febco 765 backflow preventers and similar models. Stock these repair kits in a service van for same-day fixes to irrigation systems, targeting landscapers, property managers and homeowners to reduce downtime and prevent code violations.
Branded DIY repair kits with tutorials
Package the replacement bonnet/poppet, check valve assembly and canopy into a homeowner-friendly kit with printed instructions and short how-to videos. Sell through online marketplaces and local nurseries; add premium options like tool loaners or phone support for increased conversion.
Maintenance subscription for property managers
Create a recurring service where you audit irrigation/backflow devices, supply and install replacement parts on a schedule (seasonal pre-winterization and spring commissioning). Offer bundled pricing per property or per device to smooth cash flow and ensure compliance with local regulations.
Hands-on training courses for techs
Run paid workshops or certification prep classes for irrigation technicians using these kits as hands-on components. Teach diagnostics, safe disassembly/reassembly and record-keeping; partner with suppliers to provide trainees with starter toolkits and parts discounts.
Upcycled product line from surplus parts
Salvage excess or cosmetically imperfect repair-kit components to create small-batch upcycled goods (keychains, desk organizers, decorative spinners) and sell at farmers’ markets, craft fairs, or online. Market them as eco-conscious, industrial-chic items and offer custom engraving or branding for corporate gifts.
Creative
Mini garden water spinner
Use the anodized aluminum canopy as a decorative top, a spring as the spindle, and O-rings/discs as spacers to build a small hand-powered or water-driven spinner for planters or a birdbath rim. Finished with a bit of paint or patina, it becomes a rustic kinetic accent for a patio or garden.
Industrial keychains & zipper pulls
Turn anodized canopies, small discs, screws and steel hardware into rugged keychains or zipper pulls. Polish or patina the metal, thread with a short steel cable or leather strap, and secure with a small E-ring — quick, durable and great for gift bundles or market stalls.
Adjustable micro-dripper for pots
Repurpose the poppet, rubber disc and holder to make a simple manual dripper: the rubber disc provides a variable restriction and the poppet acts as an on/off/adjust regulator. Mount it in a short riser or bottle cap to create low-cost adjustable emitters for container gardening and drought-tolerant plantings.
Steampunk desk organizer
Assemble the canopy as a pen cup, use springs and stems as structural legs or pen separators, and feature O-rings and washers as non-slip feet and decorative rings. Add an oil-brushed finish and a wooden or acrylic base for a functional, conversation-starting desk piece.
Teaching/demonstration model
Create a clear acrylic-backed demonstrator that mounts the bonnet, poppet, check disc and holder so students or customers can see how a backflow preventer seals and operates. Label parts and add simple animations (spring compression, poppet movement) for workshops or storefront demos.