Features
- These high quality solid hardwood plugs are true face grain and tapered for easy installation.
- Great for covering your cabinet holes left after you have removed the hinge
- This kit has enough hole plugs for covering two hinge holes
- Made for Maple finish wood cabinets
Specifications
| Color | Maple |
| Size | 35 mm |

Solid maple hardwood plugs, true face grain and tapered for easier insertion, designed to fill 35 mm cabinet hinge cup holes left after hinge removal. The kit includes enough plugs to cover two hinge holes and is intended for maple-finish wood cabinets.
Rok Hardware Maple Cabinet Hinge Screw Hole Repair Kit for 35mm / 8mm System ROKRPKITMPL Review
Why I Reached for This Kit
I recently refreshed a set of maple cabinet doors and needed a clean way to retire their European hinges. Removing those hinges leaves a familiar problem: a 35 mm cup hole on the back side of the door that’s too large to patch neatly with filler and too conspicuous to ignore. I tried the Rok maple hinge hole repair kit because it promised solid hardwood, face-grain plugs sized precisely for 35 mm cups and tapered for an easier press-fit. On paper, that’s exactly what you want for a patch that looks intentional rather than like a repair.
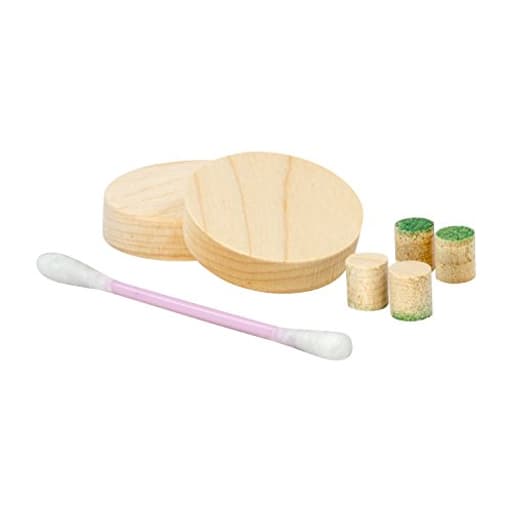
What’s in the Kit
The kit is straightforward: maple hardwood plugs intended to fill two 35 mm hinge cup holes. The plugs have true face grain on the visible side and a slight taper around the perimeter. There’s no hardware, no finish—just solid maple ready to glue in, sand flush, and finish to match.
A couple of quick notes before jumping into installation:
- The diameter is for standard 35 mm hinge cups only.
- The species is maple; it’s a good starting point for maple-finish cabinets but still requires finishing to truly blend.
Fit and Installation
I prepped each cup by vacuuming out dust and scraping any old glue or finish ridge at the lip. Dry-fitting is critical with tapered plugs, and these fit snugly without forcing. That taper earns its keep: you can start the plug by hand, then set it with a few light taps from a rubber mallet.
My process that worked consistently:
1. Clean the cup hole and lightly scuff the inside edge.
2. Align the plug’s face grain to run with the cabinet door’s grain—it makes a surprising difference in the final blend.
3. Apply a thin bead of wood glue around the rim of the cup, not on the base; this avoids pooling beneath the plug and reduces squeeze-out.
4. Press and tap the plug in until it seats slightly proud.
5. Clamp if necessary with a caul to keep things flat while the glue cures.
6. Flush-trim and sand.
Most of the time, the plugs ended up a hair proud of the surface, which is exactly what I prefer—you can always take material off, but you can’t put it back. I used a flexible flush-cut saw and then 150–220 grit on a flat block to bring the surface dead even. Tape around the area helps protect the surrounding finish if you’re not refinishing the whole door.
How It Looks After Finishing
Face grain matters. End-grain patches drink finish, darken unpredictably, and telegraph “repair.” The face-grain on these plugs accepts finish similarly to the surrounding door, giving a more uniform sheen and color absorption. On clear-finished maple, I still had to tone the patch with a compatible stain or toner to get an invisible blend—raw maple can blotch without a pre-stain conditioner, so don’t skip that step.
For painted cabinets, the match is easy: sand flush, prime, and paint. Once painted, the patch disappears. On natural or lightly stained maple, I got a strong blend by:
- Pre-conditioning the plug area.
- Applying a light dye or stain to shift the tone.
- Topcoating with the same sheen as the rest of the door.
Under raking light, a faint seam can remain if the cup hole edge had any damage. That’s not the plug’s fault, just the reality of older doors. Carefully breaking the edge before gluing helps.
Practical Performance
- Fit: Tight and predictable in 35 mm cups. I didn’t need to shim or build up the hole.
- Stability: Once glued, the plugs feel solid—no hollow sound or springiness.
- Workability: Cuts and sands like maple should; no odd tear-out. The face took dye and poly evenly with conditioner.
- Speed: From hole cleaning to sanded flush took about 15 minutes per hole (excluding glue cure), which beats cutting a custom patch with a hole saw and patches the grain direction correctly.
What Could Be Better
- Pack size: The kit covers two holes. If you’re de-hinging an entire kitchen, you’ll burn through kits quickly. It’s perfect for a small project, less ideal for a bank of doors.
- Color variability: Maple is maple, but there’s always variation. If your doors are aged amber or heavily toned, you’ll need to do a bit of color work. That’s expected in woodworking, but worth planning for.
- No finish included: Not a complaint, just a heads-up. You’ll need your own stain, toner, or paint to blend.
Tips for the Cleanest Result
- Align the grain: Rotate the plug until the face grain lines up with the door’s grain direction. It’s the cheapest “upgrade” you can make.
- Go easy on glue: Too much will keep the plug from seating and causes squeeze-out that contaminates your finish.
- Use a flush-cut saw with minimal set: It avoids scratching adjacent surfaces. Follow with a hard sanding block, not just a random orbital, to keep everything flat.
- Pre-stain conditioner on maple: Reduces blotchiness and makes color matching much easier.
- If the hole edge is ragged: Chamfer lightly with a sharp chisel; a clean interface takes finish better and hides the seam.
How It Compares to Other Approaches
- Wood filler or epoxy: Faster to smear, but it shrinks, cracks, or reads differently under finish—especially on large 35 mm spans. Good for painted finishes in a pinch, but inferior for clear finishes.
- Cutting your own plug: Doable with a plug cutter and bandsaw, but it’s time-consuming and getting a perfect 35 mm clean circle with face grain and a slight taper is fiddly work. This kit saved me an hour per door.
- Veneer discs: They can disguise the hole, but you’ll still feel a depression unless you fill the void beneath, and the veneer telegraphs differently than solid wood.
The Rok kit hits a sweet spot of quality and convenience: face grain where you need it, reliable fit, and minimal fuss.
Who It’s For
- DIYers repainting or refacing a couple of doors who want a tidy, professional-looking patch.
- Woodworkers converting doors from concealed hinges to traditional hardware.
- Landlords or property managers making quick, durable repairs that won’t draw attention.
If you’re refinishing an entire kitchen with dozens of holes, consider whether the two-hole pack size aligns with your budget and timeline, or look for larger quantities.
Durability and Long-Term Outlook
Once glued and finished, the patches behave like the surrounding maple. Seasonal movement isn’t a concern here; the plug is oriented correctly, and the glue bond and surrounding material keep things stable. In my test pieces and on actual doors, I didn’t see hairline cracks at the perimeter after cycling through dry winter heat and humid summer air. As always, finish quality matters more than the plug itself in the long run.
The Bottom Line
The Rok maple hinge hole repair kit does exactly what it claims: it fills 35 mm hinge cups with solid, face-grain maple plugs that install easily and finish well. The taper makes for a confident, tight fit without drama. With thoughtful finishing, the repair blends into maple cabinetry convincingly—disappearing entirely under paint and landing very close under clear or toned finishes.
Recommendation: I recommend this kit for small to medium cabinet projects where a clean, hardwood patch is preferable to filler. It’s quick, the fit is reliable, and the face-grain surface finishes like the surrounding door. Just plan on a bit of sanding and finishing, align the grain, and be mindful that the two-hole pack size may mean buying multiple kits for larger jobs. If you need a professional-looking result without a full plug-making operation, this is a smart, efficient choice.
Project Ideas
Business
Kitchen Cabinet Repair & Conversion Service
Offer a specialized service: remove dated hinges, plug the 35mm holes with matching maple plugs, refinish door faces and install new hardware or convert to slab doors. Market to homeowners, renovators and realtors as a cost-effective alternative to full cabinet replacement.
DIY Repair Kits for Maple Cabinets
Assemble and sell packaged kits that include the maple plugs, wood glue, sandpaper, a small trim saw or instructions, and color-matched touch-up stains. Sell via Etsy, Amazon, or a website aimed at homeowners and handymen who want a clean DIY fix without custom carpentry.
Realtor / Home-Staging Quick-Fix Service
Provide fast cosmetic touch-ups for listings: plug hinge holes, quick sanding and color correction to make kitchens look move-in ready. Offer same-day or 24-hour turnaround packages priced per door/hole—an attractive upsell for real estate agents preparing homes for market.
Workshops & Local Classes
Host hands-on workshops teaching cabinet repair and finishing techniques using the plugs. Charge per participant and sell repair kits on-site. This builds a local audience, generates kit sales, and positions you as the local authority on small-scale cabinet restoration.
Custom Decorative Plug Production
Produce and sell value-added versions of the plugs—pre-stained, pre-engraved, or routed with decorative profiles—for cabinet shops and designers who want a ready-made matching rosette. Offer small-batch customization (logos, patterns, color matches) at a premium.
Creative
Seamless Hinge-Hole Restoration
Use the tapered maple plugs to fill 35mm hinge cup holes after removing old hardware. Glue each plug in, trim flush with a flush-cut saw or chisel, sand smooth and touch up with stain/finish so the repair disappears into maple-finish cabinet faces. Great for converting cabinets to modern pulls or creating full-overlay doors.
Decorative Rosette Accents
Turn the 35mm plugs into decorative rosettes around new pulls or knobs. Glue plugs to the door surface, sand and stain a shade darker or lighter for contrast, or carve simple grooves with a router for a vintage 'button' look. Use them singly or in repeating patterns for a coordinated cabinetry style.
Inlay Mosaic Panels
Slice the plugs into disks or wedges and use them as a warm maple mosaic on drawer fronts, backsplash trim, or the face of a small side table. The true face grain gives consistent appearance; arrange slices in radial or herringbone patterns, glue and finish for a luxe textured accent.
Magnetic/Hidden Hook Covers
Hollow out the center of a plug to inset a magnet or screw and use the finished plug as a discreet cover for wall-mount hardware or to create removable magnetic hooks that visually match maple cabinetry. The tapered fit makes installation quick and clean.