
Features
- Multiple Uses: The Patiowell compact storage room is versatile, fitting perfectly in your backyard, garden, or anywhere you need. It can be utilized as a storage room or tool room, to keep your yard tidy
- Durable Material and Stable Structure Its strong construction and the thick galvanized steel we used make this shed long-lasting, non-corrosive, and UV resistant. The overlapped wallboard is waterproof and moisture-proof, making it suitable for usage in all-weather circumstances.
- Lockable Door and Sloping Roof: The lockable door provides security, keeps your tools away from being stolen, and avoids small animals from entering accidently. The sloping roof of this outdoor storage shed gives extra storage space while also preventing the rainwater accumulation and rusting.
- Protection Cap for Corners and Screws: The storage room is designed with plastic protective caps at the sharp corners of the ceiling and each screw, preventing any potential injuries during construction or use.
- Detailed Installation Instructions: The Patiowell storage shed comes with detailed installation instructions, and following the instructions allows for a quick and hassle-free setup.
- Note: 1. Please check your local HOA policy to ensure that it can be built. 2. The shed doesn't include base, you need to build it yourself if needed.
Specifications
| Color | Brown |
| Size | 5' X 3' |
Related Tools
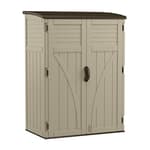
This 5' x 3' outdoor metal storage shed provides a compact enclosed space for storing garden tools and outdoor equipment. Constructed from thick galvanized steel with overlapped panels that resist corrosion, UV and moisture, it has a sloping roof to shed water, a lockable door for security, and plastic protective caps on corners and screws; a base is not included and must be provided separately.
Patiowell 5x3 FT Outdoor Storage Shed, Tool Shed with Sloping Roof and Lockable Door, Metal Shed for Backyard Garden Patio Lawn, Brown Review
Why I picked this compact metal shed
I needed a small-footprint, weather-resistant place to park yard tools that were slowly taking over my garage. The Patiowell shed in the 5-by-3 footprint looked like the right balance of size, price, and materials: galvanized steel panels, a sloping roof to shed water, a lockable door, and protective caps to tame sharp corners. After a few weekends of use and one long afternoon of assembly, here’s how it fared.
Design and build quality
This is a classic small metal shed: overlapped galvanized steel panels with a light-gauge frame, finished in a matte brown that blends into most yards. The sloping roof is simple and effective—water moves off quickly—and the overlapping wall panels do a decent job preventing wind-driven rain from finding its way inside. The door has a latch you can padlock, and plastic caps for corners and screws are included to reduce snag hazards once you’re done building.
Out of the box, expect thin panels that flex in the hand. That’s typical for sheds at this price and weight. A couple of panels had small shipping bends that I straightened by hand or with pliers. Nothing structural, and once everything ties together the stiffness increases dramatically. If you’re expecting pre-assembled, furniture-like fit and finish, this isn’t that. If you’re comfortable with light sheet metal and a nut driver, you’ll be fine.
Assembly: straightforward, not effortless
The shed doesn’t include a base, so plan your foundation first. I set mine on a level grid of pavers, then anchored the metal base rails to pressure-treated 2x3s sitting on the pavers. However you do it—concrete, a framed deck, or pavers—the key is to get it level and square before you lift a single wall panel. If your base goes out of square by even a quarter inch, hole alignment suffers later.
A few things made the build go smoother:
- Layout and labeling: I unpacked everything and grouped parts by number, which sped up finding the right pieces.
- Orientation discipline: Many parts are symmetric until you notice a notch or a hole pattern that matters later. I triple-checked the orientation before committing screws.
- Driver clutch: I set my drill/driver on a low clutch to avoid stripping thin sheet-metal threads.
- Safety: Wear gloves. The steel edges are cleanly cut but still sharp during assembly.
Working solo, I pre-assembled the base, the top wall channels, and roof beam pieces. Raising and bracing two corner panels is the awkward part; one extra set of hands helps for an hour during that phase and for setting the roof panels. Total time for me, including the base work and light sealing, was about five hours. Expect faster if you’ve built one before, slower if you haven’t.
Hole alignment was mostly good. I had a handful that required a little persuasion from a scratch awl or stepping the screw in at a slight angle to catch the first thread. On one panel I preferred to drill a clean pilot rather than force a misaligned hole. That’s normal with light-gauge kits like this.
Weatherproofing and sealing
The sloped roof does its job, but the weak point on most budget metal sheds is roof fasteners. The included screws work, but if you live where rain is frequent, consider upgrading exposed roof screws to self-drilling metal-roof screws with neoprene washers (#10 diameter is ideal). I swapped mine during assembly and lightly snugged them to compress the washer without stripping the metal. I also ran a bead of exterior-grade silicone along the outside perimeter where the base meets the foundation, and dabbed silicone at panel seams I could see daylight through before the roof went on. After two solid rains, the interior stayed dry.
If you’re in a windy area, anchoring isn’t optional. Once assembled, the shed is light enough to lift with help, which is great for repositioning but not great in gusts. I drove masonry anchors through the base into the pavers/ground frame at roughly 12-inch intervals. Zero racking since.
Door and usability
On a compact shed like this, the door is where small misalignments show up. Out of the gate, mine had a slight gap at the top latch side. Loosening the hinge screws, nudging the door, and retightening closed the gap. The door closes reliably and the lock tab accepts a standard padlock. If you want a tighter weather seal, a strip of thin adhesive-backed weatherstripping along the frame helps without interfering with the latch.
Inside, the 5x3 footprint is enough for long-handled tools, a string trimmer, blower, hose reels, and a stack of storage totes. It’s too tight for most full-size mowers, but compact electric mowers can fit if you plan the layout carefully. The walls will “oil can” if you lean heavy items directly against them. I added vertical furring strips (1x2s) to the inside of the wall channels with short self-tapping screws; that gives you something solid to mount hooks and keeps point loads off the steel.
One underrated detail: the protective caps for screws and corner points do make the interior nicer to work around, especially if you’re reaching in and out frequently.
Durability and maintenance
Galvanized steel holds up well to UV and moisture when the coating remains intact. The brown finish has resisted scuffs so far. If you do scratch it during assembly, touch it up with a rust-inhibiting paint sooner rather than later. Keep an eye on the lower wall edges and the base for trapped moisture; the silicone bead I added helps keep splashback out.
Because the shed is compact and light, snow load isn’t a big worry with the sloped roof, but don’t let wet, heavy snow pile up. A push broom clears it in seconds. Hinges and the latch benefit from a once-a-year spritz of dry lube.
What I liked
- Compact footprint with genuinely usable vertical space
- Galvanized panels and overlapped seams resist the elements once sealed
- Sloped roof sheds water well; easy to add better roof screws for peace of mind
- Door accepts a common padlock; hinge adjustments are easy
- Protective caps reduce the “sharp edge” factor post-build
- Light enough to move during positioning, solid once anchored
What could be better
- Instructions are diagram-heavy and small; more explicit orientation callouts would save time
- Out-of-box panel dents are possible; easy to fix but not confidence-inspiring
- Included roof fasteners are the weak link for long-term sealing
- No base included; proper foundation is on you (and it matters)
- Edges are sharp during assembly—gloves are mandatory
Tips before you buy and build
- Confirm with your HOA or local rules; even small sheds can have placement and height restrictions.
- Plan the base. Level and square is everything. Anchor it before you start on walls.
- Set your drill clutch low, especially on first thread engagement.
- Upgrade roof screws to self-drilling types with neoprene washers; add a thin bead of exterior silicone at the base and critical seams.
- Consider interior furring strips to mount hooks and shelves without denting panels.
Bottom line
The Patiowell shed hits its brief: a small, tidy, weather-resistant home for outdoor tools that doesn’t eat yard space. It demands more from the owner than a plastic, snap-together alternative—namely, a careful foundation and some attention to sealing—but it rewards that effort with a sturdier, sharper-looking result. It’s not a high-security box, and it’s not a plug-and-play kit for absolute beginners. It is, however, a practical, budget-friendly way to reclaim space in the garage and get your gear out of the weather.
Recommendation: I recommend this shed if you want an affordable, compact metal storage solution and you’re willing to invest time in a proper base, careful assembly, and a few weatherproofing upgrades. If you need a turnkey, tool-free build or maximum security, consider a molded resin shed or a heavier-gauge metal unit instead.
Project Ideas
Business
Neighborhood Tool & Garden Rental
Set up the shed as a rentable micro-rental station for neighbors: stock it with a curated set of infrequently used tools (edgers, tillers, specialty pruners) and sell access via an app or booking site. The lockable door plus simple inventory system lets you manage short-term rentals without a large storefront.
Pop-up Retail Kiosk
Convert the shed into a branded pop-up kiosk for markets, plant sales or seasonal gift sales. Add removable counters, exterior shelving, and attractive paint/graphics. Because it's compact and lockable, it's easy to transport/relocate and can serve as a low-cost retail presence at events or in parking lots.
Prepped Shed Service (Assembly + Customization)
Offer a service to deliver, assemble, and customize these compact sheds: build a leveled base, install shelving, insulation, lighting, paint, and keyed locks. Market to homeowners who want turnkey storage or hobby spaces. Upgrades (solar light, vents, shelving packages) provide upsell revenue.
Community Garden Hub Subscription
Place a few sheds at community gardens as subscription-access hubs where members store shared tools, seeds, and supplies. Charge monthly fees for access and offer managed inventory and restocking (fertilizer, potting mix). The compact footprint makes deployment affordable for multiple sites.
Mobile Workshop Classes
Use the shed as a branded, mobile classroom for small group workshops (potting, birdhouse building, basic tool maintenance). Outfit one shed as the demo space and transport it to partner venues (schools, community centers, markets). Charge per-attendee and sell kits or plants on-site for extra revenue.
Creative
Mini Potting Greenhouse
Convert the 5'x3' shed into a dedicated potting station: install a raised wooden base with drainage, add tiered shelving and a hinged workbench, mount clear polycarbonate panels or a small window in the roof slope for light, and use the lockable door to secure seedlings and fertilizers. Great for starting vegetables, overwintering tender plants, and keeping potting soil tidy.
Vertical Herb & Succulent Wall
Line one long interior wall with vertical planters (reclaimed pallets or hanging pockets) and attach shallow troughs to the sloping roof edge for trailing plants. Add a few hooks for tools and a removable tray on the floor to catch water. Use it as a year-round herb station for kitchen access or an aromatic patio feature.
Compact Outdoor Workshop
Outfit the shed as a small, weatherproof workbench for hand tools and light projects: custom-fit pegboard on one wall, a fold-down bench, magnet strips, and lockable storage. Add battery-powered LED lights and a solar trickle charger for tools. Ideal for hobby woodworking, bike maintenance, or crafts that need a tidy, secure space.
Kids' Playhouse / Reading Nook
Transform it into a cozy backyard hideaway: insulate minimally, add plywood flooring and soft cushions, paint fun murals, and install a small plexiglass window in the door. The lock keeps the space private for kids; the compact size makes it an adorable playhouse or quiet reading corner.
Bird & Pollinator Supply Station
Use the shed as a seasonal hub for bird-feeding and pollinator care: store and display seed mixes, nesting boxes, bee hotels, and potted pollinator plants. Fit shelves for labeled seed containers and a small table for assembling feeders and bee hotels. The sloping roof can hold a rain barrel for watering plants.