Features
- Stores up to four batteries (compatible with 12V MAX, 20V MAX, and FLEXVOLT platforms)
- Patented latching system secures each cleat/hook to the rail
- Four battery cleats — each rated up to 5 lb (total rail capacity 20 lb)
- Mounts directly to compatible metal rails (part of the workshop storage system)
- Steel rail construction for durability
- Non-slip material on cleats to help reduce scratching and corrosion
Specifications
| Color | Black |
| Material | Metal |
| Number Of Pieces | 3 |
| Product Width (In) | 1.78 in |
| Includes | (1) Steel rail; (4) Battery cleats |
| Weight Capacity | 20 lb (total) — 5 lb per cleat |
| Compatible Batteries | 12V MAX, 20V MAX, FLEXVOLT |
| Pack Size | 1 |
| Tool Storage Product Type | Tool Storage Accessory |
| Returnable | 90-Day |
| Warranty | 3 Year Limited Warranty; 1 Year Free Service; 90 Days Satisfaction Guaranteed |


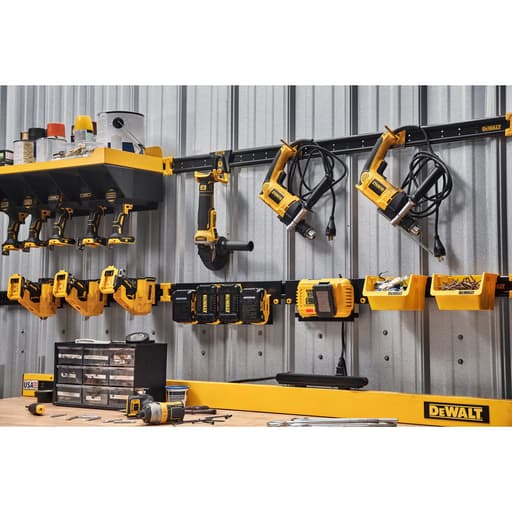
Wall-mounted metal rail that attaches to compatible workshop metal rails to store cordless tool batteries. Includes four removable battery cleats and a latching mechanism to secure the hooks to the rail. Each cleat is rated for light loads; the rail assembly is intended to organize and protect batteries for several DEWALT battery platforms.
DeWalt Battery Mount Rail Review
Why I wanted this
My battery drawer used to be a jumble of yellow-and-black bricks—charged packs mixed with empties, terminals scuffing against metal. I wanted a simple, visible way to get my cordless packs off horizontal surfaces and into a spot where I could grab the right one quickly. That’s exactly the niche this battery rail fills. It’s a compact, steel accessory designed to mount to DeWalt’s workshop storage rail system and hold four batteries in a tidy row.
Setup and mounting
Installation was straightforward, with one important caveat: this is an accessory for DeWalt’s compatible workshop rails. It doesn’t screw directly to drywall or studs on its own. In my shop, I already have a wall-mounted rail segment by the charging station, so I hung the battery rail there and engaged the latch. The latch is the standout detail—it locks the accessory to the rail securely. With the latch set, there’s no rattle or creep, even when I bumped it with a tool case.
The cleats that actually hold each battery slide onto the accessory rail and click into place. I positioned them evenly at first, then shifted one to make room for a thicker FLEXVOLT pack. The cleats are removable, so it’s easy to reconfigure spacing or pull a cleat for cleaning. From box to batteries on the wall, it took me less than 10 minutes.
If you’re starting from scratch, plan for one extra step: you’ll need the compatible metal wall rail installed level and anchored properly before this accessory has anywhere to go. If you already live in DeWalt’s storage ecosystem—rail on a wall, rail inside a cabinet, or rail on a tool chest—this slots right in.
Build and design
The rail is steel and feels appropriately stout for an accessory that will live on a shop wall. The profile is low—about the depth of a standard 20V MAX pack—so it doesn’t protrude enough to snag you when you walk past. I appreciate the non-slip material on the cleats; it keeps packs from twisting and, more importantly, shields the contact surface so battery housings don’t get gouged by bare metal. After a few weeks of daily use, there’s no paint flake or deformation, and the latch still engages crisply.
The capacity is clearly labeled: 5 pounds per cleat, 20 pounds total. That number matters with heavier packs. A 12Ah FLEXVOLT battery comes in well under the per-cleat limit, and even with four large packs loaded, the accessory held solidly. The weight rating will be more dependent on how your main wall rail is mounted than on the accessory itself, so anchor that primary rail into studs, not drywall anchors.
Battery fit and compatibility
This rail is shaped for DeWalt 12V MAX, 20V MAX, and FLEXVOLT footprints. Every DeWalt pack I tried—from small 12V to bulky FLEXVOLT—slid on and off cleanly. The cleats index the pack positively; you push the battery onto the cleat and it “seats” with a firm stop, then pull straight off. There’s no button or latch on the cleat itself, so one-handed removal is easy.
If your shop is a mixed-brand environment, know that this isn’t a universal solution. I couldn’t get other brands’ packs to sit securely. For a DeWalt-focused setup, though, it’s exactly the right geometry, and it pairs neatly with a charging shelf mounted above or below it.
Day-to-day use
The rail shines in routine workflow. I keep my charger immediately above, so charged packs move down to the rail and empties move up. Visual management became much easier; four slots force a little discipline without taking over a wall. The spacing is enough to grab the center battery without nudging its neighbors, even with gloves on.
The cleats’ non-slip surface helps, especially when the shop is dusty. Batteries don’t micro-slide or rotate over time. After a few weeks, I pulled the cleats off to blow out dust. That tool-free disassembly is a small thing, but it encourages you to actually maintain the setup instead of living with grit.
Even when the rail is fully loaded, the latch doesn’t loosen. I tested what happens if you bump the underside of a battery with a case—nothing dramatic happens; the packs stay seated. I wouldn’t mount it where it’s likely to be struck hard or knocked by lumber, but normal shop contact isn’t a problem.
What I’d change
- It requires the compatible metal wall rail. If you aren’t already invested in that system, this accessory becomes a two-part purchase and an extra install step.
- Four positions will suit most users, but a longer version would be handy for larger fleets, especially for shops with half a dozen 20V packs. You can add a second rail, of course, but a six-cleat option would reduce clutter.
- There’s no dust cover or lock. For shared spaces, a way to lock batteries to the rail could add security. For most private shops, that’s not a dealbreaker.
These aren’t flaws so much as trade-offs of the modular system. Once you accept the ecosystem approach, the accessory does exactly what it says.
Durability and safety
Steel construction is the right call here. It shrugs off knocks, and the latch has not shown any play. The non-slip surface on the cleats has resisted peeling and hasn’t marred battery housings. This is storage, not charging, so there’s no power running to the rail—no heat or electrical concerns introduced by the accessory itself. Keep it away from welding spatter and solvents, just like you would any plastic-housed battery.
Warranty and support
DeWalt backs it with a 3-year limited warranty, 1 year of free service, and a 90-day satisfaction guarantee. For a storage accessory, that’s generous coverage and aligns with the rest of their workshop storage line. If you’re on the fence, the return window lowers the risk of trying it in your space.
Tips for best results
- Mount the main wall rail into studs. You’ll feel the difference when the accessory is fully loaded.
- Place the rail at chest height near your charger to streamline the charged/used rotation.
- Load heavier FLEXVOLT packs toward the middle for balance.
- Label pack charge health or age on the top with painter’s tape so you can grab the right one at a glance.
- Pop the cleats off once in a while and blow out dust; they reinstall in seconds.
Who it’s for
- DeWalt users with a small to medium battery fleet who want fast visual access and better organization.
- Anyone already invested in the DeWalt workshop rail system who wants to expand storage with purpose-built accessories.
- Mobile shops with a rail in a truck box or service van—this keeps packs from sliding around, provided your rail is secured.
If you’re brand-agnostic or on a different rail standard, look at universal battery mounts or a shelf-based solution instead.
The bottom line
The battery rail does a simple job well: it holds four DeWalt batteries securely, in a small footprint, with a reliable latch to the main rail. Build quality is solid, the cleats treat batteries kindly, and everyday use is frictionless. The main limitation is ecosystem dependence—this is a clear “yes” if you’re on DeWalt’s rail system, and a “maybe” if you aren’t and don’t want to add that rail to your setup.
Recommendation: I recommend this for anyone already using DeWalt’s workshop rail or planning to. It’s a clean, durable way to keep 12V MAX, 20V MAX, and FLEXVOLT packs organized and protected, with a clear capacity rating (5 lb per cleat, 20 lb total) and a latch that inspires confidence. If you’re not in the DeWalt rail ecosystem and need a standalone solution, consider whether adding the compatible wall rail makes sense for your space—otherwise, a wall-mounted universal rack may be a better fit.
Project Ideas
Business
Jobsite Organization Install Service
Offer a turnkey service to design and install workshop rail systems, including Battery Mount Rails, in shops and on jobsites. Provide layout planning, safety load calculations, labeling for battery platforms, and cable management for chargers. Charge per bay plus materials, and upsell maintenance visits to reconfigure as teams grow.
Fleet Battery Accountability Program
Create a simple tracking solution for contractors: sell a kit with Battery Mount Rails, color/numbered cleat tags, and QR codes that log check-in/out of packs. Bundle with a lightweight web app or spreadsheet template for inventory. Subscription revenue comes from tag refills, reports, and periodic site audits to reduce lost batteries.
Van/Trailer Upfit Packages
Develop standardized upfit packages for trades vans that include compatible metal rails, Battery Mount Rails, charger shelves, and wiring to an inverter or shore-power inlet. Offer bronze/silver/gold tiers based on number of bays and accessories. Partner with local dealers for referrals and provide before/after photos to drive sales.
Retail Display and Demo Walls
Sell pre-built display panels to hardware stores and training centers that showcase battery organization. Panels mount quickly to store fixtures, demonstrate the latching system, and encourage add-on sales of chargers and batteries. Offer co-branded signage and seasonal refresh kits to keep displays current.
Accessory Add-Ons and Customization
Launch a microbrand of add-ons: 3D-printed cleat caps to shield contacts during storage, magnetic or Velcro label plates, anti-theft tether points, and cable clips that snap onto the rail. Sell online with bundles tailored to 12V MAX, 20V MAX, and FLEXVOLT users, and offer custom engraving for shop names or crew IDs.
Creative
Modular Charging Command Center
Build a wall-mounted charging station where the Battery Mount Rail holds packs above a row of DEWALT chargers. Use a compatible metal rail on a plywood backer, route cable channels behind the backer, add a timer or smart outlet to cycle chargers, and label each cleat by tool type. The latching cleats keep packs secure while you plug/unplug, and the 20 lb total rating helps you plan safe spacing for packs and charger placement.
Van or Trailer Battery Wall
Install the rail on a compatible metal track inside a work van or enclosed trailer to keep batteries off the floor and protected in transit. Add foam-backed standoffs or rubber isolators under the mounting rail to damp vibration, and place the assembly near an inverter/charger section. Color-code cleats for 12V MAX, 20V MAX, and FLEXVOLT so the right pack is always within reach at the jobsite.
Pegboard Fusion Organizer
Create a hybrid organizer by mounting a short run of compatible metal rail across a pegboard panel. Hang the Battery Mount Rail on the track for batteries and surround it with pegboard hooks for matching tools. Add a small shelf beneath for bits and blades, and use magnetic labels on each cleat to indicate charge status. The steel rail and latch system keep things aligned and tidy.
LED-Lit Battery Display Wall
Turn battery storage into functional wall art. Mount the rail to a stained wood or powder-coated metal panel with perimeter LED strips and a motion sensor. When you enter the shop, the LEDs softly illuminate the batteries. Include a hidden cable trough for nearby chargers and a clear acrylic lip beneath each cleat to catch dust and drips, preserving the non-slip cleat surfaces.
Portable Job Box Lid Organizer
Add the rail to the inside lid of a heavy-duty job box or cabinet door that already accepts compatible metal rails. This creates a grab-and-go battery bay that stays shut and secure thanks to the cleat latches. Use thread-locker and rivnuts for strong fastening, and keep within the 5 lb per cleat rating to prevent lid flex. Pair with a compact power strip inside the box for charging on site.