Features
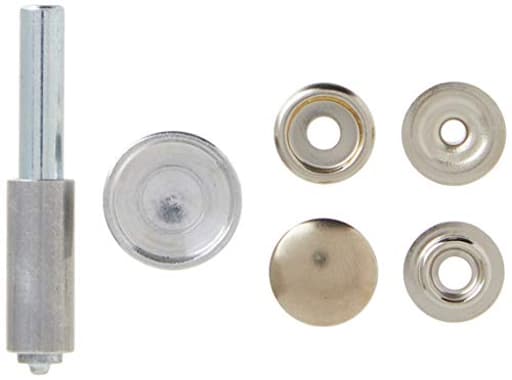
- This snap fastener kit comes with 6 fasteners and a 2-piece setting tool to connect the fastener to the article of clothing or leather
- Poppers are usually used to perform the same functions as buttons as clothing clasps, jean buttons, leather clasps and the sort
- The snap fastener setting tool features a knurled body for greater comfort and safety; Snaps are made of brass and nickel-plated for added durability
- Use snaps to repair or replace broken fasteners for coats, boat covers, tents, canvas, tarpaulins, awnings, sailcloth, lawn furniture and pool covers
- Made in the USA; Refills available through General Tools and Instruments 1266 Snap Fastener Refills, 6 Fastener Sets
Specifications
| Color | Multicolor |
| Size | Snap Kit |
| Unit Count | 1 |
Related Tools
A snap fastener kit containing six brass, nickel-plated snap sets and a two-piece setting tool for attaching snaps to clothing, leather, canvas and similar materials. The setting tool has a knurled body for improved grip, and the snaps are intended for repairing or replacing fasteners on coats, tents, boat covers, awnings and other fabric or vinyl items.
General Tools 1265 Snap Fastener Kit with 6 Fasteners Review
What’s in the box and who it’s for
General’s snap kit is the sort of simple, utilitarian set I like to keep in a drawer for emergency fabric repairs. It’s a small package: six nickel‑plated brass snap sets and a two‑piece setting tool (an anvil and a flaring punch). That’s enough hardware for a couple of jacket closures, a dog coat, or a few tabs on a cover or bag. If you’re repairing a boat canopy, tent flap, or jacket gusset and don’t want to invest in a press or specialty pliers, this is a practical way to get sturdy snaps installed with a hammer.
The pieces are nickel‑plated over brass, so they resist corrosion far better than painted carbon steel—handy for marine or outdoor use. The setting punch has a knurled grip, which sounds like a small thing, but it matters when you’re tapping carefully and don’t want the tool twisting in your fingers.
Build quality and materials
The snaps themselves feel solid, with caps that don’t have the “slotted” backs you sometimes see on bargain kits. That closed-back construction helps prevent distortion when you’re setting the cap and gives the finished side a cleaner look. The plating is even, with no burrs on the working faces, and the socket/spring engagement has a positive click that doesn’t feel flimsy.
The two‑piece tool is basic stamped steel, as expected in a kit at this price. The anvil has a domed recess on one side for the cap and a flat on the other; the punch is shaped to roll the post and lock the mating halves. After a dozen installs across different materials, my punch head shows the normal mushrooming you get from hammer work, but it held up fine for the life of the included snaps.
Setup and technique
This is a traditional hammer‑set system. The process is straightforward, but a few steps make a big difference:
- Support: Use a very solid backing—an anvil, a heavy vise, a dumbbell, or a steel plate. A kitchen counter won’t cut it; you need mass.
- Hole prep: You’ll need to make a clean hole sized to the snap post. On leather, a rotary punch (#4 worked well on my motorcycle jacket gusset). On canvas or nylon, an awl or a set of hollow punches does the trick. Ragged holes lead to crooked snaps.
- Stacking order: Dry-fit each pair (cap + socket, and stud + post) before hammering so you’re never guessing which piece mates with which.
- Light taps: Don’t whale on it. A series of controlled taps lets you watch the post roll over instead of splitting it.
I installed snaps in three scenarios: a thick cowhide gusset, a vinyl boat cover tab, and a nylon stroller caddy. The kit handled all three without drama. On the thick leather, I had to be deliberate about hole size and alignment. On the vinyl and nylon, I backed the fabric with a small scrap of webbing to stabilize the area before setting the snap—worth doing if your material is thin or stretchy.
Performance in use
Once set correctly, these snaps hold tight. On leather, the engagement feels particularly robust—there’s a confident “pop” open and closed. On coated fabrics and heavy nylon, the grip is slightly less aggressive, which is normal since the substrate compresses. I haven’t had any unintentional releases after regular use on a jacket and a boat cover.
The nickel plating has resisted scuffs and corrosion after wet, salty outings. Brass under the plating gives me peace of mind for long‑term use outdoors. If you’re outfitting a sailbag or a pool cover, the material choice alone puts this ahead of cheaper mixed‑metal kits.
The limiting factor is stack thickness. With a single layer of heavy leather or two layers of medium canvas, the included post length is ideal. If you’re trying to sandwich very thick material (say, doubled saddle leather with webbing), you’ll run out of post. In that case, you need long‑post snaps or a different kit.
Learning curve and pitfalls
There’s a bit of a learning curve, but it’s short. My first cap was slightly over‑flared because I got impatient and hit it too hard; the result was a loose fit. With lighter, controlled taps, the subsequent installs were tight and square. Two other common pitfalls:
- Misalignment: If your hole isn’t centered or the substrate isn’t fully supported, the socket can set crooked, which compromises the snap. Check squareness after a few taps, not after twenty.
- Hole size: Too small and you’ll crush the post as it tries to flare; too large and the snap will wobble. Aim for a snug slip‑fit.
The included paper diagram is minimalist. If this is your first time, lay out the parts by pair (cap/socket and stud/post) and dry‑assemble them. After doing one or two on scrap material, you’ll be fine.
Where it shines
- Small repair jobs: Replacing a failed waistband snap, fixing a dog coat closure, or adding snaps to a jacket gusset.
- Outdoor fabrics: Canvas, marine vinyl, sailcloth, and covers where corrosion resistance matters.
- Occasional use: You don’t need to buy or store a dedicated press. A hammer and solid backing are enough.
Where it struggles
- Production work: For dozens of snaps in a row, hand‑setting gets tedious. A press or locking pliers‑style setter is faster and more consistent.
- Extra‑thick stacks: If you’re frequently working on doubled heavy leather or thick laminated materials, you’ll want longer posts than what’s in this kit.
- Tight spaces: Inside sleeves or bag corners, swinging a hammer can be awkward. Pliers‑type setters slip into tight spots more gracefully.
Practical tips from the bench
- Practice on scrap from the same material first.
- Pre‑build each pair before mounting so you don’t mix a stud with a socket.
- Use blue painter’s tape to hold the cap on the anvil while you position the fabric—prevents a cap from jumping off as you align the punch.
- If removing a failed snap, drill out the center of the post from the backside, then peel the flange with pliers. Protect the fabric with a sacrificial block.
- A small dot of contact cement on stretchy fabrics keeps layers from shifting during the set.
Value and expandability
As a compact, Made‑in‑USA kit with six complete sets, it’s a good value for homeowners, hobbyists, and anyone who needs a trustworthy repair every now and then. The hardware quality is better than the ultra‑cheap assortments I’ve tried, and the results look cleaner. If you find yourself using these often, compatible refill packs are available so you can keep using the same setting tool without buying a whole new kit.
The bottom line
This is a straightforward, dependable snap fastener kit that rewards a little patience with strong, neat results. It’s not a high‑volume solution and it won’t overcome physics if you’re trying to set through a stack that’s too thick for the post, but within its intended range—clothing, leather, canvas, vinyl—it performs above its price point. The nickel‑plated brass hardware holds up outdoors, the knurled tool is easy to control, and the results are consistent once you dial in your tapping rhythm.
Recommendation: I recommend this snap kit for small to medium repairs and one‑off projects on clothing, leather, and outdoor fabrics. It’s a low‑cost, compact way to get durable snaps without specialized equipment, and the hardware quality inspires confidence. If you’re outfitting an entire project with dozens of snaps or working on extra‑thick stacks, step up to long‑post hardware and a press or pliers‑style setter. For everyone else, this kit earns a spot in the toolbox.
Project Ideas
Business
Mobile Outdoor Gear Snap Repair
Offer on-site snap replacement and fastener repair for tents, awnings, boat covers and tarps at marinas, campgrounds and outdoor markets. Low overhead (tool kit + travel), quick turnaround, and add seasonal service contracts for campsites and rental companies.
Upcycle & Alteration Service
Run a boutique service that modernizes vintage or damaged garments by replacing buttons with snaps, converting closures, and adding snap-based modular features. Market to thrift shoppers and eco-conscious customers—sell finished pieces online or at pop-ups.
DIY Snap Kits + Video Courses
Package snap kits (snaps, pre-cut tabs, instructions) with downloadable patterns and short how-to videos. Sell on Etsy/Shopify and upsell live virtual classes teaching snap setting techniques. Low-cost product with high margin and repeat-purchase potential.
Workshops & Event Booths
Host hands-on workshops at craft stores and maker fairs teaching how to set snaps into fabric, leather and canvas. Operate a booth at boat shows, outdoor expos and farmers' markets offering quick snap repairs and custom snap installations—build clientele and sell supplies.
Creative
Interchangeable Cushion Covers
Sew a sturdy base cover with a flange edged in snap tape and create multiple decorative outer panels that snap on and off. Great for outdoor/seasonal cushions—allowing quick swaps for cleaning or style without removing the whole cushion or zippers.
Leather Bracelet & Jewelry Line
Make adjustable leather bracelets, choker necklaces, and cuffs using brass snaps as closures. Use small leather tabs for snap placement, add stamping/painting, and create a small line of modular jewelry where customers can mix-and-match bands and charms.
Modular Textile Wall Art
Create a grid of fabric or canvas panels with snaps on the back so panels can be rearranged into different patterns or colors. Ideal for seasonal decor or gallery walls—panels can be swapped without rehanging frames.
Quick-Change Bag Straps & Accessories
Add reinforced snap tabs to handbags, camera bags and laptop sleeves so straps, pouches and rain flaps can be snapped on/off. Build a line of interchangeable straps (leather, webbing, chain) that snap into place for customization.