Features
- Tool-free assembly
- Stackable to increase planting depth
- Textured panels with wood-like appearance
- Modular/customizable layout using multiple units
- Provides about 7 sq ft of planting area
- Includes panels, assembly pins, and an instruction manual
Specifications
| Planting Area | 7 sq. ft. |
| Height | 8.5 in |
| Length | 23.8 in |
| Width | 10.9 in |
| Weight | 9.8 lb |
| Panel Dimensions | 21.75 in x 10.375 in |
| Number Of Panels | 6 |
| Number Of Assembly Pins | 6 |
| Includes | Instruction manual |
| Battery Included | No |
| Cordless Vs Corded | Cordless |
| Watt Hours | 0 |
| Gtin | 00885911843874 |
| Price (Listed) | 48.99 USD |
Related Tools

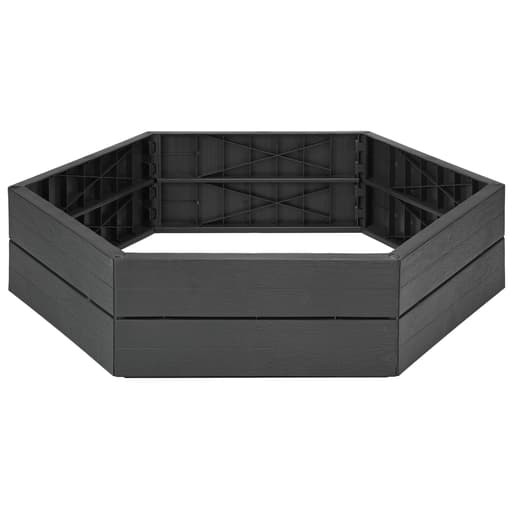
A 3-foot modular raised garden bed that provides approximately 7 sq ft of planting area. It assembles without tools, can be stacked with additional units to increase planting depth, and uses textured panels intended to resemble wood for a cohesive outdoor appearance. Designed for planting flowers, herbs, and vegetables.
Black & Decker 3-Foot Raised Garden Bed Review
Setting up a compact raised bed on a tight patch of lawn is one of my favorite spring chores, and this season I tried the Black & Decker raised bed. It’s a simple, modular kit that promises quick setup, tidy lines, and the option to stack for deeper soil. After several weeks of planting, watering, and a couple of heavy rains, here’s how it performed.
Build and design
This is a six-panel, tool-free kit that assembles into a compact footprint of roughly 7 square feet. Think of it as a low, hexagonal bed rather than a long rectangle. Each layer is 8.5 inches tall, which is enough for many flowers, herbs, and shallow-rooted vegetables. The plastic panels have a wood-like texture; from a few steps back, it reads as a tidy, cohesive border without the maintenance headaches you get from real wood.
At 9.8 pounds for the set, it’s easy to carry and position solo. The panels feel rigid enough that I wasn’t worried about bowing once filled, and the interlocking pins keep the seams aligned. It’s an open-bottom design, which is ideal for drainage and lets roots reach native soil if you set it on the ground (you’ll want a weed barrier if you’re going over turf).
Assembly experience
From opening the box to filling with soil took me about 20 minutes. The process is straightforward:
- Lay out the six panels on level ground.
- Slot the corners together; the molded guides make it hard to misalign.
- Drop the pins through the corner sleeves to lock the panels.
No tools, no loose hardware beyond the pins, and the instruction leaflet is clear. The only hiccup I had was on slightly uneven ground; if your site isn’t flat, the last pin can feel tight. A quick pass with a rake to level the area solved it. Once pinned, the structure stayed square (or, more accurately, evenly sided) with minimal flex.
I also stacked a second unit to test depth. The same pins align vertically, so the upper bed nests on the lower one without wobble. With two layers (17 inches), the walls still felt stable under load, though I wouldn’t stack beyond two without additional bracing in a windy area.
Capacity and planting performance
A single layer at 8.5 inches tall holds roughly 5 cubic feet of soil mix (7 sq ft x 0.708 ft depth ≈ 4.96 cu ft). That’s two typical 2-cubic-foot bags plus a bit of compost. I planted a mix of basil, parsley, thyme, dwarf marigolds, and a compact cherry tomato, and everything rooted in well.
Drainage is excellent because the bottom is open. After a heavy storm, there was no pooling, and the sides didn’t bulge. The height is enough to discourage pets from trampling but still easy to step around for weeding. For root crops like carrots or parsnips, one layer is borderline; stacking two layers made a noticeable difference in moisture retention and root depth, and is the route I’d recommend for anything that prefers 12 inches or more of soil.
Modularity and expandability
The appeal of this system is flexibility. You can:
- Stack units to increase planting depth.
- Place multiple units adjacent to create a cluster of beds with paths in between.
- Reconfigure season to season, since disassembly is as easy as pulling the pins.
The panels and pins are interchangeable, so expanding the garden footprint just means adding kits. I’d like to see accessory connectors for joining beds side-by-side with shared walls (for fewer seams and slightly higher stability), but even placed edge-to-edge, the layout options are generous for small spaces.
Durability and weather
The textured plastic won’t fool a carpenter up close, but it resists the issues that can plague budget cedar kits: splitting, swelling, and rot. After several weeks in direct sun and two soaking rains, I didn’t see any fading or warping. The panels clean up with a quick hose-down. Because the bed is relatively light empty, I’d store it indoors over winter if you’re in a freeze/thaw climate and not using it; that will prolong its life and keep the pins from getting brittle over time. Filled with soil, the mass alone keeps it planted securely.
Ergonomics and garden care
At 8.5 inches tall, one layer reduces bending a bit but doesn’t transform the ergonomics. If accessibility is a priority, plan on stacking to reach a more comfortable working height, or use it as a top tier in a tiered arrangement. The top edge is smooth, so leaning in won’t snag sleeves. Corners are blunt enough that I didn’t worry about catching irrigation lines, and there’s enough rigidity to clip a small plant label or low trellis to the sides. For taller supports, I’d sink stakes into the ground just inside the bed rather than try to anchor them to the panels.
Aesthetics and fit in the yard
The faux-wood texture looks clean and uniform, especially when grouped. It’s a step up from the utility look of plain plastic and doesn’t compete with the plants visually. Because the bed is a compact hex rather than a long rectangle, it sits nicely in a corner of a patio or as a centerpiece in a small yard. If your space demands straight lines, you’ll want to consider how the hex footprint fits into your layout; spacing multiple units creates pleasant, organic curves with walkable paths between.
Value
At a listed price of $48.99, the cost per square foot of planting area is around $7. For a kit that assembles in minutes, won’t rot, and can be stacked, that’s respectable value. Comparable cedar beds with similar capacity often cost more and require screws or brackets. Composite boards with aluminum corners can run higher still. The trade-off here is look and height: if you’re after a premium wood aesthetic or a tall, freestanding box, you’ll spend more elsewhere. If you need a quick, durable foundation for herbs, flowers, and greens, this lands in a sweet spot.
Limitations to consider
- Depth: One layer is shallow for deep-rooted crops. Plan on two for carrots, tomatoes with deep watering, or potatoes.
- Anchoring: There are no ground stakes included. On slopes or very uneven ground, you’ll want to level carefully and let the weight of the soil do the anchoring.
- Shape: The hex footprint is compact but not as space-efficient against straight fences as a rectangular bed.
- Pest exclusion: As with most open-bottom beds, burrowing pests can get in unless you add hardware cloth beneath.
None of these are deal-breakers for the intended use, but they’re worth planning around.
Tips for best results
- Prep the site: Rake the area flat, remove high spots, and lay down a weed barrier if placing over grass.
- Soil mix: Use a high-quality raised-bed mix or a blend of compost, peat/coir, and perlite. Avoid dense topsoil alone.
- Watering: Because the bed drains well, consider a short run of drip line or a soaker hose looped around the interior.
- Stacking: If you’re stacking, fill the lower layer half full, set the upper layer, pin it, then finish filling to lock everything in place.
Recommendation
I recommend the Black & Decker raised bed for gardeners who want a fast, tidy, and low-maintenance way to start or expand a small planting area. It assembles in minutes without tools, looks presentable in a yard or on a patio, and offers real flexibility: use one for herbs and flowers, or stack to handle deeper-rooted veggies. The price is fair for the durability and convenience. If you need a tall, rectangular bed for along a fence or you’re planning deep-rooted crops in a single layer, look elsewhere or budget for stacking. For most small-space gardens, though, this raised bed hits a very practical balance of setup speed, sturdiness, and usability.
Project Ideas
Business
Seasonal Rent-a-Bed Service
Offer spring and fall installs of one to four raised beds with soil, plant starts, and monthly maintenance. Customers pick themes (salad, salsa, pollinator). Tool-free assembly keeps labor low; charge a setup fee plus a monthly subscription for care and replanting.
HOA/Airbnb Patio Staging
Stage balconies and small patios with attractive modular beds planted with low-maintenance flowers and herbs. Provide install, watering schedules, and monthly refresh. Market to HOAs, property managers, and short-term rentals to boost curb appeal and guest experience.
Themed Garden Kits + QR Guides
Bundle the bed with potting mix, seeds/starts, and a printed planting map. Themes: Salsa Garden, Cocktail Herbs, Pollinator Patch. Include QR codes to quick setup videos and care calendars. Sell online with local delivery or at markets; upsell extra modules for expansion.
Microfarm-to-Cafe Herbs
Deploy rows of these lightweight, modular beds on sunny lot edges or rooftops to grow high-demand herbs and edible flowers. Offer weekly fresh-cut deliveries to cafes and caterers. Start small and scale by adding units; standardize varieties for consistency.
Hands-On Workshop Series
Partner with nurseries or community centers to host 90-minute build-and-plant workshops. Teach wicking-bed setup, soil mixing, and seasonal planting plans. Participants purchase the kit as part of the ticket, creating product sales plus class revenue.
Creative
Tiered Herb Cascade
Stack two units in the back and one in front to create a tiered, waterfall-style herb garden. Plant deep-rooted herbs (rosemary, sage) in the higher tier for depth and trailing or low herbs (thyme, oregano) up front. The wood-like panels give it a polished patio look, and the modular layout lets you expand later.
Pollinator Pocket Meadow
Combine two to three beds in an L or zig-zag layout and fill with native pollinator plants (coneflower, milkweed, yarrow, calendula). Add a small bee hotel or shallow water dish on a stake. The low 8.5 in profile keeps sightlines open while creating a vibrant, wildlife-friendly corner.
Kid’s Pizza Garden
Create a themed bed with tomatoes (trellised), basil, oregano, peppers, and scallions. Let kids paint plant markers shaped like pizza slices and learn care routines. The tool-free assembly makes it a fast weekend project and the modular bed keeps soil contained and tidy.
Sub-Irrigated Patio Salad Bar
Convert one unit into a wicking bed: line with pond liner, add a perforated pipe or inverted nursery trays as a reservoir, then fill with lightweight mix. Succession plant lettuces, arugula, and baby kale for weekly harvests. Add a clear tote lid or cold-frame top for shoulder seasons.
Deep-Root Veggie Tower
Stack two to three units for 17–26 in of depth and grow carrots, beets, radishes, and parsnips in a sandy mix. Use the modular footprint to fit narrow spaces and keep roots straight and pest-free.