Features
- Application: 4pin 10mm LED quick connector kit suitable for 10mm wide SMD 5050 RGB(not RGBIC) LED ribbon lights,connecting non-waterproof LED .
- High Quality: Flame retardant PVC is durable and flexible. The pure copper wires inside are tin-plated, ensuring perfect electric conductivity and longer lifespan.
- DIY Combination: RGB Extension cable connector kit,this is a good accessory kit for your LED strips.It includes multi of connectors which used in your DIY colorful LED lighting program and showing the best effects.
- Operting Condition: These LED tape connectors support 0-4A current and 0-24V voltage input, heat resistance level from 20-100 degree.
- Easy Installation: RGB 4pin 10mm LED strip connectors are flexible and durable,can be jointed with connectors by yourself.No soldering,no stripping ,just snap down quickly and vigorously with a pliers then you can enjoy your colorful lighting effects.please be sure to confirm your LED strip's width (10mm) and the 4-pin RGB.
Specifications
| Unit Count | 9 |
Solderless 4‑pin connector kit for 10 mm SMD 5050 RGB (non‑RGBIC) LED strips, providing multiple connector types and extension cables for joining non‑waterproof LED tape in DIY lighting projects. Connectors use flame‑retardant PVC jackets and tin‑plated copper conductors, support 0–4 A and 0–24 V, and install without soldering by snapping closed.
FSJEE 4 Pin LED Strip Connector Kit for 5050 RGB(NOT RGBIC) 10mm LED Light Strip,Include 8 Types of Solderless Accessories,Provide Most of Parts for DIY Lighting Project Review
A flexible connector kit for 10 mm 5050 RGB strip projects
I tested the FSJEE connector kit on a small under‑cabinet upgrade and a longer run behind a media console. My goal was simple: avoid soldering, make a few tight turns, bridge gaps between cabinets, and add a removable break near the power supply. The kit delivered most of what I needed without a trip to the workbench, and when used thoughtfully, it’s a real time saver.
This kit targets 10 mm, 4‑pin SMD 5050 RGB strips (not RGBIC), the ubiquitous non‑addressable LED tape you’ll find in many budget lighting kits. If your strip is sheathed in silicone (waterproof) or uses 8 mm 3528 LEDs, this is not the right set. Within that lane, though, it covers a lot of ground.
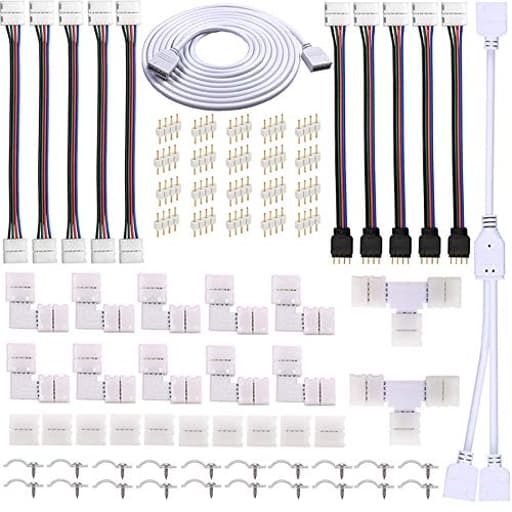
What’s in the kit
The assortment includes multiple connector styles that cover the common scenarios:
- Strip‑to‑strip “gapless” couplers for clean, straight joins
- Strip‑to‑wire clamps for jumping over obstacles or creating power injection points
- Right‑angle corner pieces to keep turns flat at cabinet corners or shelf edges
- Short RGB extension leads and 4‑pin adapters for controller connections or quick disconnects
The wires are tin‑plated copper inside flexible, flame‑retardant PVC jackets. Connectors are the standard snap‑down style with metal contacts that pierce the copper pads on the LED tape. They’re rated up to 24 V and 4 A, which is appropriate for most short to mid‑length RGB runs.
Setup and installation
Solderless connectors are all about alignment and pressure. Here’s how the setup went for me:
- Strip prep: I made clean, square cuts at the printed cut lines with a sharp blade. Any ragged edge will cause grief later.
- Orientation: I matched the + (V+) and RGB channel labeling on the strip to the markings inside the connectors. The markings on the connectors are tiny; I used good lighting and a quick phone camera zoom to confirm orientation.
- Insertion: I slid the copper pads under the contacts until they were fully seated. On thicker tape, I needed to nudge the strip under each contact with a small flat tool.
- Closing: A firm pinch with pliers to snap the lids shut made all the difference. Finger pressure alone wasn’t consistent enough.
- Test first: I powered up every joint before sticking anything down. That avoided peeling and resticking adhesive when a channel didn’t light.
The right‑angle corners were especially handy under cabinets to keep everything tidy and flat, and the short extensions helped bridge the gap between separate sections without visible wiring.
Performance and reliability
Once aligned and clamped, most connections were stable and trouble‑free. The straight couplers and L‑corners carried full brightness without visible drop or flicker on moderate runs. The extension leads stayed cool to the touch.
Where I ran into issues was exactly where anyone familiar with these connectors expects them: minor channel dropouts from imperfect contact. If a red or blue channel didn’t light after first power‑on, re‑seating the strip so all four pads were fully under the contacts fixed it 9 times out of 10. On one especially stubborn joint, lightly cleaning the copper pads with isopropyl alcohol helped. I also had one instance where the strip slipped out as I repositioned the run; a second go with more decisive pressure on the latch solved it.
After a week of use, nothing loosened on its own. That said, these aren’t designed to be flexed repeatedly. If your installation will be moved or handled (behind a hinged panel, for example), add strain relief with adhesive clips or a spot of hot glue where the wire exits the connector. For permanent, vibration‑prone installations, solder still wins.
Build quality and electrical considerations
The materials are perfectly serviceable for DIY and light professional work. The PVC insulation is flexible, and the contacts bite cleanly when the tape is properly aligned. The tin‑plated copper conductors are an appropriate choice for corrosion resistance at the contact interface.
A few electrical notes from testing:
- Current and heat: At typical RGB loads on 12–24 V systems and short segments, connectors stayed cool. Stay mindful of the 4 A guideline; long, high‑brightness runs benefit from power injection rather than pushing all current through a single connector.
- Voltage drop: The included leads are fine for short hops. If you’re extending power more than a couple of feet, consider a thicker gauge cable for that segment to minimize color shift at full white.
- Contact surface: Strip PCBs vary. Some have thinner copper pads or a heavier solder mask. If your strip’s pads are slightly recessed, you may need to push more assertively to ensure the contacts reach copper.
Limitations and compatibility
This is a focused kit, and that’s a good thing—provided your strips match the spec:
- 10 mm width only. It won’t close properly on 8 mm tape (3528) or 12 mm varieties.
- 4‑pin RGB only. It won’t work with RGBIC or addressable strips that require 3‑pin data connections or proprietary connectors.
- Non‑waterproof tape only. If your strip is in a silicone sleeve, you’ll need to remove the sleeve and gel around the cut point for reliable contact or use specialized waterproof connectors.
Also, while the kit covers straight joins, corners, and short extensions well, T‑junctions or star splits aren’t this set’s strength. If your layout requires branching to multiple directions from a single feed, plan to introduce a small terminal block or a controller with multiple outputs.
Tips for best results
A little care up front prevents most headaches:
- Use a square, sharp cut at the marked cut lines.
- Clean pads with isopropyl alcohol if they’ve picked up oils or dust.
- Confirm +/V+ alignment—mark the strip with a fine pen if needed.
- Seat pads fully under each contact before snapping shut; use needle‑nose pliers for a positive latch.
- Test every joint before peeling adhesive and mounting.
- Add strain relief where wires exit connectors, especially on vertical runs.
- For long runs at full white, inject power every few meters to avoid dimming and keep connector currents reasonable.
Alternatives and when to solder
If you’re building a permanent installation, or if your strips live in tight channels where you can’t apply pliers, soldered joins with heat‑shrink still provide the most robust, compact solution. For outdoor or damp locations, use waterproof connectors or solder and reseal the silicone jacket.
If you need compatibility with addressable RGBIC strips, look for 3‑pin data‑capable connectors matched to your strip type and width; this kit isn’t designed for that.
Value
For the price, this is a generous mix of the pieces I reach for most: straight joins, corners, and short extension leads. Having multiple of each style meant I didn’t have to ration parts or compromise on layout. You can certainly buy individual connectors, but the bundled approach is sensible for a fresh project or a rework where you’re not yet sure which form factor you’ll need most.
The bottom line
The FSJEE connector kit accomplishes what a solderless set should: it speeds up clean, modular RGB strip installations and gives you enough options to handle real‑world layouts. It isn’t magic—you still need good alignment and firm closure—but with a careful install, the connections are stable and electrically solid. The materials are appropriate for indoor use, and the assortment covers the common joins you’ll encounter.
I recommend the FSJEE connector kit to anyone working with 10 mm 5050 RGB strips who wants to avoid soldering. It’s a practical, affordable set that, used correctly, yields reliable results. If your project demands absolute permanence, lives in a high‑vibration environment, or uses waterproof or addressable strips, plan on soldering or choosing connectors tailored to those constraints. For everyday DIY lighting—under cabinets, shelves, desks, and media consoles—this kit hits the mark.
Project Ideas
Business
Rapid prototyping & demo service for interior designers
Offer an on‑demand prototyping service that uses solderless connectors to quickly mock up lighting concepts for clients (restaurants, retail displays, residential projects). The no‑solder kit speeds iteration on site: change lengths, test colors, and show multiple layouts without a workshop. Charge for design time plus a small on‑site materials fee.
DIY lighting kit product line & workshop classes
Package tailored project kits (under‑cabinet, frame backlight, wall panel) that include cut strips, the 4‑pin connector set, controllers, power supplies, mounting channels, and instructions. Host in‑person or virtual build workshops teaching people to assemble and customize kits. Revenue streams: kit sales, class fees, and repeat accessory sales (extra connectors/jumpers).
Quick retrofit and repair service
Market a local service to repair or upgrade existing non‑waterproof LED installations using solderless connectors to replace damaged sections or extend runs without soldering. Fast turnaround and minimal disruption (no soldering on site) are strong selling points for commercial clients like cafes or hair salons. Upsell: smart controllers and scheduled maintenance plans.
Modular retail display & signage product
Design modular retail signs and point‑of‑sale displays with interchangeable, connectorized LED strips so store staff can quickly change colors or swap panels for promotions. Sell the displays plus a subscription for seasonal color templates or controller presets. The solderless system eases store installs and reduces required technical skill.
Content & monetized tutorials with affiliate kit links
Create step‑by‑step video tutorials and downloadable project templates showing creative uses of 10 mm RGB strips and solderless connectors. Monetize through affiliate links to the connector kits, controllers, and tools, plus offer paid pattern packs or consulting for custom builds. Include clear safety and compatibility notes (10 mm width, non‑waterproof, 0–4 A limit) to reduce support requests.
Creative
Under‑cabinet RGB task & mood lighting
Use multiple 10mm 5050 RGB strips joined with solderless 4‑pin connectors to create layered under‑cabinet lighting in a kitchen or workshop. Run strips around corners with L‑connectors, add short jumper cables to bridge gaps, and divide into zones with inline connectors so a controller can switch between bright task white and soft colored mood scenes. Benefits: fast, no‑solder joins for easy reconfiguration; note strips are non‑waterproof so mount inside cabinets or under lip profiles.
Modular backlit picture frames and canvas halos
Cut strips to length and use right‑angle and straight connectors to form glowing frames or halos behind artwork and photos. Because connectors let you detach segments, you can swap art or change strip lengths without soldering. Use diffusing foam or frosted acrylic to soften light and create even color wash effects. Keep total current per run under the 0–4 A limit and verify 10 mm strip width for fit.
Geometric wall art panels
Design a set of small geometric panels (triangles, hexagons) with pre‑mounted LED strip channels. Connect the pieces using the kit's short jumper cables and 4‑pin connectors to create a reconfigurable mosaic that lights in coordinated patterns. Ideal for accent walls, gaming setups, or studio backdrops. Solderless connectors make on‑site adjustments easy when arranging panels.
Lightbox & edge‑lit signage for home or events
Build slim edge‑lit lightboxes for seasonal signs, party decor, or tabletop centerpieces. Use the connectors to run strips along the box edge and to route power to hidden recesses without soldering. Multiple connector types in the kit let you tuck connections into corners or extend power runs cleanly. Remember to keep wiring inside dry areas—these connectors are for non‑waterproof strips.
Detachable costume/prop lighting
Create festival or cosplay lighting with removable LED segments joined by the solderless connectors. Make sleeves, belts, or armor panels with quick‑release connectors so battery packs and controllers can be detached for charging or washing garments. Keep the design low‑voltage and protect connections from snags; secure connectors inside sewn pockets or silicone channels.