Features
- Authentic AmesburyTruth Hardware Made in the USA
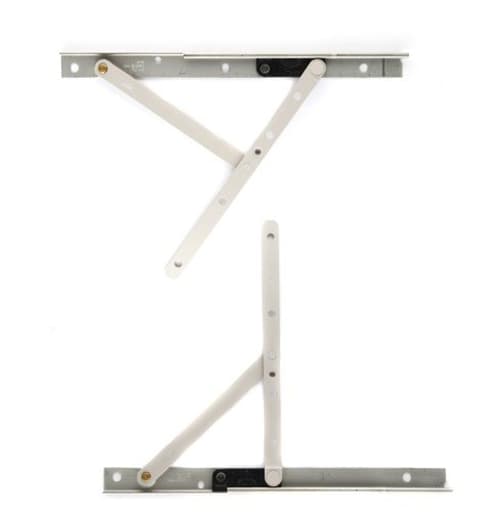
- Both a top and bottom hinge are included
- Ships complete with replacement screws
Related Tools
A pair of casement window hinges that mount the top and bottom of a window sash to the frame, allowing the sash to pivot open and closed. Supplied as a top-and-bottom set and includes replacement screws; components are made in the USA.
Truth Hardware Truth Casement Window Hinge Review
Why I tried these hinges
A failing casement hinge doesn’t announce itself until the sash starts rubbing the frame, the crank labors, or the window simply refuses to close square. That’s where I found myself: a 1990s-era casement window with a sagging bottom hinge and a top hinge that still looked serviceable. I opted to replace the pair with this hinge set to restore smooth operation and bring the sash back into alignment.
Design and build
These are straightforward, purpose-built casement hinges supplied as a matched top-and-bottom set. The metalwork is cleanly stamped and riveted with consistent play in the pivot points—just enough to move freely, not so loose that the sash meanders. The finish is a thin plating typical for residential hardware. It’s not marine-grade, but it’s appropriate for inland exposures and most climates if you keep up with basic maintenance. The fact that the components are made in the USA is more than a sticker; the hole spacing and geometry matched my existing hardware precisely, which isn’t always a given with off-brand replacements.
The set I received included replacement screws. They’re standard wood screws of adequate quality and length for most wood sash/frame combinations. If you’re in a coastal environment or replacing severely corroded hardware, I’d consider upgrading to stainless fasteners, but for typical installs the included hardware does the job.
Compatibility and fit
Casement hardware is more standardized than many realize, and this set follows a very common pattern. On my window, the mounting holes lined up without slotting or drilling, which made the swap cleaner and faster. A couple of tips if you’re verifying fit ahead of time:
- Measure the track length of your existing hinge and compare it visually to the replacement.
- Confirm handedness. Many hinges are side-specific; match right/left to the window’s hinge side as viewed from inside.
- Check the stack height of the sash shoe relative to the frame track; it affects how the sash sits in the opening.
If your home uses windows built with Truth hardware from the 80s/90s onward, there’s a good chance these hinges will be a direct fit. Still, it’s worth pulling one hinge before you order and comparing geometry.
Installation experience
Taking the old hinge off was the hard part. After decades of exposure, the bottom hinge on my window was fused by rust. Here’s the process that worked well for me:
- Crank the window open a few inches and disconnect the operator arm at the sash shoe.
- Tape the glass and support the sash. On ground-floor windows, a simple wood prop or a helper’s hands will do; on upper levels, I’d avoid working solo off a ladder.
- Remove the sash-side screws on the old hinge first, then the frame-side. A hand impact driver and penetrating oil were essential for breaking free stubborn fasteners without stripping heads.
- Clean the footprint. I scraped off old debris and applied a dab of exterior-grade sealant in the original screw holes to improve bite.
- Install the new hinge, sash side first, then the frame side. Keep all screws slightly loose until both top and bottom hinges are in place; then snug everything down evenly.
- Reconnect the operator arm and test the swing.
With the old hardware out of the way, the new hinges went in smoothly. The slotted mounting holes allow a bit of adjustment. I used that to fine-tune the reveal so the sash closed flush all around without binding. Total time was about an hour for a first window, half that once I had a rhythm.
Performance and feel
The improvement was immediate. The sash now opens with a consistent, quiet motion and tracks straight through the arc. There’s enough inherent friction in the hinges to keep the sash from drifting on a breezy day, but not so much that the operator feels overloaded. The final inch of closing is the real test; the sash seated into the weatherstrip evenly, and the lock engaged without forcing.
One unexpected benefit was reduced air noise. The worn hinge had been allowing a slight twist in the sash. With the hinge set installed and the reveal adjusted, the seal engagement is more uniform, and the whistle on windy nights disappeared.
Durability and maintenance
After a season of use, there’s no perceptible play at the pivot points and no finish flaking. That said, casement hinges live a rough life at the sill line. A quick maintenance routine will extend their lifespan:
- Once or twice a year, add a drop of light oil or a spritz of dry PTFE lubricant to the pivot points.
- Keep the track free of grit and debris.
- If your original screws were badly rusted, consider swapping the included screws for stainless fasteners on the bottom hinge in particular.
The top hinge on older windows often outlasts the bottom because it doesn’t sit in water. If you’re tempted to replace only the failed bottom hinge, you can—but replacing the pair ensures matched wear and alignment.
What I’d change
Two small quibbles. First, I’d prefer stainless screws in the box, even if it nudged the price up a few dollars; the bottom hinge sits where splashback and condensation collect. Second, a one-page install and adjustment sheet would help DIYers who haven’t replaced casement hardware before. The process is logical, but there are a couple of gotchas—like supporting the sash and leaving screws loose for final adjustment—that are easier to do right with a reminder.
Value
These hinges aren’t the cheapest option, but the value is in the exact fit and predictable geometry. I’ve wasted more time forcing generic hardware to play nice than the price difference here. The inclusion of both top and bottom hinges also makes sense—even if only one has failed, you get a matched set and the opportunity to reset the sash correctly.
Practical tips from the install
- Pre-drill pilot holes if the original screws were undersized or the wood is soft.
- Use painter’s tape on the glass and frame to prevent accidental scratches while maneuvering the sash.
- If a screw head starts to cam out, stop and switch to a hand impact driver; you’ll save yourself a lot of grief.
- Mark the original hinge outlines with pencil before removal; it gives you a reference for initial positioning.
Who it’s for
If you have casement windows that originally shipped with Truth-style hardware and you’re experiencing sag, binding, or poor sealing, this hinge set is a straightforward, homeowner-friendly fix. Pro installers will appreciate the predictable fit and quick alignment; DIYers with basic tools and patience can do a clean replacement in an afternoon.
Recommendation
I recommend this hinge set. It delivers what matters most in replacement window hardware: a reliable, made-in-USA build, accurate hole spacing for common Truth-based casements, and a matched top-and-bottom pair that restores alignment and smooth operation. Installation is approachable if you support the sash and come prepared to fight old, rusted screws. I’d like to see stainless fasteners included and a brief instruction sheet for first-timers, but those are modest asks. If your casement is sagging or grinding its way closed, these hinges are a solid, confidence-inspiring fix that should give your window another long tour of duty.
Project Ideas
Business
Historic Window Restoration Service
Offer specialized repair and retrofitting for older homes using authentic AmesburyTruth casement hinge sets. Emphasize the Made-in-USA quality and include replacement-screw installs as part of the package. Target preservationists, historic districts, and homeowners who want original-style hardware with modern reliability.
DIY Casement Kits for Makers
Assemble and sell DIY kits that pair pre-cut sash/frame components with the complete top-and-bottom hinge set and labeled replacement screws. Market kits for small cabinets, display windows, or planter fronts on Etsy and at craft fairs; include step-by-step instructions and a parts checklist to simplify installation for hobbyists.
Workshops & Online Courses
Run hands-on workshops and paid video courses teaching casement hinge install, sash repair, and retrofit techniques. Use the authentic hardware in demonstrations and sell bundled materials (hinges + screws) as course add-ons. Upsell on-site install day rates for local students who want professional help completing projects.
Contractor Supply & Installation Bundles
Partner with local contractors and window specialists to supply pre-packaged top-and-bottom hinge sets with replacement screws and quick-install guides. Offer volume discounts for restoration projects and an installation service add-on. Highlight American manufacturing as a selling point for clients specifying domestic-sourced components.
Creative
Pivoting Display Window
Turn an old sash into a wall-mounted display that opens on casement hinges. Mount the hinge set top and bottom to allow the sash to pivot outward 90° so you can access collectibles or seasonal decor behind glass. Use the included replacement screws and the authentic AmesburyTruth hardware for a reliable, period-correct mechanism.
Slim Wall Cabinet Door
Build a shallow medicine-cabinet-style shelf and use the top-and-bottom casement hinges for a tidy, balanced pivoting door. The two-point mounting keeps the thin door rigid and far less prone to sag than a single hinge, and the American-made hardware gives a premium feel for a bathroom or hallway project.
Outdoor Fold-Out Herb Box
Create a weatherized wall planter where the front sash pivots out on the casement hinges to reveal soil trays and make pruning/harvesting easy. Use corrosion-resistant fasteners and the supplied replacement screws for secure attachment; the two-hinge set keeps the planter stable even when weighted with pots.
Hidden Drop-Down Work Surface
Craft a compact workstation that tucks flush against the wall and pivots down on the bottom hinge while the top hinge acts as a guide/stop. With both top and bottom mounting points provided, you get a controlled motion ideal for a laptop shelf or kids' craft desk — sturdy, simple, and serviceable with US-made parts.