Features
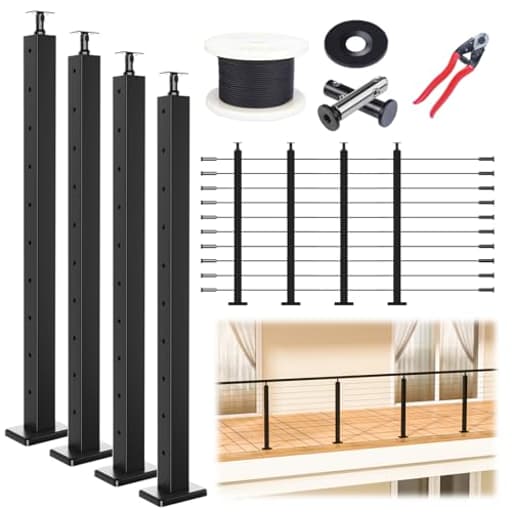
- One Purchase, Complete Solution: Get a comprehensive solution with just one purchase! 15-20ft Modular 36" Cable Railing Post Kit includes 4pcs Cable Railing Posts PS01, Swageless Invisible Cable Railing Kit CB05, Adhesive Washers CR66, Wire Rope WR19 and Cable Cutter CR12. Please note: handrail not included. If you need one, pls search for Muzata HT10
- Free Design 1+1: We offer a diverse range of modular cable railing post kit to match every home style. All you need to do is measure the installation area, purchase the assembly kit, and choose a mounting option from Figure 4. The entire process is as straightforward as putting together a jigsaw puzzle. Tip: Ensure the distance between posts does not exceed 5 ft. Want to explore more layout options or system types? Click "Visit the Muzata Store" below the title
- Easy to Install: No hydraulic crimper needed! Our cable railing kit features a patented swageless design, saving time and money and simplifying installation. For one-post corner or stair to landing solution, search Muzata CB17 cable terminals for seamless transitions. Plus, we include a detailed paper user guide for installation steps
- High-Quality Materials: Cool Black Railing Style! All components, crafted from premium stainless steel with excellent rust resistance, feature a black powder-coated finish. This creates a sleek and harmonious all-black system, adding a modern and stylish touch to your home, while long-lasting durability
- Why Choose Us: Muzata has been working with every effort to provide quality products and professional service, making home renovation easy and affordable. Need personality complete set solutions, pls reach us to get a free design or after-sales service
Specifications
| Color | 15-20ft Level post kit |
| Size | 36" |
| Unit Count | 6 |
Related Tools

This modular cable railing kit provides a complete 15–20 ft, 36-inch-high, four-level post system for installing horizontal stainless-steel cable infill on decks or stairs; it includes four posts, swageless cable terminals, adhesive washers, wire rope, and a cable cutter (handrail not included). Components are black powder-coated stainless steel to resist corrosion, the swageless design eliminates the need for a hydraulic crimper, and the kit includes a paper installation guide with multiple mounting layout options (maintain post spacing under 5 ft).
Muzata 15-20FT Modular Black Cable Railing Kit 36 Inch 4 Level Post Kit Complete Set Cable Railing System for Decks Length Adjustable Easy DIY with Paper User Guide (No Handrail) RWS1 BH4S Review
Overview
I installed the Muzata kit on a 16-foot deck run with a short stair section to see how “complete” and DIY-friendly it really is. In short, it’s a thoughtfully packaged system for a modern, low-visibility railing, and the black powder-coated stainless steel looks great once everything is tensioned. The swageless terminals keep you out of specialized crimping tools, and the included cutter is better than a throwaway. But there are practical quirks—hardware choices, instructions, and some layout constraints—that you should plan for before you start cutting cable.
If you’re covering a straight 15–20 ft run at 36 inches high and want a clean, all-black look without piecing a system together from scratch, this kit gets you most of the way there. You will need to source your own handrail, and you’ll want to verify your substrate and fastener choices before committing to the first hole.
What’s included and first impressions
The kit ships with four 36-inch posts, black-coated stainless wire rope, swageless terminal fittings, adhesive grommet washers, and a cable cutter. All visible metal is finished in a uniform satin black that resisted fingerprints during install and looks cohesive once assembled. The posts are pre-drilled for horizontal runs, and the bases are stout with four-bolt patterns that inspire confidence when properly anchored.
A few pleasant surprises:
- The swageless fittings are compact and genuinely “invisible” once tensioned.
- The cutter is sharp enough to give clean ends, which makes the terminal assembly easier.
- The overall look is consistent—cables, posts, and fittings all match in finish.
What’s not included:
- A handrail. Plan on a wood or metal top rail and mount hardware of your choosing.
- Spare fittings. Inventory is tight; treat each terminal carefully during install.
Planning and layout
Measure your run and account for end terminations, post spacing, and code. The guidance to keep post spacing under 5 ft is realistic for keeping cable deflection in check. I set mine at roughly 4 ft on center for a stiffer feel.
A few layout notes from my build:
- Height and infill spacing: You’re at 36 inches high with horizontal cables. Cable spacing typically aims to maintain less than a 4-inch gap under load. Plan the number of cables accordingly and tension evenly.
- Stairs: The pre-drilled hole pattern works for most straight runs. On stairs with deep nosing, the lowest hole placement can get tight. Shimming the post or omitting the lowest run on the short stair section solved it for me. If you’re transitioning from a stair to a landing at a corner, consider dedicated corner/stair terminals from the same ecosystem; they make cleaner geometry.
- Handrail strategy: I prefer to mount the handrail (I used a 1x4 cedar cap) before tensioning cables. It ties the posts together and keeps everything square while you pull tension.
Dry-fit the posts, tape out cable paths, and make sure you have the right anchors for your substrate. The included lag screws were usable in solid framing, but they’re long and partially unthreaded; in thinner deck boards you can end up with insufficient thread engagement on the top side. For decking over framing, I had better results replacing them with fully-threaded 5/16-inch bolts sized to my layer thickness, pulling into the framing below.
Installation experience
The appeal here is the swageless design: you cut cable, insert, and tighten. No hydraulic crimper required. That claim held true—once you get a feel for the terminal internals, the process is repeatable and quick.
My sequence:
1. Set and plumb posts, starting at an end, using appropriate anchors for the substrate.
2. Mount the handrail/cap to stabilize the posts.
3. Thread all the adhesive washers onto their holes with backing still on.
4. Pull and cut one cable to fit, assemble both ends, test the tension range, then use that cable as a template for the rest.
5. Tension from the bottom cable upward. It helps keep load consistent and prevents upper cables from slackening as lower ones tighten.
Notes and tips:
- Cutting: The supplied cutter makes clean, square cuts. Tape the cable where you cut to avoid frayed strands.
- Adhesive washers: These have peel-off adhesive backing. Don’t expose the adhesive until you’re fully tensioned; the backing keeps them sliding during setup and protects the finish. Once everything is tight, peel and press them home, then trim the backing around the cable.
- Fittings: The terminals are compact, but they aren’t forgiving of miscut lengths. Sneak up on the length to ensure you have enough adjustment range to tension without bottoming out the fittings.
- Tools: You’ll want a torque-friendly driver for base anchors, a couple of open-end wrenches for terminals, a level, and a square. A rubber mallet helps seat posts on shims if needed.
Where I hit friction:
- Instructions: The paper guide covers basics but glosses over critical sequencing (e.g., when to reveal adhesive on the washers, recommended tensioning order). Expect to lean on your own best practices.
- Hardware matching: On deck surfaces with thinner boards, the supplied lag screws can be wrong-sized. Have a hardware store run ready; fully-threaded bolts solved it for me.
- Lowest cable on stairs: Clearance can be marginal; plan your tread nosing and post placement carefully.
Quality and durability
The black powder coat is even and attractive. I did a few intentional scrapes with a driver bit around washers and fittings—no chipping, only minor scuffs that wiped clean. The stainless beneath should hold up well outdoors. I’d still recommend periodic inspection, especially in coastal environments, and a quick washdown to remove salts or debris.
Once tensioned, the system feels secure. With posts properly anchored and a solid top rail, there’s minimal deflection under a firm lean. The “invisible” terminals keep the sightline clean; it reads as a continuous black line of cables rather than a busy grid of hardware.
Code and safety notes
- Verify local code for railing height and stair specifics; some jurisdictions call for 42 inches on decks.
- Maintain cable spacing to prevent a 4-inch sphere from passing anywhere along the run.
- Tension evenly and recheck after 24–48 hours; cables can settle slightly.
- For masonry installs, use appropriate anchors rated for the base material and ensure edge distances aren’t compromised.
Practical tips from the install
- Use the first dialed-in cable as a cutting template for the rest to save time.
- Work bottom to top when tensioning. It reduces the need to re-tension.
- Keep the washer adhesive covered until the very end; then peel and press.
- If your deck surface is thinner or you’re going through decking into framing, plan on swapping the base fasteners for fully-threaded bolts sized to your stack-up.
- Consider rubber grommets if you want extra abrasion protection at the post holes, especially on stair runs.
What I’d change
- Documentation: The kit needs clearer, step-by-step guidance with real photos, especially on washer use, tensioning order, and troubleshooting cable length vs. adjustment range.
- Fastener bundle: Include alternate-length, fully-threaded bolts or at least specify substrate-dependent fastener choices prominently. A few spare terminal parts would also reduce anxiety during a first-time install.
- Hole placement: Raising the lowest cable hole slightly on the stair-friendly posts would improve clearance on nosed treads without users having to shim or omit a run.
Who it’s for
- DIYers who want a cohesive, modern cable look without buying a separate crimper and hunting for compatible fittings.
- Small to mid-length straight runs (15–20 ft) with simple geometry.
- Deck owners who plan to use a wood cap rail and can handle minor hardware substitutions.
Who should look elsewhere:
- Complex multi-landing stairs or aggressive angles where specialized corner/stair hardware and custom hole patterns are a must.
- Users who need hyper-detailed, hand-holding instructions with zero room for interpretation.
Recommendation
I recommend the Muzata kit for straightforward deck runs and simple stair sections if you’re comfortable with basic layout, swapping a few fasteners to match your substrate, and working methodically. The end result is clean, sturdy, and visually light, with the major win being the swageless terminals that cut the tooling curve. The finish quality is good, the included cutter does its job, and once tensioned, the system feels secure and looks intentionally designed.
Plan ahead for post anchoring, consider upgrading or adjusting base hardware for your specific build-up, and give yourself extra time on the first cable. Do that, and you’ll get a modern railing at a fair value without specialty tools.
Project Ideas
Business
Local Cable Railing Install Service
Offer turnkey installations for homeowners, property managers and Airbnb hosts: site visit, custom layout, install (including optional handrail fitment), and cleanup. Market via social media, local contractor networks and real estate agents. Price by linear foot with tiers (basic kit install, premium handrail/add-ons, rush service) and offer photo portfolio and seasonal promotions.
Pre-packaged Custom Kits & Add-on Store
Create and sell niche bundled kits: e.g., indoor loft kits with matching hardwood handrails, balcony plant-kit bundles (post + planters + LED connectors), or stair transition sets. Source the modular kits wholesale, add curated handrails, endcaps, mounting templates, and how-to guides. Sell on Shopify, Etsy or Amazon and leverage how-to videos and downloadable templates to reduce support requests.
Event/Pop-up Barrier & Decor Rentals
Rent modular cable railing systems for outdoor events, weddings, and pop-up retail spaces as temporary crowd-control and stylish barriers. Offer themed packages (string lights, signage hooks, planter attachments) and same-day setup/teardown. Charge per event by linear foot plus delivery and staffing fees; target event planners, venues and farmers markets.
Workshops, Online Courses & Consultation
Run paid weekend workshops teaching DIY cable-rail installation and sell the kit as a bundled material. Complement with an evergreen online course (video modules, checklists, troubleshooting) and 1:1 remote consultations for custom layouts. Upsell on-site installs for clients who prefer not to DIY and create affiliate links to the exact kit and compatible handrails.
Creative
Loft or Interior Stair Railing Upgrade
Use the 36" modular kit to replace bulky balusters with a sleek horizontal cable railing for an indoor loft or staircase. The swageless terminals and black powder-coat give a clean, modern look without a hydraulic crimper; add a wooden or metal handrail (sold separately) to match your decor. Good quick weekend project: cut posts to fit, anchor to stringer or floor, tension cables, then finish handrail and trim.
Vertical Plant Trellis / Living Wall
Mount the posts vertically along a balcony or fence and string multiple cable runs as a support grid for climbing plants, hanging pots, or woven planter baskets. The corrosion-resistant stainless-steel cables stand up to outdoor moisture and can double as anchor points for lights or hanging decor. Great for small-space gardening — mix planters at different heights for texture and privacy.
Suspended Shelving / Media Wall
Repurpose the posts and cables as supports for suspended wooden shelves: use the cables as tension members and bolt wooden planks to the posts for a floating, industrial shelving unit or media console. The swageless system simplifies repeated anchor points and keeps the aesthetic minimal; ideal for entryways, lofts, or retail displays.
Pergola Half-Wall & Privacy Screen
Create a low cable half-wall on a pergola or deck edge and weave bamboo slats, fabric, or reed panels through the cable runs for a contemporary privacy screen. The black powder-coated finish looks cohesive outdoors and the modular layout (post spacing <5 ft) lets you tailor privacy density while preserving airflow and sightlines.