Features
- VERTICAL QUEEN DIY MUPRPHY BED - Cabinet finished measurements: 86-7/8 in H x 66-3/8 in W x 16 in D (closed) x 86 in D(open) See images for dimensions for hide away bed. High quality Murphy bed kit.
- MULTI-FUNCTIONAL - DIY Murphy Bed Kit! Enjoy a space-saving design, easy construction and assembly, and premium Wall bed hardware that transforms any room into a stylish, multifunctional oasis.
- PREMIUM QUALITY: USA-made innovation and craftsmanship with our bed lift mechanism Murphy bed kit. Engineered for long lasting performance. This hide away bed , delivers sleek, space-saving design.
- LIFETIME WARRANTY: Elevate your space with our premium DIY Murphy bed hardware. Every murphy bed kit includes a Lifetime Warranty, ensuring superior quality, peace of mind, and a space-saving design.
- TOP RATED CUSTOMER SUPPORT: Our U.S.-based team is ready via toll-free phone and online to support your DIY Murphy bed kit. Access 24/7 step-by-step videos online for a seamless DIY experience.
- DETAILED INSTRUCTIONS: Easy DIY murphy bed hardware clear visual instructions (on paper, PDF, online videos) included. DIY Murphy Bed includes full cut list for buying and quickly cutting the lumber.
- NOT INCLUDED WITH MURPHY BED HARDWARE: Basic woodworking tools, lumber from the hardware store, and an innerspring mattress Queen Mattress size up to 60"W x 80"L x up to 12”H and up to 85 lbs.
Specifications
| Color | Black |
| Size | Queen Vertical |
| Unit Count | 13 |
Related Tools
Vertical queen-size DIY Murphy bed hardware kit for building a wall-mounted pull-down bed; finished cabinet measures 86-7/8" H × 66-3/8" W × 16" D (closed) and 86" D (open). The kit contains a U.S.-made bed lift mechanism and hardware for a hide-away design, supports a mattress up to 60" × 80" × 12" and up to 85 lb, and requires lumber, basic woodworking tools, and a mattress (not included). Lifetime warranty and U.S.-based phone/online support are provided, with paper/PDF instructions and step-by-step videos.
Easy DIY Murphy Bed Queen Size DIY Murphy Bed Hardware Kit – Vertical Wall Bed for Space-Saving - Budget-Friendly DIY Setup -Made in USA -Hide Away Design with Murphy Bed Queen Hardware - Bed Lift Mechanism - Pull Down Review
I wanted a guest bed that disappears behind cabinetry and gives me back an entire room during the week. After weighing cabinet-bed options and some overbuilt plans, I went with the Easy DIY Murphy Bed kit in the vertical queen configuration. It’s a hardware-and-instructions package aimed at DIYers who are comfortable working with sheet goods. After building and living with it, I’d call it a well-engineered kit that rewards careful planning and precise execution.
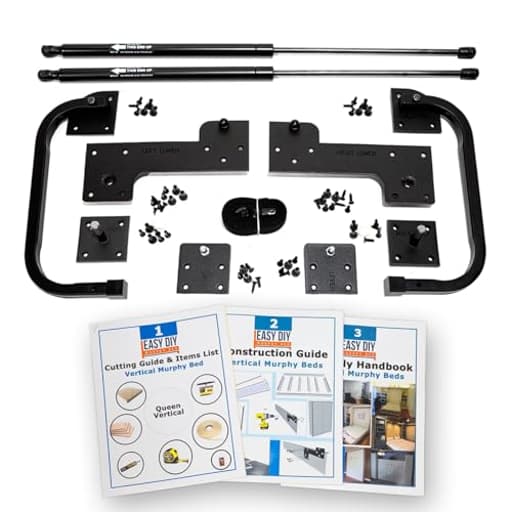
What you actually get (and don’t)
This is a hardware kit, not a flat-pack bed. You supply lumber, sheet goods, finish, basic woodworking tools, and the mattress. In the box: the gas-lift mechanism, pivot brackets, legs, fasteners, and a thorough set of instructions (paper and digital), backed up by step-by-step videos. The hardware has a sturdy, made-in-USA feel—the pistons engage smoothly, and the leg and bracket components are cleanly finished in black.
The plans specify a finished cabinet at 86-7/8 in height, 66-3/8 in width, and 16 in deep when closed. Open, it projects about 86 inches. The mattress spec is a queen up to 60 × 80 inches, no more than 12 inches thick, and up to 85 lb. That constraint matters; choose a lighter innerspring or a modest-weight hybrid. If you throw a dense memory foam mattress at this mechanism and exceed the limit, you’ll fight either sluggish lift or unsafe drop behavior.
Planning and space constraints
Measure twice, plan thrice. The cabinet’s height means you need enough ceiling clearance to tip it upright after assembly. Don’t just measure ceiling height—check the diagonal clearance to pivot the cabinet from horizontal to vertical. With a 16-inch-deep case, you’ll want roughly 88–89 inches of unobstructed height to stand it up comfortably. Low basement ceilings make this step a careful operation; I staged the cabinet on moving blankets and used a helper to control the pivot.
Anchoring is non-negotiable. The bed must be secured to wall studs. I used a high-quality stud finder, verified with a pilot bit, and shimmed along the base to compensate for a slightly crowned floor and a not-quite-plumb wall. Taking time here pays off later: a square, plumb cabinet keeps the bed face gaps even and prevents racking.
Tools and materials that helped
- Four sturdy sawhorses and a flat 4 × 8 torsion-box-style work surface
- A track saw or circular saw with a reliable straightedge guide
- New, high-tooth-count blades for plywood (fine finish crosscuts)
- A drill/driver set with countersink, and a drill guide for perpendicular holes
- Edge banding with an iron-on adhesive and a decent edge trimmer
- Plenty of clamps, painter’s tape, and a good combination square
- Backer boards when drilling through plywood to avoid tear-out
I built the cabinet and bed frame from 3/4-inch veneer plywood, banded all exposed edges, and pre-finished panels before final assembly. If you don’t have a large table saw setup, take the included cut list to a home center and have the sheet goods ripped on a panel saw. It saves time and keeps everything square.
Build experience
With sheet goods cut accurately, the project is very straightforward—though not small. I staged the build into three chunks: cabinet case, bed frame, and then hardware/installation. The instructions are unusually detailed, and the cut list is practical. I appreciated the callouts around critical spacing: the side gap, the footer gap, piston mounting points, and the exact hinge line. There is not much tolerance here. Being off by even a sixteenth in the wrong place can show up as a visible gap or a rub point later.
Adhesive choice matters. Where the plans call for construction adhesive for the frame-to-cabinet bond, consider that decision a one-way door. Dry-fit, mark, and confirm orientation and gaps before glue. I penciled layout lines and even tacked temporary spacers to enforce the specified clearances while clamping. That eliminated second-guessing and kept the reveal consistent top to bottom.
The gas pistons slot in with a reassuring snap, but they do need the cabinet to be secure and a helper to flex the geometry into place the first time. Expect some back-and-forth to seat the pistons on both sides evenly.
Time investment: cutting and edge work took me most of a Saturday; pre-finishing the panels took another long day with drying time; cabinet assembly and hardware install fit into a third day. Plan for a full weekend plus a few evenings if you’re finishing. It’s realistic to complete in 20–30 hours, depending on your shop setup and appetite for sanding and paint.
Daily use and performance
With a compliant mattress fitted, the bed lifts and lowers one-handed. The motion is controlled and even, without the jerky feel I’ve experienced on cheaper spring-based kits. The legs fold cleanly and land square on the floor. Once anchored, the case feels monolithic—no creaks or flex, even when someone flops onto the mattress. I added simple face trim and pulls to match the room; the mechanism didn’t care, but be mindful of added weight on the moving panel.
I also mounted a low-profile, lightweight accessory to the face (make sure to center the mass and stay within the piston balance envelope). If you customize the face, dry-run the lift with any added weight before finalizing.
Documentation and support
The written manual is unusually thorough, with clear diagrams and a logical progression. The videos mirror the steps and are valuable for understanding sequences like piston installation and case anchoring. I did contact support once (about ceiling clearance strategy and shimming order) and got a prompt, practical response. That, along with the lifetime warranty on the hardware, adds confidence that the mechanism is built to last and the company stands behind it.
Accuracy really matters
This build rewards careful measuring. A few tips that saved time and frustration:
- Label every piece as it’s cut and stack by assembly step.
- Keep drill holes perpendicular; a simple drill guide or doweling jig helps.
- Always use a backer board under plywood when drilling through to avoid chip-out.
- Sand and edge-band before assembly; you won’t want a sander near the hardware.
- If your room is tight, clear it completely before the final glue-up and stand-up.
Pros
- Robust, smooth gas-lift mechanism with stable, balanced motion
- Excellent instructions with a usable cut list and companion videos
- Thoughtful design details that minimize guesswork
- Lifetime warranty and responsive, U.S.-based support
- Clean black hardware that disappears visually once installed
Cons
- Demands precise cuts; minimal tolerance for cumulative error
- Requires a large, flat work surface and at least one strong helper
- Mattress weight limit caps you at lighter innerspring or hybrid options
- The kit is only part of the cost; quality plywood and finishing materials add up
- Ceiling clearance and anchoring can be tricky in older, out-of-square rooms
Who it’s for
If you have basic-to-intermediate woodworking skills, are comfortable breaking down plywood, and can commit a weekend to focused shop time, this kit is a smart way to add a real guest bed without surrendering a room. It’s not the first project I’d hand to a brand-new builder, but it’s well within reach of anyone who has built cabinetry or closet organizers and can work to a line.
If you want plug-and-play furniture with zero shop work, buy a finished Murphy bed cabinet. If you want a custom look, the satisfaction of your own build, and a mechanism that performs like commercial units, this strikes an excellent balance.
Recommendation
I recommend this kit. The hardware quality, clear documentation, and dependable lift mechanism make it a strong foundation for a Murphy bed project. It does ask for precision and planning, and the real cost lives in the plywood and finishing, not just the box that arrives. But the result is a sturdy, smooth-operating bed that disappears behind a clean facade and transforms a room on demand. For DIYers willing to measure carefully, pre-finish thoughtfully, and anchor properly, it delivers exactly what a good Murphy bed should: space when you need it, comfort when you don’t.
Project Ideas
Business
Turnkey Murphy Bed Install Service
Offer a local build-and-install service for homeowners, landlords, and short-term rental owners. Services: site consult, plywood/lumber procurement using the kit's cut list, assembly of the cabinet, installation and safety check, mattress recommendation. Pricing model: flat install fee + materials markup or bundled package (labor + materials + mattress). Emphasize the kit’s U.S.-made hardware, lifetime warranty, and video instructions as selling points.
Prebuilt Face Panels & Custom Finishes
Sell pre-cut, pre-finished cabinet faces and trim packages that match common interior styles (modern matte, shaker, mid-century). Customers buy the Murphy hardware kit and your custom face panels to simplify the DIY. Deliver via local pickup or ship flat-packed. Offer upsells like integrated handles, soft-close latches, paint kits, and coordinated shelving kits.
Airbnb / Property Staging Partnership
Partner with short-term rental managers and real estate stagers to install Murphy beds in studio units to increase occupancy and perceived space. Offer short lead-time installs and a warranty-backed maintenance plan. Create case studies showing increased nightly rates or better booking performance to attract property management firms.
DIY Workshops & Weekend Builds
Host hands-on weekend workshops at makerspaces or community centers teaching participants to build the cabinet around the Murphy hardware. Revenue streams: workshop fee, kit sales at a markup, and add-on services (delivery, paint, custom hardware). Use the kit’s step-by-step videos and paper instructions to structure curricula and ensure participants complete a working wall-bed.
Niche Conversions — Tiny Homes & Vanbuilders
Specialize in converting closets, alcoves, and tiny-home interiors into space-saving bedrooms using the vertical queen kit. Offer consulting, measurements, and custom lightweight cabinetry optimized for the kit’s 16" closed depth and lift capacity. Target tiny-home builders, RV converters, and van-life influencers with package deals and collaborative marketing.
Creative
Home Office by Day / Guest Suite by Night
Build a vertical Murphy bed cabinet that incorporates a fold-down desk mounted to the inside of the cabinet face. During the day the face acts as a working surface with cable management and shallow shelving; at night the desk stays attached or folds up, and the bed pulls down into a comfortable queen (supports mattress up to 60" x 80" x 12", 85 lb). Use plywood or hardwood face panels and a soft-close latch for a refined finish. Ideal finishes: matte paint for modern offices or walnut veneer for a warm study.
Entertainment Wall with Hidden Bed
Design a living-room wall unit that frames a flat-screen, media shelf, and open display cubbies around the Murphy bed cabinet. When closed it reads like built-in cabinetry; when open the bed drops down without disturbing the media layout. Keep shelving lightweight and mount shelving to the wall frame (not the moving bed) to stay within the hardware weight limits. Add integrated LED strip lighting for a dramatic reveal.
Kids’ Themed Nook — Playroom to Sleepover
Create a playful, themed cabinet (treehouse, spaceship, castle) that hides a queen bed for sleepovers. Inside the cabinet add a chalkboard or whiteboard panel, a small book ledge, and removable soft LED lighting. Use kid-friendly, durable finishes and round off edges. Because the kit supports a 12" mattress max and 85 lb, choose a lighter foam mattress and keep decorative items detachable so the lift mechanism isn't overloaded.
Tiny Home / Tiny-Room Conversion
Use the vertical queen kit in a tiny house, studio, or van conversion to free up daytime floor area. Design the surrounding cabinetry for shallow storage (16" closed depth), fold-away clothes hooks, and ventilated shoe cubbies. Use lightweight cabinet materials (Baltic birch or MDF faced with veneer) so the working parts remain within spec. The kit’s lifetime warranty and step-by-step videos make it practical for a one-person build.
Pet-Friendly Murphy: Dog Nook + Bed
Build a cabinet with a lower pet nook (insulated, ventilated, removable cushion) and the Murphy bed above. The pet area stays accessible when the bed is closed and sealed with soft-closing doors. Keep the pet compartment independent of the bed frame so it doesn't affect the lift mechanism. Finish with washable fabrics and a hideaway feeding drawer for convenience.