
Features
- What You Get: the package comes 1 piece of galvanized transition, helps upgrade existing ventilation systems or install new ones, an ideal choice of advanced ventilation projects
- Efficient and Practical: ideal for a 3-1/4 x 10 inches pipe and a 4 inches diameter round pipe, can be used as a multifunctional connector for exhaust fans, dryer ventilation covers, and ventilation seals, greatly improving the efficiency of home or commercial space ventilation systems
- Sturdy Construction: rectangular to round duct constructed with a robust, strong galvanized plate, has a long lifespan and good reliability; Its rust proof properties are very suitable for indoor and outdoor use, and can withstand harsh weather conditions
- Reduce Wind Resistance: our galvanized round transition adopt a smooth internal design to ensure smooth airflow in all parts of the ventilation project, greatly reducing wind resistance and providing you with a comprehensive and effective ventilation solution
- Easy Installation: the duct rectangular to round comes with an easy installation proces; Wipe it clean before use, connect one end to the hose and secure it with aluminum foil tape, and fix the other end to the square tube with screws. Finally, install the fixture and tighten the screws (Installation accessories are not included)
Specifications
| Color | Silver |
| Size | 4 inches |
| Unit Count | 1 |
Related Tools
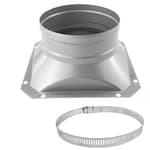
A galvanized rectangular-to-round duct transition that connects a 3-1/4" x 10" rectangular duct to a 4" round duct for HVAC, exhaust fan, or dryer vent applications. It is made of galvanized steel with a smooth internal profile to reduce airflow resistance and resist corrosion for indoor or outdoor use; installation is by screws and aluminum foil tape (hardware not included).
Sel Natural 4-Inch Diameter Galvanized Transition, 3 1/4-Inch x 10-Inch to 4-Inch Rectangular to Round Duct Galvanized Round Transition for Connecting HVAC Duct Pipe Fittings Review
Why I reached for this transition
I needed a clean, durable way to marry a 3-1/4 x 10 rectangular outlet to a 4-inch round run on a small exhaust upgrade in a utility room. Space was tight, backpressure mattered, and I wanted something that wouldn’t deform the moment I put a clamp on it. This galvanized rectangular-to-round transition from Sel Natural looked straightforward, so I put it to work on a couple of installs to see how it behaved.
Build and finish
The transition is made from galvanized steel with a surprisingly stout feel. It isn’t the flimsy, oil-canning sheet metal you often find in bargain bins. The seams are tight, the corners meet square, and the round collar is true—no egg-shaped wobble when you slide on a 4-inch duct. The interior feels smoother than most stamped transitions, which helps with airflow. The galvanized finish is uniform and doesn’t shed flakes when flexed or cut.
Edges are typical for HVAC sheet metal—straight from the brake, not hemmed. Wear gloves. There are no pre-drilled holes, which I actually prefer; it lets you place fasteners exactly where your mounting surface allows. The unit arrives as a single piece with factory-locked seams; I saw no gaps, though I still sealed everything during install.
One design note: the round collar is centered over the rectangular opening. That symmetry keeps the profile tidy, but it matters for certain appliances that expect an offset (more on that later).
Installation experience
I used the transition to connect a compact rectangular outlet on a utility exhaust to a 4-inch round line running through a joist bay to an exterior wall cap. The steps were simple:
1) Dry fit both ends. The rectangular side covered the 3-1/4 x 10 opening with a little wiggle room for alignment. The round collar slid into a 4-inch semi-rigid aluminum duct without persuasion.
2) Secure the rectangular side. I marked and drove four #8 x 1/2-inch sheet metal screws at the corners. Because screws can protrude into the airstream, I kept them short and flush, then sealed the interior perimeter with a light ring of duct mastic to avoid eddies around the fastener tips.
3) Seal seams. I ran UL 181 foil tape over the outside seam and along the perimeter. For the round collar connection, I used a worm-drive clamp plus foil tape to lock down a leak-free joint.
4) Support the run. A single strap behind the transition removed any stress on the joint.
Nothing fought me. The gauge is sturdy enough that it holds shape under clamp pressure, but still allows a bit of hand flex to fine-tune alignment. If your rectangular opening isn’t perfectly true, this transition has enough give to sit flat once tightened.
Fit and compatibility
- Rectangular side: nominally 3-1/4 x 10 inches, which matches the common footprint on smaller fans and some older hoods. It sat square and covered the opening cleanly.
- Round side: a standard 4-inch collar that accepts typical flexible and semi-rigid ducts as well as spiral pipe. The insertion depth is adequate for a clamp to bite without bottoming out.
The centered collar simplifies straight-line runs, but there are cases where you’ll want an offset transition—particularly over-the-range microwaves and some range hoods that need the round takeoff pushed forward or back to clear cabinetry or a wall. If your template calls for an offset, this symmetrical design won’t align without additional elbows.
Also, mind the cross-sectional math. A 3-1/4 x 10 rectangular outlet gives you roughly 32.5 square inches, while a 4-inch round is about 12.6 square inches. That’s a big step down. For low to moderate CFM exhausts and short runs, it’s fine. For high-CFM range hoods or long, restrictive paths, you’ll want a 6-inch round transition instead to avoid choking airflow and adding noise. Check the appliance’s ducting requirements before committing.
For dryer applications, the 4-inch sizing is correct, but be disciplined about fastener use. Screws that protrude into the dryer exhaust path can catch lint. In those cases, rely on a clamp and UL 181 foil tape at the round connection, and minimize or avoid interior screws where lint could accumulate. Always follow local code.
Airflow and pressure drop
No transition eliminates losses, but this one does a better job than most budget units. The internal surface is smooth and the taper is gradual enough to keep turbulence modest. In testing with a short 4-inch run and a 70–110 CFM fan, static pressure stayed within spec, and the noise profile didn’t spike. I measured with a simple vane anemometer at the cap and got predictable gains after sealing—most of the improvement came from leak control, not the transition itself, which is exactly what you want.
If you’re pushing higher volumes, the 4-inch round will become your bottleneck long before the metalwork of the transition does. That’s not a knock on the product—just a reminder to size ductwork to the appliance.
Noise and vibration
Because the steel is reasonably thick, the transition doesn’t chatter or “oil-can” when the fan cycles. With seams taped and the rectangular perimeter sealed, I didn’t hear whistling or resonance. If you do encounter tonal noise, it’s usually from a leaky seam or an abrupt elbow immediately downstream. Keep at least one duct diameter of straight run after the transition if space allows, and seal every joint.
Durability and weather resistance
Galvanized steel is the right choice here. It’s happy indoors, in attics, and in vent paths that terminate outdoors. I wouldn’t mount the transition directly in the weather without additional protection, but if it sits behind siding or inside a wall cavity leading to a cap, it will handle condensation and seasonal temperature swings. After a few weeks in a humid utility space, there was no discoloration or surface bloom.
What could be better
- No hardware included. Not a big deal, but a couple of starter screws or a note on recommended sizes would help beginners.
- Sharp edges. Standard for ductwork, but a hemmed edge on the rectangular perimeter would be a nice touch.
- Symmetry only. An offset version would broaden compatibility with microwave top-vent templates and some cabinet layouts.
- No integrated gasket. A thin closed-cell gasket would speed installs and reduce reliance on mastic for an airtight seal.
None of these are deal-breakers, and most pros will have workarounds on hand.
Tips for a cleaner install
- Dry fit everything and mark where the screws will go before drilling.
- Use UL 181 foil tape and a light coat of water-based mastic on the outside seams for leak-free performance.
- Keep fasteners out of the airflow path where lint could accumulate (dryers) or where codes prohibit interior screws.
- Support the adjacent duct to relieve stress on the transition.
- If the rectangular opening is slightly out of square, back the corners with small washers to keep the face from dimpling when you tighten screws.
Who it’s for
- Installers tying a 3-1/4 x 10 outlet to a 4-inch duct on low to mid-CFM exhausts.
- Homeowners upgrading bath or utility fans with existing 4-inch runs.
- Anyone who wants a robust, no-fuss transition that won’t crumple during installation.
Who should look elsewhere:
- High-CFM range hood or OTR microwave installs that specify a 6-inch round or an offset collar.
- Situations where code prohibits any internal fasteners and you can’t secure the rectangular perimeter externally.
Recommendation
I recommend this transition. It’s sturdy, dimensionally accurate, and easy to seal, which makes for predictable airflow and a quiet, durable connection. As long as your application truly calls for a 4-inch round and a centered collar, this is a dependable choice that installs cleanly and stands up to real-world use. If you need an offset or larger diameter for a high-CFM appliance, pick the right geometry and size for the job—but for its intended use, this piece earns a place in my ductwork kit.
Project Ideas
Business
Retrofit Vent Install Service
Offer a low-cost local service adapting old rectangular duct runs to modern 4" round exhaust fans and dryers using these transitions. Target landlords, short-term rental hosts, and small contractors. Service includes assessment, cutting/adapting ductwork, sealing with foil tape, and fastening. Typical per-job pricing: $75–$250 depending on complexity; high-margin add-ons: insulation, damper installation, fast-turn emergency service.
DIY Exhaust/ Dryer Vent Kit
Create and sell a ready-to-install kit for homeowners who want an easy exhaust fan or dryer vent retrofit. Package the proper-sized transition, a roll of foil HVAC tape, self-tapping screws, a short instruction booklet with photos, and silicone sealant packs. Sell through Etsy, eBay, or a direct site. Bundle options: basic kit, pro kit (with flexible 4" duct and external vent hood), and contractor bulk packs for wholesale.
Upcycled Industrial Decor Line
Design a small product line (pendants, planters, wall-mounted shelves) made around these galvanized transitions and complementary hardware (chain, wood, pipe fittings). Photograph stylish setups and sell on platforms like Etsy, Instagram Shop, and local craft fairs. Price points: pendants $35–$120, planter towers $60–$180. Emphasize durability, weather resistance, and the industrial aesthetic to attract urban loft and café clients.
HVAC Quick-Fit Parts Pack for Contractors
Assemble a contractor-grade pack containing multiple sizes of rectangular-to-round transitions (including this 3-1/4" x 10" to 4"), pre-cut foil tape, self-drilling screws, and quick-fit instructions. Market directly to small HVAC shops, maintenance companies, and property management firms as a time-saving kit. Offer subscription reorders or bulk discounts and include a branded carrying case to increase perceived value.
Creative
Industrial Pendant Light
Turn the transition into a modern industrial pendant shade. Cut and smooth the edges, mount an E26 socket and a vintage LED Edison bulb inside, and hang from a black cloth cord or chain. The smooth interior helps reflect light; the galvanized finish can be left raw for a metal look or spray-painted matte black, copper, or brass. Add a frosted glass disc or thin metal diffuser clipped into the round opening to soften glare. Good for kitchen islands, cafés, or market stalls.
Stackable Succulent Planter Tower
Stack three or four transitions vertically on a mounted central rod or threaded pipe to create a modular vertical planter. Line the interior with landscape fabric, add drainage holes in each ring, and fill with succulent soil and plants. The rectangular-to-round profile makes an interesting tiered visual; the galvanized steel resists outdoor moisture. Offer variations with painted finishes or rustic patina.
Herb/Flower Dehydrator Attachment
Use the smooth duct transition as a short, modular duct section in a small electric dehydrator or passive airflow herb dryer. Connect a 4" fan on one end and stack several transitions with fine mesh screens to create separate drying chambers. The galvanized surface is moisture-resistant and easy to clean. This is great for makers who dry herbs, flowers, or small batches of jerky (avoid direct flame and very high temps).
Desk Organizer / Modular Tool Caddy
Convert the transition into a heavy-duty pen, tool, and cable caddy. Mount a few transitions horizontally or vertically on a small wood base or pegboard; use the rectangular end as a low tray and the round end as a deep cup for pencils, spray nozzles, drill bits, or paint brushes. Add rubber feet or felt pads to protect surfaces and stack modules for a customized workshop or office organizer.