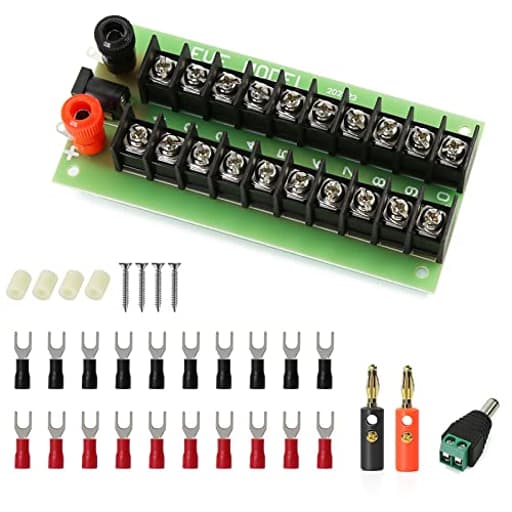
Features
- There are 3 connectors for the input of voltage and 2 x 10 connectors for the outputs on the distributor.
- 4 holes for mounting with wide spacers.
- Maximum voltage: 30V AC or DC voltage.
- Total supply maximum current: 8A (2-pole Power supply to terminal).
- Current carrying capacity per connection: 6A (max).
- California Prop 65 WARNING: This product contains chemicals known to the State of California to cause cancer and birth defects or other reproductive harm. Wash hands after handling.
Specifications
| Color | Black |
Related Tools
Power distribution board with three input connectors and two sets of ten output terminals (20 outputs total) for distributing DC or AC up to 30 V. It includes four mounting holes with wide spacers, supports a total supply current of up to 8 A via a 2‑pole input, and a maximum per-connection current of 6 A.
Evemodel PCB005 1X Power Distribution Board 3 Inputs 2 x 10 Outputs for DC AC Voltage Review
A tidy way to tame low‑voltage wiring
I put the Evemodel distribution board to work in two places: under a model-railroad bench for structure lighting and on a test panel where I stage 12–24 V accessories. In both scenarios, the goal was the same—turn a bundle of pigtails into something orderly, serviceable, and safe. The board’s layout is straightforward: three screw terminals for input and two banks of ten outputs, all rated for low-voltage AC or DC up to 30 V. The overall current rating is modest at 8 A, which is appropriate for hobby lighting, small motors, and accessories, but not for high-power loads.
Even before wiring it, the board ticks two important boxes for me: it mounts cleanly and it labels clearly. The four mounting holes and included wide spacers gave me the standoff height I needed to route wires behind the board without pinching insulation. The black PCB with white silkscreen is easy to read under the bench with a headlamp—small quality-of-life details that pay dividends during troubleshooting.
Design and build quality
The terminal blocks clamp consistently and accept stranded wire without drama. I had no trouble with 18 AWG conductors when used with ferrules; 20–22 AWG also seated well for LED runs. The screws don’t feel gummy or soft, and the blocks are firmly anchored, which matters when you’re tightening multiple times during a layout reconfiguration. The board traces are broad and well-tinned, and the soldering on my unit was clean with no cold joints or sloppy bridges.
Hardware-wise, the standoffs are nicely sized and keep the underside clear of stray staples or splinters on wood surfaces. I did swap the included mounting screws for slightly longer ones to get a better bite in plywood—an easy fix and worth doing if you’re mounting through carpet or foam. Once installed, the board sits flat and doesn’t flex under the mild pressure of wire insertion.
Color and finish are utilitarian: a black PCB that disappears visually under a bench but looks neat on a test panel. There’s no protective cover over the terminals, so if your project can snag wiring or you’ll have small hands in the area, consider a simple acrylic guard or enclosure.
Understanding the electrical ratings
Two numbers define how you should plan loads: 8 A total across the board and 6 A maximum per connection. In practical terms, each individual output position can handle up to 6 A, but the total current flowing through the board should not exceed 8 A. That means you can’t run multiple 6 A branches simultaneously; this is a distribution and organization solution, not a high-current power bus.
The board is advertised for up to 30 V AC or DC. I ran 12 V DC continuously around 4–5 A total for mixed LED loads without noticeable warming. Checking with an IR thermometer after a few hours, I saw only a slight temperature rise at the input terminals—exactly what I’d expect for this current level. I also powered 16 VAC accessory circuits for turnout motors and lamps, and the board handled them fine. It’s essentially a passive bus with screw terminals, so polarity is up to you. For DC, I treated each bank of ten as a “+” or “–” bus as needed and tied return paths accordingly.
The three input terminals offer flexibility, but you should verify the mapping on your unit before committing. On mine, two inputs fed the two output banks, and the third could be used either to parallel both banks to a common source or feed an auxiliary/common line, depending on how you bridge and label your rails. A quick continuity check with a meter takes the guesswork out and ensures your DC polarity or AC pairing is exactly what you intend.
Installation experience
Under the layout bench, I assigned one bank to structure lighting and the other to street and platform lights. Using ferrules on stranded wire makes a big difference here; you get consistent clamping torque and fewer stray strands. I labeled each output with a small tape flag so I could trace circuits later. The standoffs gave ample room to route incoming supply wires behind the board and tie them off to a nearby cable tie mount, adding a bit of strain relief.
I recommend upstream fusing matched to your supply and branch needs. Since the board doesn’t provide individual fuses, I added an inline fuse at the supply and used a small fused splitter for critical circuits like turnout control. It’s a simple way to compartmentalize faults: if someone shorts a lamp during scenery work, you don’t lose the entire zone.
For wire gauge, 18 AWG is a comfortable default for runs carrying a couple of amps. For purely decorative LED circuits drawing tens of milliamps per branch, 20–22 AWG is fine. If you’re anywhere near the upper end of the board’s ratings, keep lead lengths short and ensure all screws are snug. I recheck torque after a day because stranded copper can cold-flow slightly and loosen under the clamp plate.
Mounting took minutes. I predrilled pilot holes, set the spacers, and positioned the board so the terminals faced me when I’m kneeling at the bench edge. That orientation sounds trivial, but it’s the difference between a quick tweak and a frustrating reach. After a few weeks of rearranging loads, the terminals still feel as crisp as day one.
Where it excels (and where it doesn’t)
This is a sweet spot tool for model railroads, slot-car tracks, small RC charging rigs, LED signage, and general low-voltage hobby projects. It makes it easy to fan out from a single supply to many endpoints and keep things logically organized. Because it accepts AC or DC up to 30 V, it slots neatly into accessory systems that still run on 12–16 VAC transformers as well as modern DC LED setups.
If you need per-circuit protection, status LEDs, or distribution across higher voltages or currents, you’ll want a different class of product. There’s no DIN rail option or enclosure in the box, so industrial panels and mobile environments (vehicles, marine) are outside its comfort zone unless you add protective mounting and shielding. And for high-current LED strips, pumps, or Peltier elements, the 8 A ceiling will run out quickly—use multiple boards or step up to heavier busbars with fusing.
Safety and small considerations
It carries a California Prop 65 warning; I handled and mounted it as I would any PCB—wash hands after a long session and avoid eating or drinking over the workbench. Stay within the 30 V limit and do not mix mains voltage on or near the board. If you’re distributing AC, label clearly to avoid mixing with DC lines down the road.
A small wishlist: a protective terminal cover would be welcome, slightly longer mounting screws would suit thicker substrates, and etched bus maps or a quick-start diagram would reduce the need for a meter on first use. None are deal-breakers, but they’d refine an already useful product.
Verdict and recommendation
In use, this distribution board does exactly what it promises: it turns a messy cluster of low-voltage runs into a clean, serviceable hub. The terminals clamp well, the layout is intuitive, and installation is quick. Respect the 8 A total rating and the 30 V ceiling, and it’s a reliable backbone for hobby lighting and accessories. I recommend it for anyone building out a model layout, accessory panel, or small 12–24 V DC/AC system who values organization and easy expansion. If you need per-branch fusing or higher current capacity, pair it with upstream protection or step up to a fused distribution block; otherwise, this board is a straightforward, budget-friendly way to keep low-voltage wiring under control.
Project Ideas
Business
Pre-wired Maker Power Kits
Produce and sell pre-assembled power distribution kits targeted at makers, schools and hobbyists: the board mounted into an attractive, labeled enclosure with common adapters (banana jacks, DC barrel, screw terminals) and per-branch polyfuses. Offer variants (single-voltage, multi-rail) and provide documentation with safe current guidelines. Price as an easy-to-integrate power module for DIY projects and labs.
Event & Stage Lighting Hubs
Offer compact power hubs for small event companies, photographers and venue technicians to power low-voltage LED strips, uplights and effects. Create rental-ready units with protective housings, quick-lock connectors, tri-color status LEDs and cable management. Market the service for pop-up events, trade shows and photo/video shoots where distributed low-voltage power is needed quickly and reliably.
Service Shop Diagnostic Harness
Develop a diagnostic and servicing accessory targeted at e-bike, scooter and small vehicle repair shops. Package the board with reinforced terminals, test leads, and a panel-mounted voltage/current meter so technicians can power and test multiple circuits simultaneously during diagnostics or repairs. Offer this as a value-add tool in repair kits or as a branded shop instrument.
STEM Classroom Power Solution
Create classroom-focused kits that include the distribution board, clear safety labeling, individual output on/off switches, and per-output current limiting. Add lesson plans and experiments that show safe distribution of power to microcontrollers, sensors and LEDs. Sell bundles to schools and makerspaces emphasizing safety, low-voltage operation (≤30 V) and hands-on learning.
Smart Monitored Distribution Add-on
Develop a premium product by adding per-output current sensors, switching MOSFETs and Wi‑Fi/Bluetooth monitoring to the base board. Sell this as an IoT-enabled power hub for prototype labs, small manufacturing fixtures and smart installations where remote monitoring, alerting on overcurrent and scheduling per-output power is valuable. Offer firmware, an app and enterprise options (bulk provisioning, analytics).
Creative
Zoned LED Lighting Rig
Build a multi-zone LED lighting system for a room, studio or display. Use the three inputs as separate power sources or master zones (e.g., warm, cool, accent) and the 20 outputs to feed individual LED strips, pods or downlights. Mount the board into a slim enclosure with labeled outputs and use MOSFET-based PWM drivers on each output line for dimming and color control from an Arduino/ESP. Important: respect the 30 V and 6 A per-connection limits and fuse each major branch to avoid overloading the 8 A total supply.
Portable Bench Power Hub
Create a rugged bench power distribution module for electronics prototyping and repair. Install the PCB in a benchtop case, add banana/banana-to-terminal adapters or screw terminal breakout panels, main power switch, and per-output indicator LEDs. Use the three inputs for multiple supply rails (e.g., 5 V, 12 V, 24 V) or for redundancy, and label outputs for quick access. Add inline fuses or resettable polyfuses so each output is protected from shorts during development.
Multi-Battery Service/Charging Station
Assemble a battery service station to charge and test multiple small 12–30 V batteries (or series packs) in a controlled way. Use the three inputs as selectable charger inputs (or three isolated chargers) and the outputs to route charge/discharge to individual battery bays. Include isolation diodes or mechanical switches per output and a simple balancing/voltage-sense circuit to prevent cross-connection. Note: this is suitable for identical battery chemistries only and requires proper charge-management circuitry—do not rely on the board alone for charging safety.
Wearable/Prop Power Harness
Design a discrete power harness for cosplay, film props or stage costumes where many LEDs, small motors and servos need power. Mount the board in a small sealed box hidden in a backpack or belt pack. Use the 20 outputs to run separate accessory channels (left arm, right arm, helmet, etc.), and use the three inputs to split the pack into redundant supplies or different voltages. Keep wiring neat, fuse high-current lines, and plan cooling/venting if enclosure gets warm.
Kinetic/Interactive Art Controller
Power an interactive sculpture with many small actuators and lights. The PCB gives you 20 distributed outputs that you can pair with driver boards or relays controlled by a microcontroller to sequence motion and lighting. Use the three inputs to separate heavy loads (motors) from sensitive electronics (sensors and LEDs) to reduce interference. Include current monitoring or per-channel fusing so a single stalled motor won’t kill the whole installation.