Features
- Quick & Easy Application: No more messy glue and brushes! Just spray evenly on your finished diamond painting for hassle-free sealing in seconds.
- Fast Drying Formula: Our upgraded spray sealer dries completely in just 30 minutes, unlike traditional glue that takes hours to set.
- Long-Lasting Protection: Forms a strong, glossy protective layer to prevent diamonds from falling off and keep your artwork looking vibrant for years.
- No Residue, No Yellowing: Transparent, non-sticky finish that preserves the shine and color of your diamond art without leaving residue or discoloration.
- Ideal for All Diamond Paintings: Compatible with all types of diamond art projects. 80ml bottle provides ample coverage for multiple paintings.
Specifications
| Color | 1 PACK |
| Size | 200ML x 1 |
| Unit Count | 1 |
Related Tools
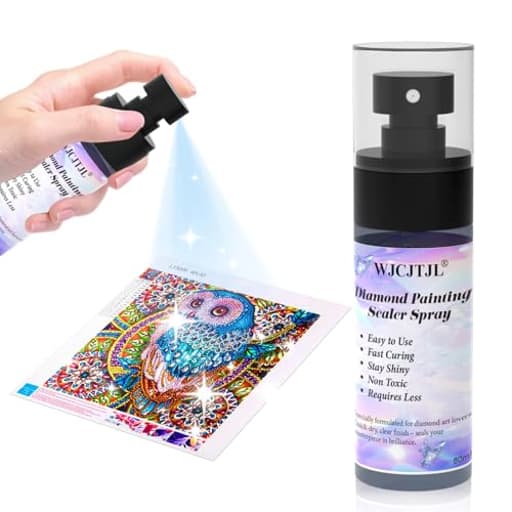
A 200 ml spray sealer designed to fix and protect finished diamond paintings by applying a transparent, glossy protective coating. It sprays on without a brush, dries in about 30 minutes to a non-sticky, non-yellowing finish, and helps keep diamonds from coming loose while providing coverage for multiple projects.
WJCJTJL Upgraded Diamond Painting Sealer Spray - 30 Minutes Quick Dry Diamond Art Sealer Glue, Keep Diamond Art Fixed and Shiny, Diamond Art Accessories and Tools, Easy to Use, No Brush Needed Review
What this spray is and why I tried it
Diamond paintings are fun—until you brush a hand across a finished canvas and hear a few drills ping loose. I wanted something faster and cleaner than brush-on sealers to lock stones in place without dulling the sparkle. The WJCJTJL spray sealer (model DPS-001) promises a quick, glossy, non-yellowing coat in about half an hour, all from a 200 ml spray bottle. I used it on several finished canvases (round and square), a partial-drill piece with exposed printed background, and a set of resin keychain charms to see how it behaves across different surfaces.
Setup and application
The appeal here is simplicity: no mixing, no brush, no cleanup beyond a wipedown of the nozzle. Here’s the application routine that worked best for me:
- Prep: Lightly roll the finished canvas to seat the drills, then brush away dust. Place the piece in a clean cardboard box or on a turntable to control overspray.
- Shake: A full minute of vigorous shaking matters. Under-shaken product can sputter and create uneven dots.
- Distance and passes: I held the spray 10–12 inches from the surface and used slow, overlapping passes at a steady speed, keeping the can moving to avoid pooling.
- Coats: One light coat locks everything down on most wall-hung canvases. For items handled regularly (keychains, bookmarks), two light coats with a 10–15 minute flash time in between gave better reinforcement.
- Drying: Touch-dry around the advertised 30 minutes in normal room conditions. I still let pieces sit a few hours before stacking or framing and treated 24 hours as a full cure.
Pro tip: After each session, a quick wipe of the nozzle with a lint-free cloth keeps it from clogging. A short test spray onto scrap before your next project helps confirm the pattern.
Spray pattern and control
Compared with a brush-on sealer, spray is naturally more uniform, and you avoid brush marks seeping into gaps between drills. That said, the nozzle here isn’t a precision fan tip. It’s a fine mist most of the time, with the occasional speckle if you start or stop over the artwork or if the can isn’t shaken well. Two habits prevented issues for me:
- Always start and end each pass off the edge of the canvas.
- Keep the nozzle clean and the can upright; tilting too far can invite sputter.
On a 40 × 30 cm canvas, I didn’t see runs or pooling with light coats. If you flood an area, it can wick into the drill grid and slightly darken the printed fabric, especially on partial-drill pieces. Light passes solve that.
Finish and appearance
The finish is glossy and transparent. On full-drill canvases, the spray didn’t cloud or chalk the facets; the sparkle stayed lively. AB-coated drills retained their iridescence after drying. The coating leveled enough to tie the surface together without filling the grid, so the micro-faceted look remained intact rather than turning into a glassy sheet.
On partial-drill pieces, the sealer left a uniform sheen across both the drills and the exposed printed background, which can be a plus if you’re framing without glass. If you prefer the background to stay matte, mask those areas before spraying.
I saw no tinting or yellowing while testing and revisiting pieces over several weeks. As with any clear coat, avoid heavy applications—thick layers are where yellowing typically starts over time.
Bond strength and durability
After curing, I flexed canvases, tapped them against a table edge, and ran a microfiber cloth across the surface. The drills stayed put. For items that will live on a wall, one coat felt sufficient. For high-touch objects (keychains, luggage tags), two coats made a noticeable difference; single-coated charms still felt secure, but two coats shrugged off more aggressive rubbing.
A few practical notes:
- The coating dried non-sticky and didn’t attract dust.
- It’s water-resistant enough for light moisture (a damp cloth), but I wouldn’t treat it as waterproof. For coasters or outdoor pieces, I’d still choose a more robust topcoat or plan on additional sealing.
Drying time, odor, and cleanup
Dry-to-touch in about 30–45 minutes matched my results in a 70–72°F room at moderate humidity. Higher humidity pushed it closer to 45 minutes. Odor is present but mild compared with solvent-heavy sprays; I still prefer a window open or a garage setup. There’s no messy brush cleanup—just wipe the nozzle and cap it.
Coverage and bottle size
This is a 200 ml bottle. Using light coats, I covered:
- Three 30 × 40 cm canvases with one coat each
- One 30 × 40 cm canvas with two coats
- A handful of small accessories
I finished with roughly a third of the bottle remaining. Your mileage will vary with technique and coat thickness, but it’s reasonable to expect multiple projects from a single bottle.
Where it fits versus brush-on sealers
Brush-on formula advantages:
- Penetrates slightly deeper into gaps for a “grout-like” lock on loose sections
- Absolute control over where product goes (no overspray)
This spray’s advantages:
- Speed: no setup, fast coverage, quicker dry-to-touch
- Finish: no brush marks or streaks, even on large surfaces
- Convenience: ideal for people who don’t want to babysit thick coats or wash brushes
For most full-drill canvases in frames, I prefer this spray. For heavily gapped drills or fabric items you plan to handle constantly, a brush-on product or a two-coat spray approach may be better.
Quirks and limitations
- Nozzle temperament: It’s generally fine but can sputter if under-shaken or if the nozzle isn’t wiped. A test spray and steady distance reduce risk.
- Overspray: Mask edges and surrounding surfaces, especially with partial-drill pieces. A cardboard spray booth saves headaches.
- Not a cure-all for poor adhesion: If your underlying canvas adhesive is failing, the spray helps, but it’s not a structural fix for large sections lifting off.
- Gloss only: If you prefer a matte or satin look, this product doesn’t offer sheen options.
Tips for best results
- Seat and clean the drills before spraying; seal in dust and you’ll see it forever.
- Use two light coats instead of one heavy coat for handled items.
- Keep passes overlapping by about 50% and start/stop off-canvas.
- Ventilate and give it time; handle gently until fully cured.
Who will appreciate it
- Hobbyists finishing multiple canvases who want a fast, low-mess seal
- Anyone framing without glass who wants a cohesive, glossy finish
- Crafters making keychains, bookmarks, and tags who need added durability without a thick, gunky layer
If you’re extremely particular about matte finishes or you prefer brush-on “grout” sealing that fills gaps between drills, this may not be your favorite.
Recommendation
I recommend the WJCJTJL spray sealer for diamond art makers who value speed, clean application, and a clear, glossy finish that preserves sparkle. It locks drills in place effectively with one to two light coats, dries in roughly half an hour, and avoids the brush marks and long cure times of traditional glue-based sealers. You’ll want to respect its quirks—shake thoroughly, test spray, and keep the nozzle clean—but with basic technique, it delivers reliable, non-yellowing protection across full- and partial-drill projects. For heavy-use items, plan on two coats; for wall pieces, one coat is usually enough. Overall, it’s a practical, time-saving addition to a diamond art toolkit.
Project Ideas
Business
Finished Sealed Artwork Shop
Build an online shop (Etsy, Shopify, Amazon Handmade) selling fully finished, spray-sealed diamond paintings ready to hang. Use the 30-minute dry time to offer quick shipping and turnaround. Market the sealed finish as a premium benefit (no loose gems, long-lasting gloss, non-yellowing).
Sealing & Framing Service
Offer a local or mail-in finishing service for other crafters: spray-seal, edge-fix, and professionally frame diamond paintings. Charge per size/complexity and offer expedited options leveraging the quick-dry formula for next-day turnaround.
Premium DIY Kits & Bundles
Assemble and sell upgraded diamond painting kits that include the 200 ml spray sealer as a finishing accessory. Position them as ‘premium’ kits—include instructions for sealing, tips for even coverage, and a small brush/edge adhesive for framing prep to justify a higher price point.
Private Label Sealer & Subscription
Source the sealer in bulk and create a private-label product targeted at diamond painting communities. Offer a subscription refill model (every X months) or bundled pricing for clubs and resellers. Emphasize features like fast drying, non-yellowing, and brushless application in your marketing.
Workshops, Tutorials & Restoration
Monetize expertise by teaching in-person or online classes on finishing techniques, sealing best practices, and small-item conversion (ornaments, jewelry). Offer a paid restoration service for older pieces (re-seal, re-glue loose diamonds) and sell follow-up maintenance packages.
Creative
Glossy Gallery Triptych
Assemble three related diamond paintings into a matched triptych. Spray each canvas evenly with the 200 ml sealer for a consistent, high-gloss finish that prevents gems from loosening, then mount and frame. Quick 30-minute drying gives you a fast turnaround so you can produce sets for gifts or wall collections.
Sparkling Wearables & Accessories
Cut small finished sections of diamond art and adhere them to pre-cut wood/metal blanks to make pendants, brooches, keychains and magnets. Use the sealer to lock gems in place and add a shiny protective coat—several light sprays will secure edges and keep pieces wearable and display-ready.
Holiday Ornaments & 3D Decor
Create seasonal ornaments (eggs, baubles, mini canvases) covered in diamonds. Spray a light, even layer to keep stones from loosening during handling and storage; the non-yellowing finish preserves color. Because it dries in 30 minutes, you can make gift sets quickly for markets or craft fairs.
Mixed-Media Coasters & Trays (Gloss Finish)
Apply diamond art to small wooden or MDF coasters and lock them with multiple thin coats of the sealer to build a durable glossy surface. For heavy-use items, use the sealer as the protective base and then apply an epoxy topcoat. The sealer prevents gem loss and keeps colors vibrant under subsequent finishes.
Textured Frame Accents
Use leftover diamonds and small diamond-painted panels as insets on picture frames or mirror borders. Spray-seal after placement to create a uniform shine and secure loose pieces. This turns a simple frame into a custom, durable focal piece for home décor.