Features
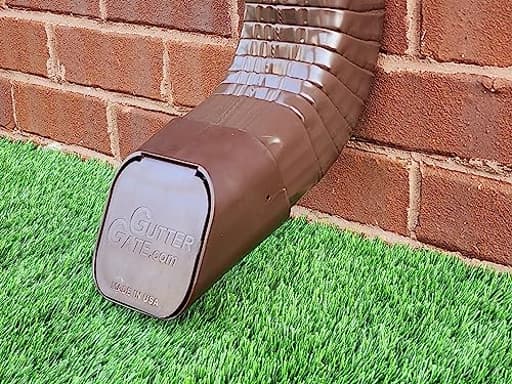
- GutterGate 2"x3" Type-A Brown Gutter Downspout Extension Accessory
Specifications
| Color | Brown |
| Size | 2"x3" |
| Unit Count | 1 |
Related Tools

This 2"x3" brown downspout extension attaches to rectangular gutter downspouts to direct roof runoff away from foundations and landscaping. It is sized for 2"x3" outlets and supplied as a single accessory for installation.
GutterGate 2"x3" Type-A Brown Gutter Downspout Extension Accessory Review
Why I picked up the GutterGate 2x3 extension
My front beds were getting hammered by runoff, and a standard splash block wasn’t cutting it. I wanted something low-profile that would clean up the look at the base of the downspout, shed water cleanly away from the foundation, and discourage the occasional chipmunk from treating my downspout like a ladder. The GutterGate 2x3 extension in brown seemed like the simple, tidy solution: it matches common gutter colors, fits a standard 2x3 downspout, and promises straightforward install.
After using it through several storms, I’m impressed by how much function you can get from such a small piece of hardware—provided you understand its limitations and install it correctly.
Design and build quality
This is a single, Type-A extension sized for 2x3 downspouts. The metal feels notably rigid for this category—stiffer than the flimsy, easy-to-crumple extensions you find in bargain bins. The brown finish is even and consistent, with a satin sheen that blends well with standard gutter paint tones. It’s not a long throw; think of it more as a tidy termination and directional guide rather than a lengthy channel that moves water far across the lawn.
Two things stood out immediately:
- The gauge feels robust enough to shrug off lawn equipment bumps and seasonal handling.
- The geometry is clean and square, which helps it seat firmly without warping.
The unit I bought arrived as a single accessory (as advertised) and included two color-matched self-tapping screws.
Fit and installation
“2x3” is nominal. Actual downspout dimensions vary by manufacturer and age, and the fit can differ depending on whether your downspout end is crimped, dented, or slightly out-of-square. On my house, I had one downspout that the extension slid over perfectly, and another that required a quick crimp with sheet-metal pliers to get a snug, wobble-free fit.
A few install notes that made a difference:
- Check orientation: Type-A refers to the way the rectangular profile is oriented relative to elbows and the direction of the bend. Make sure your downspout’s profile aligns with this extension’s opening so the slip joint mates properly.
- Dry-fit before you fasten. I rotated the extension a few degrees to aim runoff toward a slight slope, which helped carry water away from the foundation without extra piping.
- Use short self-tapping screws on both sides, not just the front. Two was enough to hold firmly; three would be overkill on most setups.
- If you see a gap, a small bead of gutter sealant inside the joint prevents drips that can create muddy splatter at the base.
Installation time per downspout was under five minutes with a cordless drill. No special tools needed beyond tin snips or pliers if you need to tweak fit.
Performance in rain
In light to medium rain, flow is clean and consistent. The squared mouth seems to encourage water to sheet rather than sputter. In heavier downpours, I saw no meaningful backup or restriction at the outlet—important if you’ve dealt with elbows that bottleneck. The extension directs water out and slightly down, which reduces the tendency for splashback against siding compared to a blunt-cut downspout end.
That said, this is a compact extension. If your goal is to move water several feet off the foundation, you’ll still want a splash block, a flexible extension, or underground drain tile. I paired one side of the house with a splash block and left the other side without to test. The splash block side kept soil displacement essentially to zero; the bare side had minor mulch migration after a severe storm. The extension itself isn’t the culprit—it just isn’t intended to replace a true long-run diverter.
Debris and critter control
A nice side benefit is how the mouth shape and lip reduce the chance of large leaves and twigs settling right at the exit. It doesn’t act like a strainer (and it isn’t meant to), but the extension discourages clog-prone ledges at the outlet. I still recommend regular gutter maintenance—this won’t save a system that’s already choking upstream.
As for critters: the tightened outlet and the firmer lip make it less inviting for small animals to reverse-climb, and I haven’t had any critter incursions since installing it. Still, I wouldn’t call it critter-proof. If chipmunks or squirrels are persistent in your area, pair the extension with a fine mesh insert or a dedicated downspout guard at either the bottom or the top, depending on where they’re getting in.
Durability and finish
After a season of use, the finish has resisted scuffs and the edges haven’t deformed. The brown coating sheds dirt decently; a quick rinse returned it to near-new. I haven’t seen galvanic staining or rust at the screw points. In freeze-thaw conditions, it stayed put without loosening at the joint.
If you live where snow load or ice heaving is aggressive, you could choose to friction-fit without screws to make winter removal easier. I opted to keep mine fastened year-round and haven’t had issues, but the extension is easy to remove if you prefer a seasonal swap.
What I liked
- Solid, rigid construction that holds shape and resists dings
- Clean, understated look that matches standard brown downspouts
- Simple, fast install with self-tapping screws
- Good water flow with minimal splashback at the base
- Helps keep debris from accumulating right at the outlet
- Modest deterrent effect on small animals
Where it falls short
- Length is conservative; it won’t move water several feet on its own
- Fit can require minor crimping or adjustment on out-of-square downspouts
- Only for 2x3 downspouts; no built-in adjustability for other sizes
- Not a dedicated critter-proofing solution
Best practices and tips
- Measure your downspout. 2x3 is nominal; plan to adjust with pliers if your outlet is dinged or oversized.
- Confirm Type-A orientation matches your setup.
- Use two short self-tapping screws to avoid distorting the metal.
- Add a splash block or longer extension if you need distance from the foundation.
- If critters are a real concern, add a fine-mesh screen or a dedicated guard upstream.
Comparisons and alternatives
If your primary goal is maximum water displacement, a flexible polyethylene extension will carry water farther but at the expense of appearance and durability. If critter exclusion is your top priority, choose a purpose-built downspout guard with tight mesh, then add a short extension or splash block. The GutterGate 2x3 extension sits in the middle: cleaner and tougher than plastic flex pieces, more attractive than perforated guards at the outlet, and plenty capable for day-to-day runoff control—just not a specialty tool for either extreme.
Value
As a single accessory, the price is in line with finished metal pieces rather than plastic. Given the build quality and the tidy look, the value holds up. You may need more than one per house, so budget accordingly.
Bottom line
The GutterGate 2x3 extension is a well-made, low-profile way to finish a downspout and direct water away without adding visual clutter. It improves the look at the base, handles heavy rain without choking the flow, and gives you a small assist against debris and critters. Its limitations are understandable: it’s not meant to throw water far across the yard, and it isn’t a dedicated animal guard.
Recommendation: I recommend it for anyone with 2x3 downspouts who wants a clean, durable termination that modestly improves drainage at the base. Pair it with a splash block or longer extension if foundation distance is critical, and add a mesh guard if you have persistent critter issues. Used that way, it’s a simple upgrade that looks good, installs fast, and holds up.
Project Ideas
Business
Modular Vertical Garden Kits
Package the extension as part of a DIY modular vertical garden kit: include brackets, fasteners, landscape fabric, starter soil packs and instructions. Market to urban gardeners and renters looking for low-profile, easy-install vertical planters. Offer bundles for different fence lengths and subscription seed packs.
Foundation Protection/Rain Diversion Bundles
Sell the downspout extension in kits aimed at preventing foundation and landscaping damage. Bundle with elbow connectors, splash blocks, flexible hose, and simple installation instructions. Offer a basic installation service or online how-to videos targeted at homeowners and property managers.
Curb-Boost Decorative Downspout Line
Create a small product line that customizes extension accessories for aesthetics—color-matching, textured finishes, engraved panels, or integrated low-voltage/solar lighting. Target home-improvement retailers and landscapers who want attractive, functional gutter components that add curb appeal.
Seasonal Wildlife Conversion Kits
Offer conversion kits that turn the extension into seasonal bird feeders, bat water stations, or pollinator watering stations. Kits include trays, perches, anti-squirrel guards, and refillable seed/water cartridges. Market to eco-conscious consumers, HOA groups, and garden centers, with optional refill subscriptions.
Creative
Modular Vertical Planter
Turn the 2"x3" extension into a stackable planter module. Cut an angled opening along the front, drill a few drainage holes, paint or line with landscape fabric, and mount multiple pieces staggered on a fence or wall. Use silicone and simple brackets to link modules end-to-end for a low-cost vertical succulent or herb wall.
Mini Rain Chain & Accent Light
Repurpose the extension as the top segment of a decorative rain chain and waterproof LED accent. Mount the extension at the downspout outlet, route a short cascade into metal cups or chained links, and hide a small solar-powered LED strip inside the extension so it illuminates the water flow at night. Adds curb appeal and highlights roof runoff visually.
Bird Bath / Feeder Conversion
Convert the extension into a neat bird bath/feeder that uses natural roof runoff. Cap or shorten the lower end, attach a shallow tray or dish to the front opening, and add a small mesh or perch. When installed under an eave it collects just enough water for small birds and offers a tidy, weather-resistant feeder.
Wall-mounted Tool & Mail Caddy
Mount the extension horizontally as a slim wall caddy for rolled-up blueprints, umbrellas, garden tools, or mail. Line the inside with rubber or felt to protect contents, add a small drain hole if used for wet items, and paint or wrap it to match interior/exterior decor for a functional, rustic storage solution.