Features
- Jandorf grommet
- 61501 grommet, 1/8 in ID x 11/32 in OD x 3/16 in T, rubber, black
- Manufactured in Canada
Specifications
| Color | No Color |
| Size | One Size |
| Unit Count | 1 |

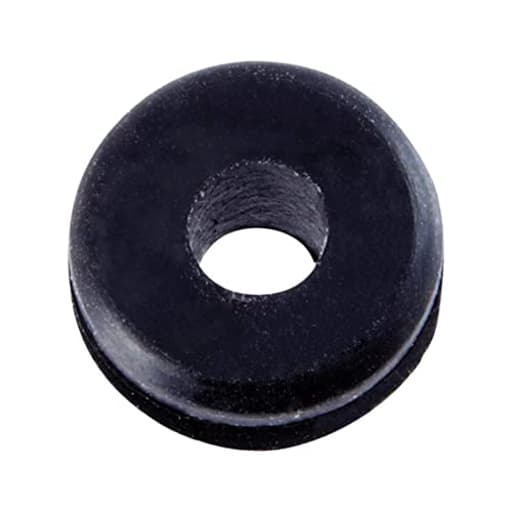
Black rubber grommet with a 1/8 in inner diameter, 11/32 in outer diameter, and 3/16 in thickness. Inserts into panel or enclosure holes to protect wires or tubing from abrasion, provide vibration cushioning, and help seal the opening.
Jandorf Specialty Hardware 61501 Grommet, 1/8 in Id X 11/32 in Od X 3/16 in T, Rubber, Black Review
A tiny rubber ring can make or break a clean wiring job. I picked up the Jandorf grommet (model 61501) for a small electronics enclosure and ended up using a few more across a bench build, just to see how it handled different materials and cable sizes. It’s a simple part—black rubber, 1/8-inch inner diameter, 11/32-inch outer diameter, and about 3/16-inch thick—but details matter with grommets, and this one gets most of them right.
Build and first impressions
The grommet feels like a medium-durometer rubber: pliable enough to seat by hand, firm enough to hold its shape under panel compression. The molding on the pieces I used was clean—no burrs or flashing that would abrade insulation, and the lip geometry was even around the circumference. For such a small part, that consistency matters; a thin spot on the lip is exactly where a cable jacket can get pinched.
It’s sold individually and manufactured in Canada. If you’ve dealt with off-brand grommets that crumble or arrive misshapen, this immediately feels like a step up. No plasticky sheen, no chalking out of the bag, and it doesn’t feel gummy.
Fit and sizing reality
The headline dimension here is the 1/8-inch inner diameter. In practical terms, that’s a comfortable pass-through for:
- A single jacketed 18 AWG wire with some air around it
- Two smaller signal leads (think 22–24 AWG) sharing the opening
- 1/8-inch OD tubing used in hobby pneumatics
If you’re aiming for a tight seal around a single small-gauge conductor, this opening will be a bit generous. For a snugger fit, you’d drop down to a smaller ID grommet or add a strain relief bushing. If you’re routing a USB-C or similar cable, you’ll want a larger ID altogether.
The outside diameter is listed at 11/32 inch. Don’t treat that as your hole size. With grommets, the correct drill size depends on the groove geometry (the channel that snaps into the panel edge), and that spec often isn’t listed. What worked best for me:
- Start a touch undersized with a step bit.
- Test-fit the grommet; you want an effortful press, not a loose wobble.
- Sneak up one step if needed until the lips capture the panel without bulging out.
On thin sheet metal, I found a slightly undersized hole helps; on plastics, a true-to-size hole works fine since there’s a little give. In 1.5 mm aluminum, I could install it by thumb pressure and finalize seating with a plastic spudger. No tearing or nicking the lip.
Installation experience
There isn’t much ceremony to installation, but a few habits made it go smoothly:
- Deburr aggressively. Any burr will shear the underside of the lip the first time a cable flexes.
- A tiny dab of isopropyl on the groove acts as a temporary lubricant and flashes off quickly.
- If the panel edge is rough or laser-cut with a heat-affected rim, kiss it with a countersink. The grommet seats more evenly and lasts longer.
Once installed, the grommet sat flush, with consistent tension all around the aperture. Pulling a cable back and forth to simulate strain didn’t dislodge it.
Performance on the bench
The whole point of a grommet is abrasion protection and vibration damping. On both counts, this one did the job. The lips are thick enough to cover a sharp edge, and the inner barrel isn’t so thin that it collapses under side load. In a small enclosure on my 3D printer stand, it quieted the faint buzz from a wire harness rubbing a steel panel; under a microscope, the jacket showed no scuffing after an afternoon of cycling.
As a seal, it’s “better than a bare hole,” not weatherproof. It will cut drafts and help with dust, but don’t expect it to keep out oil or water in a harsh environment. For outdoor use or oily settings, I’d reach for a material-specific grommet (EPDM for UV, neoprene or nitrile for oil) with a tighter ID or a proper strain relief.
Durability and material feel
After a few installs and removals, the lip retained shape and didn’t show white stress marks. That’s a good sign for long-term resilience. I wouldn’t call it soft; it’s firm enough that it won’t stretch out dramatically with a slightly oversized cable. I didn’t observe any immediate cracking or chalking after moderate heat exposure from a heat gun during panel shrink-fit tests, but I’d still avoid sustained heat or UV if reliability is critical. For indoor enclosures, it’s entirely suitable.
Compatibility and best uses
Where this grommet shines:
- Small electronics enclosures where a 1/8-inch pass-through is sufficient
- Protecting single conductors or pairs of small wires from a sharp chassis cutout
- Bundling small pneumatic lines through thin panels
- Light-duty vibration isolation where cabling contacts a panel edge
Where you may want something else:
- Cables with pre-terminated large connectors (you’ll need a larger ID)
- Outdoor or oily environments requiring specific rubber chemistries
- Situations requiring strain relief or an IP-rated seal
Value and buying advice
As a single unit, this grommet performs well. The catch is price-per-piece. In my experience, buying grommets one at a time online can be surprisingly expensive compared to local hardware stores or bulk assortments. If you know you’ll need multiples, an assorted kit with various IDs and panel fits often costs less per piece and gives you flexibility when a cable spec changes mid-project.
That said, there’s also value in certainty. If you need exactly a 1/8-inch ID, a cleanly molded part, and a known outer geometry for a specific hole, grabbing this exact model avoids the lottery of mixed kits. I appreciated that what arrived matched the dimensions closely enough that I could plan my hole layout before drilling.
Practical tips
- Measure cable diameter, not just the wire gauge. The jacket thickness determines fit.
- Use a step bit and test-fit as you go. Hole charts are helpful, but actual groove geometry varies by brand.
- Deburr and, if possible, slightly chamfer the hole. Grommets seat more evenly and last longer.
- If you need sealing, pair the grommet with a grommet plug or a boot, or choose a compression-style strain relief instead.
What I’d change
I’d love to see clearer documentation on the recommended panel hole size and panel thickness range. Many grommet spec sheets include those two numbers, and having them removes guesswork—especially when working in brittle plastics. A small note in the packaging or product listing would do.
I also wish there were an option for a multi-pack at a lower unit price, since I rarely use just one grommet on a project.
Final recommendation
I recommend the Jandorf grommet for clean, reliable pass-throughs in indoor enclosures when a 1/8-inch opening is what you need. It installs cleanly, protects cables well, and feels consistent and well-made. If you only need a single piece or you’re matching an existing spec, it’s a solid, low-risk buy. If you’re outfitting multiple panels or building out several prototypes, consider a multi-pack or an assortment for better value, but keep this model on your short list when precision and dependable molding matter.
Project Ideas
Business
Micro-Hardware Maker Kits
Create and sell small kits for hobbyists that include an assortment of these rubber grommets plus instructions and example projects (headphone strain-relief, Raspberry Pi cable exits, leather key tags). Package them attractively for Etsy or maker-market stalls and provide short tutorial videos to drive sales.
Premium Cable-Organizer Line
Build a small-batch product line of handcrafted cable wraps, headphone holders, and travel cord organizers that use the grommet as a built-in strain relief/anchor. Market them to remote workers, travelers, and audiophiles — emphasize durability, aesthetics, and small-run customization (colors, monograms).
Repair & Replacement Kits for Electronics
Offer targeted replacement grommet kits for vintage audio gear, arcade machines, or DIY enclosures where small rubber pass-throughs wear out. Include multiple sizes, installation instructions, and optional installation service. Position as a specialty service to restoration hobbyists and niche electronics shops.
Wholesale Craft Supply Packs
Source these Jandorf grommets in bulk and repackage them into consumer-friendly quantities and color options for craft stores, sewing shops, and makerspaces. Add SKU-friendly labeling, usage suggestions, and profitable margin while serving a niche often overlooked by large distributors.
Workshops & Digital Courses
Run hands-on workshops (local or online) teaching practical finishing techniques for electronics, leatherwork, and textiles using small grommets. Charge for attendance and sell supply packs as add-ons. Use classes to build a customer list and cross-sell curated kits and finished products.
Creative
Industrial Jewelry Accents
Use the tiny black rubber grommet as a tactile spacer or eyelet in bracelets, chokers, or necklaces. Thread thin wire, leather cord, or a delicate chain through the 1/8" ID to create modern, industrial-looking beads that also protect cords from wear. Combine several grommets with metal beads, patinaed findings, or resin for a steampunk/minimalist line.
Mini Cable-Relief Keychain
Make compact cable-organizer keychains: mount the grommet into a small leather or acrylic tag so a charging cable or earbud wire passes through with strain relief. The rubber grommet cushions the cable and gives a polished, finished hole. Great as a giftable project — personalize the tag with stamping or engraving.
Dollhouse & Miniature Hardware
Add realistic plumbing ports, engine pass-throughs, or portholes in dollhouse panels and model vehicles. The grommet's scale and shape are ideal for tiny hose fittings or decorative vent details — glue into drilled holes to create convincing miniature mechanical elements.
Mixed-Media & Steampunk Embellishments
Incorporate grommets into wall art, assemblage pieces, or wearable art as faux rivets, portholes or tubing junctions. Paint or age them, mount in clusters, or thread small wires and tubes through to add depth, texture, and an engineered aesthetic to collage and sculpture.
Reinforced Plush & Soft Toys
Use the rubber grommet as an internal reinforcement where small decorative elements, safety lights, or elastic cords pass through plush fabric. Install the grommet in a small cutout to protect seams and prevent tearing — a neat way to add functional detail like a nose port or cord exit on handmade toys.