Features
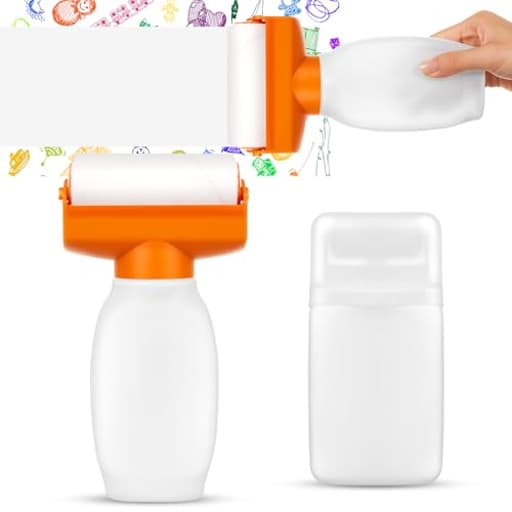
- Packaging: you will receive two roller brush heads, two containers of different capacities, one paint bottle 500 ml, the other paint bottle 100 ml
- Material: the refillable roller brush is made of plastic, has no irritating odor, will not leave obvious marks after use, will not stick to your hands, and will not produce a strong odor, so you can use it with confidence
- How to Use: before repairing the wall, wipe off the dust on the wall, then press out the paint and roll it evenly on the wall; After one layer is dry, repeat the same method to apply several layers until the desired coverage effect is achieved
- Advanced Technology: our roller paint combines the brush and paint roller, effectively covering graffiti, shoe marks, and stains on walls; The ensures long-lasting results, providing your walls with a fresh and renewed appearance
- Applicable Occasions: this roller brush kit can not only be applied for wall repair, but also can be applied in various occasions, such as wall painting design, graffiti creation, home decoration, etc
Specifications
| Color | orange, white |
| Unit Count | 2 |
Related Tools
Refillable roller brush kit for repairing and painting walls, wood and furniture; includes two roller heads and two refillable paint bottles (500 ml and 100 ml). The plastic rollers dispense paint while rolling to cover stains, scuffs and graffiti—wipe the surface first, press to release paint and roll evenly, repeating layers as needed for coverage.
Weysat 2pcs 4" 1. 5" Refillable Roller Paint Brush Roller Brush Sets Wall Repair Tool Kit for Walls, Living Room, Kitchen, Wood, Furniture Repair Review
Why I reached for a refillable roller kit
Small paint fixes are where time disappears: pour a tray, load a roller, cover a scuff, then clean everything for a job that took five minutes on the wall and twenty minutes in setup and cleanup. I picked up the Weysat refillable roller kit to see if I could cut that overhead and keep touch-ups moving without dragging out my full painting setup.
Over a few weeks I used it around the house and shop: covering shoe marks and kid art in a hallway, blending in a patched nail hole, freshening a cabinet side panel, and even reviving a tired fabric ottoman with water-based fabric paint. It’s a simple, plastic system—two roller heads (a roughly 4-inch and a narrow 1.5-inch) and two refillable bottles (500 ml and 100 ml)—designed to push paint into the roller as you go. No tray required.
What’s in the box and first impressions
The kit includes:
- Two roller heads: a wider one for small walls and panels, and a slender one for trim edges, furniture, and tight spots.
- Two bottles: a 500 ml bottle for larger areas and a 100 ml bottle for quick fixes and tight work.
Everything is plastic in orange and white. There’s no odor out of the box and the parts snap/threads together with a straightforward feel. The plastic is light, not flimsy, but you do need to treat the threaded connections with a little care—cross-threading is possible if you rush. The roller surfaces are smooth and non-fuzzy, which keeps shedding to a minimum and leaves a fine, consistent stipple when you keep the pressure steady.
Setup: the details that matter
The success of a refillable roller lives or dies on two things: paint viscosity and how you manage pressure.
- Viscosity: The kit works best with standard interior acrylic/latex or water-based furniture/fabric paints that aren’t thickened by age. If yours has been sitting, thin just a touch per the can’s instructions and, importantly, strain it through a paint filter. Straining makes a huge difference; any skin or grit will clog the feed or cause blotches.
- Filling: Don’t overfill. Half to two-thirds capacity in the bottle keeps the head from getting pressurized and reduces the chance of paint pushing past the threads. Wipe the threads before you connect the head so you start dry and clean.
- Priming: Roll on scrap drywall or cardboard with minimal squeeze to wet the roller evenly before you hit the wall. Once the roller face is uniformly tinted, add slight pressure to keep a steady feed.
With those steps dialed in, the kit is pretty forgiving. Skip them and you’re more likely to fight blobs or starved patches.
Performance on walls
On a flat-finish hallway wall with scuffs, the larger roller turned a chore into a quick loop: prime, roll a thin coat, wait, repeat. Two to three light passes blended the marks into the surrounding paint without flashing. The system’s biggest advantage is not having a tray; I was moving from one mark to the next with a rag in my pocket and blue tape for baseboards.
The smaller roller is excellent for controlled touch-ups around light switches, door frames, and the inside corners of closets. It doesn’t lay paint into corners like a brush, but it gets close enough that a quick pass with a sash brush finishes the job.
On eggshell and semi-gloss finishes, it’s still workable, but you need to respect dry time and use multiple thin coats. Any urge to squeeze hard for faster coverage is rewarded with a shiny patch. Light pressure and patience keep the sheen consistent.
Wood, trim, and furniture
On a cabinet side panel, the small roller laid down a clean coat of water-based enamel with decent leveling. I wouldn’t pick it for narrow trim or detailed profiles—the roller surface can’t get into the crevices the way a brush does—but for flat furniture panels, closet doors, and shelving, it’s handy.
I also tried it with water-based fabric paint on a scuffed ottoman. The narrow roller shined here: it spread the paint evenly without soaking the fabric, and the integrated feed meant I wasn’t dribbling from a brush. The trick was to keep passes light and cross-hatch the second coat once the first had dried. This isn’t the intended “primary” use, but it worked better than expected for fabric refreshes.
Flow control and finish quality
There’s no trigger—flow is controlled by the pressure you apply to the bottle. It takes a few minutes to develop the feel. A consistent, gentle squeeze is the sweet spot. Too little and the roller dries out, leaving a textured, patchy look. Too much and you’ll see wet edges and the occasional drip. Once you get the hang of it, the finish is comparable to a standard mini-roller: a fine, uniform stipple on flat and matte paints.
Leaks and mess management
For me, leaks were the biggest variable. On my first run with the larger bottle, I saw a slow weep at the bottle-to-head joint. Cleaning the threads, tightening firmly (not aggressively), and keeping the fill level modest reduced the issue, but it didn’t disappear completely until I added a wrap of PTFE plumber’s tape to the threads. After that, it was clean. The smaller bottle never leaked for me.
Some practical tips that helped:
- Wipe threads before assembly; keep everything dry during setup.
- Do not overfill; 50–60% capacity is plenty.
- Use strained paint only; lumps can lift the gasket and cause seepage.
- Keep the roller oriented upright when not rolling; parking it horizontally can encourage a slow ooze if there’s residual pressure in the bottle.
- Don’t store paint inside the tool. Empty and rinse when you’re done.
Cleaning and care
Cleanup is easier than a tray and a full roller frame, but it’s still a multistep job:
- Empty remaining paint back into a can through a filter.
- Rinse the bottle.
- Run warm, soapy water through the assembled head by squeezing and rolling on scrap until the water runs clear.
- Disassemble and give the threads and roller face a final rinse.
- Air dry fully before reassembly.
Solvent-based paints are a no-go for me with this kit; they’re hard on the plastic and seals, and cleanup becomes tedious. Stick to water-based products.
Durability and ergonomics
After three weekends of use, both rollers still feed evenly, though the smaller head developed a faint squeak that disappeared with a drop of mineral oil on the axle (applied carefully, away from the roller face). The plastic body is light, easy to hold, and the balance with the small bottle is excellent for detail work. There’s no extendable handle, so ceilings and high walls still require a ladder or a different tool.
Where it excels—and where it doesn’t
Strengths:
- Quick, tray-free touch-ups and small panels.
- Two sizes cover most household fixes.
- Consistent, fine roller texture on flat/matte walls.
- Surprisingly useful for fabric and flat furniture panels.
- Compact to store and easy to grab for fast jobs.
Limitations:
- Flow control requires a gentle hand; it’s easy to overfeed at first.
- Potential for leaks at the head/bottle threads if you overfill or neglect the threads.
- Not suited for oil/solvent-based products.
- Can’t match a brush for detailed trim or a full-size roller for large areas.
Best practices for better results
- Strain your paint; it’s the single best way to avoid clogs and blotches.
- Start with light passes and build coverage with thin coats.
- Keep a damp microfiber handy to catch any edge drips immediately.
- Mask edges and baseboards; the roller’s built-in feed can sneak paint under edges if you tilt it.
- Test on a hidden area first, especially on higher-sheen walls.
Recommendation
I recommend the Weysat refillable roller kit for homeowners, renters, and DIYers who do frequent small touch-ups and light furniture refreshes and want to skip the tray and cut setup time. It’s at its best on flat and matte walls, small panels, and fabric or craft projects with water-based paints. The dual sizes make it versatile, and once you learn the squeeze-and-roll rhythm, you can move quickly with a predictable finish.
I would not choose it for large rooms, solvent-based coatings, or highly detailed trim work. And while I managed leaks with careful filling, clean threads, and a wrap of PTFE tape, that caveat is worth noting for anyone who wants a completely mess-proof experience out of the box.
If you’re comfortable with a little setup discipline and you want a grab-and-go solution for everyday touch-ups, this kit earns a spot in the cabinet. If you’re chasing perfection on glossy walls or painting whole rooms, a traditional roller/brush setup will still be the better choice.
Project Ideas
Business
On-Demand Spot-Repair Service
Start a mobile service offering quick wall and furniture touch-ups for landlords, property managers, and real-estate agents. Use a kit of refillable rollers for fast coverage and color-matched touch-ups on-site. Pricing model: per-spot or bundled monthly contracts for multi-unit buildings. Low startup cost and quick job turnover make this scalable.
Airbnb/Short-Stay Host Kits
Package compact touch-up kits (roller, 100 ml sample bottles in common wall colors, microfiber cloth, instructions) targeted at vacation-rental hosts. Sell online or through local host networks and include short how-to videos. Offer refill packs and color-matching services as upsells—position as an ‘emergency’ fix for same-day turnovers and guest damage.
Event & Brand Experience Pop-Ups
Offer interactive mural activations at festivals, corporate events, or retail openings where attendees help paint a wall with the refillable rollers. Revenue streams: ticketed participation, brand sponsorships, or renting kits to event organizers. The roller’s low-odor, low-mess design makes it ideal for high-traffic public activations.
Retail DIY Repair Kits
Assemble and sell branded DIY repair kits to consumers and small contractors, including two rollers, small sample bottles, color cards, and step-by-step guides. Distribute via hardware stores, online marketplaces, and social channels. Offer subscription refills (500 ml or custom-matched colors) and instructional workshops or virtual demos as additional revenue streams.
Creative
Patch-and-Blend Wall Repair
Use the refillable roller to create small, precise touch-up patches that perfectly blend into existing paint. Mix a small amount of matched paint in the 100 ml bottle for spot repairs and the 500 ml for larger areas. Technique: clean the spot, press a little paint, roll outward from the center to feather edges, let dry and add thin additional layers until invisible. Great for rental turnovers, touch-ups after moving furniture, or prepping walls for photography.
Striped Accent Walls
Create clean, two-tone or multi-stripe accent walls quickly by filling the roller with contrasting colors and using painter’s tape to define lines. The refillable bottles let you switch colors without juggling multiple brushes. Use the smaller roller for narrow stripes and the larger for wider bands. Ideal for kid rooms, feature walls, or easy seasonal refreshes.
Faux-Antique Furniture Finish
Refill the roller with watered-down stain or chalk paint to apply a thin, even glaze over furniture for an aged look. Roll on a base color, let dry, then use the roller with a darker glaze and wipe off selectively for a distressed finish. The controlled dispense minimizes drips and makes layering fast—perfect for upcycling thrifted pieces.
Large-Scale Stencil & Mural Work
Combine custom stencils with the refillable roller to speed up mural elements and repeating patterns across large surfaces. Load bold colors into the 500 ml bottle for long runs and keep accent tones in the 100 ml for details. This approach is fast, low-mess, and great for creating graffiti-style art, geometric murals, or community-art projects.