Features
- Fits all Solo sprayers except one-hand sprayers and ecs series
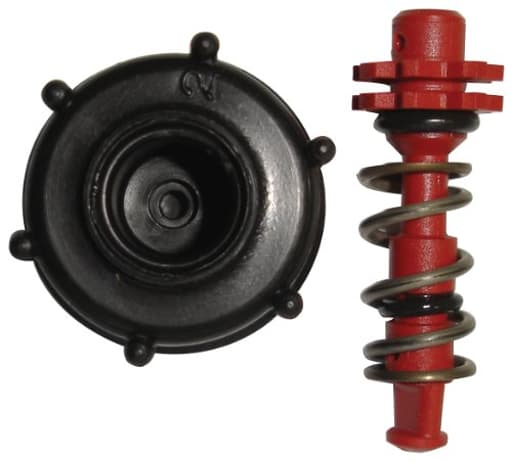
- Includes valve body and retaining nut
- Includes pressure spring and o rings
- Genuine solo replacement parts
- Made in the usa
Specifications
| Color | Red |
| Unit Count | 1 |
Related Tools
This sprayer shut-off valve repair kit replaces the valve assembly on compatible sprayers, excluding one-hand and ECS-series units. It includes a valve body, retaining nut, pressure spring, and O-rings to restore shut-off function; parts are made in the USA and supplied in red.
SOLO 0610402-K Sprayer Shut-Off Valve Repair Kit Review
Why I reached for this kit
I’m a big believer in fixing good tools rather than tossing them. My Solo backpack sprayer has earned its keep for years, but the shut-off started weeping at the tip and the trigger got mushy. Rather than replacing the whole wand assembly, I tried the Solo shut-off repair kit. It’s a simple, USA-made set of genuine parts in Solo’s red color: a new valve body, retaining nut (the cap), pressure spring, and a couple of O-rings. It’s designed for most Solo sprayers—just note it won’t fit one-hand models or ECS-series units.
What’s in the box
- Valve body: the core of the shut-off that houses the moving stem and seals
- Retaining nut (cap): the threaded collar that often cracks from age or winter damage
- Pressure spring: what returns the valve to the closed position and determines trigger feel
- O-rings: fresh seals to cure drips and restore pressure integrity
It’s not a full trigger handle; this is strictly the internal shut-off guts and cap. If your handle body is split or the trigger lever is broken, you’ll need a complete shut-off assembly instead.
Compatibility and fit
I installed the kit on a 4-gallon Solo backpack sprayer (the classic 425-style setup). Fit was exact, threads were clean, and tolerances felt right. The retaining nut matched perfectly and solved a hairline crack that had started at the flats of my original cap. If you’re unsure about your model, check that you don’t have a one-hand sprayer or an ECS-series unit. Otherwise, this kit covers a wide swath of Solo’s larger sprayers.
Installation: straightforward, with one big tip
The swap is a 10–20 minute job if you’re comfortable with small seals and threads. Here’s how I did it:
- Rinse and depressurize: Empty the tank, rinse with clean water, and pump out any residual liquid. Lock the trigger open to relieve pressure.
- Disassemble the shut-off: Unscrew the retaining nut (cap) at the front of the handle and pull the old valve body out. Keep track of any old O-rings.
- Inspect and clean: Look inside the handle for debris or scoring. Wipe out the bore with a clean rag. If you find crusted herbicide, soak and scrub until smooth.
- Lubricate O-rings: Lightly coat the new O-rings with silicone grease or petroleum-free plumber’s grease. This prevents pinching and extends seal life.
- Spring orientation matters: The pressure spring sits below the valve stem—between the wider end of the stem and the threaded cap—not wrapped around the narrow stem as some pictures suggest. Seat it correctly so the trigger returns cleanly.
- Reassemble: Slide the new valve body in, set the spring, and thread on the new retaining nut. Hand-tighten firmly. Avoid over-torquing—plastic threads don’t need brute force.
- Pressure test: Fill with water, pump, and test. Look for weeps around the cap and at the nozzle. Cycle the trigger several times to confirm a crisp seal.
With the new parts installed, my trigger feel went from spongy to clean, and the nagging drip at the tip stopped. The fresh spring and O-rings make more of a difference than you’d expect.
Performance and durability
After several weeks of mixed use (herbicides and foliar feeds), the shut-off has held pressure without creeping, and the trigger snap is back to factory fresh. The retaining nut has a slightly thicker, more resilient feel compared to my aged original, which inspires some confidence for long-term use. I can’t promise immortality—plastics and O-rings have finite lives—but compared to buying a full wand or a new sprayer, this is sensible maintenance.
A few notes on durability:
- Freeze protection: If water or solution sits in the cap area and freezes, the cap can split. Drain and store your sprayer dry and warm, or at least crack the system open to let condensate out in winter.
- Chemical exposure: Some solvents and oil-based products can swell or harden seals. If you spray more aggressive chemicals, consider more frequent inspections and keep a spare kit on hand.
- Thread care: Cross-threading the retaining nut is a fast way to shorten its life. Start it gently by hand and keep the bore clean.
What I liked
- Genuine Solo parts, made in the USA: Fit and finish are right, and tolerances match the original.
- Complete shut-off refresh: New cap, spring, and O-rings address the most common failure points in one go.
- Affordable fix: This is an easy way to extend the life of a solid sprayer without replacing the entire handle assembly.
- Improved trigger feel: The new spring restores a positive, predictable shut-off that makes spot-spraying less frustrating.
What could be better
- Spring orientation isn’t intuitive: The way some diagrams or photos show the parts can mislead you. Install the spring under the wider end of the stem, not around the narrow shaft.
- Not a cure-all: If your valve seat inside the handle is damaged or the handle body is cracked, this kit won’t solve it. Diagnose before you buy.
- Quality variability is possible: As with most small plastic-and-seal kits, occasional out-of-box defects (slightly off-size O-rings or a finicky spring) can happen. A dab of silicone grease and careful assembly typically resolves minor issues; otherwise, exchange it.
Troubleshooting tips
If you still see leaks or poor shut-off after installing:
- Check O-ring seating: A twisted or pinched O-ring will weep. Re-lube, reseat, and try again.
- Verify spring placement: Incorrect orientation can prevent the valve from closing fully.
- Inspect the nozzle and tip: Sometimes the “leak” is at the nozzle gasket rather than the shut-off.
- Flush debris: Grit in the bore or on the valve face can keep the valve from sealing.
- Look for handle damage: Hairline cracks around the cap threads or inside the bore call for a full handle replacement.
Who should buy this
- Solo backpack or compression sprayer users with a leaking trigger, cracked cap, or soft trigger return.
- Maintenance-minded owners who prefer servicing tools over replacing them.
- Landscapers and homeowners who winterize imperfectly or run a lot of solution through the wand and want a periodic refresh.
Avoid it if you own a one-hand Solo sprayer or an ECS-series unit; this kit won’t fit.
Care and prevention
- Rinse after each use: Flush clean water through the wand, then depressurize and open the trigger to let it drain.
- Dry storage: Store with the cap loosened or the wand disconnected to avoid trapping moisture.
- Grease occasionally: A light silicone lube on the O-rings once or twice a season keeps the action smooth.
- Don’t overtighten: Hand-snug is enough for the retaining nut; over-torquing shortens its life.
Final recommendation
I recommend the Solo shut-off repair kit for most Solo sprayer owners dealing with drips, a cracked cap, or a tired trigger. It’s an inexpensive, genuine-parts fix that restores function quickly and extends the life of a solid sprayer. The key is correct spring orientation and a bit of O-ring lubrication during install; get those right and you’ll likely be back to a crisp, leak-free shut-off with minimal fuss. If your handle body is damaged or you have a non-compatible model, skip this kit and opt for the correct complete shut-off assembly. Otherwise, this is exactly the sort of practical, repair-first solution I like to keep on the shelf.
Project Ideas
Business
Solo Sprayer Repair Service
Offer local drop-off or mobile repair for Solo sprayers using genuine replacement kits. Market to landscapers, nurseries, and property managers who rely on reliable equipment. Charge a fixed diagnostic + repair fee and keep common kits in stock for same-day service.
Repair Kit Bundles & How-To Packs
Create retail-friendly bundles: the red valve kit plus a step-by-step printed guide, a small set of common tools (hex key, pliers), and a QR code linking to a video tutorial. Sell online or through garden centers; position as an easy DIY replacement to extend sprayer life.
Instructional Video Series / Paid Workshop
Produce short how-to videos demonstrating valve replacement, preventive maintenance, and troubleshooting for Solo sprayer users. Monetize via YouTube ads, Patreon, or paid workshops for commercial users (landscapers, pest control). Offer downloadable checklists and parts lists as upsells.
Subscription Parts & Maintenance Program
Target businesses with recurring needs (landscaping companies, greenhouses) by offering a subscription that delivers replacement valves, O-rings, and springs on a schedule, plus priority repair service. Include inventory management and reminders to reduce equipment downtime.
Refurbish & Resell Service
Buy used Solo sprayers, refurbish them with genuine parts from this kit, and resell as 'certified refurbished' units online or to local buyers. Highlight the Made-in-USA replacement parts and include a short warranty to justify a higher resale price.
Creative
Miniature Misting Art Rig
Use the valve body, spring and O-rings to build a small, hand-held misting tool for fine texture work on canvas or wood. Convert a cleaned Solo-compatible bottle into an adjustable micro-sprayer by mounting the red valve and adding an artist tip. Great for watercolors, gesso misting, or even applying thin stains and finishes with controlled atomization.
Custom Plant Misting Station
Repurpose the kit parts to repair or upgrade a tabletop plant mister. Fit the valve into a refillable bottle and tune the pressure spring and tip to produce a gentle, even mist for humidity-loving houseplants or propagation trays. Add decorative labels and a wooden stand to make a stylish gift or retail item for plant shops.
Portable Cleaning Atomizer
Build a pocket-sized cleaning sprayer for electronics, camera lenses, or small tools. The genuine valve parts ensure reliable shut-off and leak-free transport. Package the finished unit with microfiber cloths and a small bottle of lens-safe cleaner for a boutique kit.
Industrial-Looking Jewelry & Sculpture
Use the bright red valve body and stainless retaining nut as industrial-style components in mixed-media jewelry or small sculptures. The spring and O-rings can be incorporated as textural elements or moving parts in kinetic pieces — good for craft fairs where upcycled hardware pieces sell well.
DIY Pressure-Feed Airbrush Attachment
Adapt the valve assembly to create a low-cost pressure-feed attachment for hobby airbrushing or model painting. The pressure spring and precision valve body can be tuned for fine control; combine with a small compressor and reservoir for a compact, repair-shop friendly spray setup.