Features
- Cover is field-installable for a flush mount
- Compatible with 24-space QO Load Centers
- For indoor use only
- This product is UL listed
Specifications
| Unit Count | 1 |
Related Tools

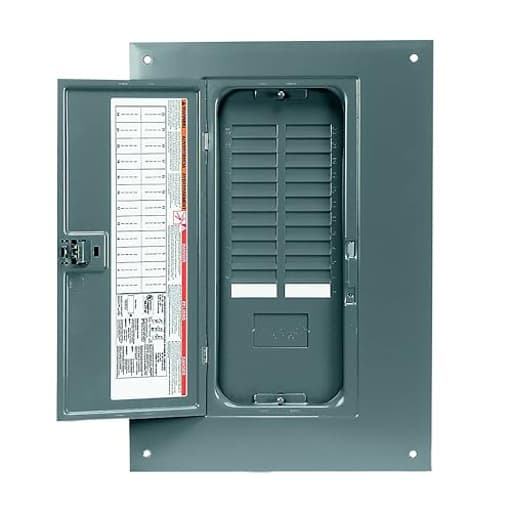
Flush-mount cover designed for 24-space QO load centers that installs in the field to convert the enclosure to a flush mount. Intended for indoor use and UL listed to provide protection for the panel's internal components.
Schneider Electric Square D - QOC24UF 24-Space Load Center Flush Cover Review
What it is and who it’s for
Schneider Electric’s QOC24UF is a flush-mount trim and door for 24-space Square D QO load centers. In plain terms: it’s the cover only, not an enclosure or breakers. If your existing QO panel is already installed and you need to replace a tired trim, convert a surface-mount box to a clean flush look, or finish a drywall job around a panel, this is the piece that provides the visible door and the finished frame.
It’s UL listed and intended for indoor locations. Matching brand and series here isn’t just about aesthetics—using the correct OEM trim preserves the panel’s listing and keeps inspectors happy.
Compatibility and fit
Square D makes two major residential lines (QO and Homeline), and this trim is for QO only, in the 24-space size. On my panel, fit was what you want from an OEM part: the breaker openings lined up, the deadfront sat flat, and the door closed without rubbing. The hinge action was smooth and the latch engaged reliably.
Before ordering, I recommend double-checking:
- Series: “QO,” not “HOM”
- Spaces: 24-space cabinet
- Mounting style: for flush mounting (not surface trim)
- Orientation and wall opening: make sure your rough opening is square
If you’re replacing a very old trim, expect slight generational differences in screw location or lip depth. In my case, the alignment was dead-on, but I’ve run into older boxes where the drywall reveals needed a touch of cleanup to let the new frame sit perfectly flush.
Installation experience
Swapping the old trim for this flush cover is straightforward if you’re comfortable working around panels. I followed this general approach:
- Safety first: I turned off all branch circuits and the main where possible. The cover swap itself doesn’t require touching conductors, but open panels expose live parts—take it seriously.
- Remove the old trim and door, keeping track of screws. If the original screws are in good shape, I prefer reusing them because they’re already matched to the threads in the can.
- Dry-fit the new trim. This is where you’ll discover if the drywall cutout is too tight or out of square. A rasp or a sharp utility knife can fix minor interference.
- Start screws loosely, square up the trim, then snug them down evenly so the frame doesn’t twist. Check that the deadfront openings center over the breaker handles.
- Test the door swing and latch. Adjust if needed—minor tweaks in how the trim sits will change door gaps.
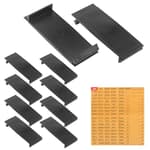
My cover arrived with screws, but on a previous install the included screws didn’t like the cabinet’s threads. If yours fight, don’t force them—bring one of your old screws to the hardware store and match thread and length, usually a pan or truss head that won’t mar the finish. A tiny bit of paraffin or thread cleaner can help if the cabinet’s ears are painted or slightly rough.
If you’re converting a surface-mount enclosure to a flush look in a remodel, budget extra time to fix the wall opening, add blocking, and establish a clean, even reveal. The trim can hide a bit of imperfection, but it won’t fix an out-of-plane wall by itself.
Build quality and finish
The flush cover is stamped steel with a durable painted finish appropriate for indoor use. Edges are clean and the door panel doesn’t oil-can or rattle. The paint holds up well to fingerprints and light cleaning. I prefer a matte or low-sheen finish for panels in living spaces; this one reads neutral and professional in a utility room or garage.
UL listing matters here: the deadfront aligns correctly, and the breaker handle clearances are as-designed. Generic trims can look fine but miss critical spacing; this one gets that right.
One practical note: these are big, flat pieces of metal. Shipping can be less gentle than we’d like. Inspect on arrival; a slightly bent corner can often be nudged back carefully on a flat surface, but deeper creases or a twisted frame should be exchanged to avoid fit and appearance problems.
Everyday use
Once installed, a trim should disappear into the room—functionally and visually. The door on the flush cover opens and closes smoothly, and the latch engages with a positive feel. There’s ample room inside the door to maintain a clear, legible circuit directory. If you’re refreshing an older panel, take the opportunity to relabel circuits; it makes future work safer and faster.
Because this is indoor-rated only, keep it out of damp or corrosive environments. If your panel lives in a laundry area or humid basement, a dehumidifier and good ventilation go a long way toward preventing the surface rust that plagues older covers.
Code and safety considerations
- Use the correct trim for your exact model to maintain the UL listing.
- Don’t modify knockout openings or break edges inside the deadfront. If something doesn’t align, the trim is likely the wrong model or the underlying panel is non-standard.
- If the existing cabinet mounting ears are stripped or damaged, repair that first—trim screws are not structural, but they must hold securely.
- If you aren’t comfortable working around energized gear, hire an electrician. It’s a quick task for a pro and not worth the risk if you’re unsure.
Strengths
- OEM fit and alignment on a 24-space QO box
- Clean, finished appearance for flush installations
- UL listed and indoor-rated, as required for inspections
- Simple, familiar latch and hinge with a solid feel
- Field installation is straightforward with basic care and layout
Limitations and watch-outs
- It’s the cover only. If you need a complete load center (box, interior, and breakers), this is not it.
- Compatibility is exacting: QO series and 24-space. Order the wrong one and it won’t fit properly.
- Shipping can be unkind to large trims; check for bent corners or scuffs before installing.
- Depending on your cabinet, the included screws may not be a perfect match—reusing originals or sourcing the correct thread can save frustration.
- Indoor use only. Not suitable for garages that get wet, exterior walls without protection, or other damp locations.
Value
For OEM electrical gear, pricing is typically consistent across suppliers with modest swings. In my view, paying for the correct, listed trim is worth it. You maintain the panel’s approvals, the fit is right the first time, and the final look is clean—especially important if the panel sits somewhere visible.
If you’re comparing costs to a whole new panel, remember this is a trim-only solution. Replacing the cover can dramatically improve appearance and function without the expense and labor of a full panel swap, provided your existing enclosure and interior are in good condition.
Tips for a cleaner install
- Paint the wall first, then install the trim to avoid splatter on the door.
- Use painter’s tape on the trim edges during drywall touch-ups to protect the finish.
- Label circuits neatly on the directory and keep a digital copy.
- If the wall isn’t perfectly flat, lightly shim behind the trim at the screw points to keep the frame from bowing.
The bottom line
As a replacement or finishing piece for a 24-space QO panel, the flush cover does exactly what it should: it fits, it looks clean, and it maintains the listing and safety clearances the system depends on. Installation is approachable for experienced DIYers and painless for pros. The main hazards are avoidable: order the correct model, confirm it’s the cover you need (not a full panel), and check for shipping damage on arrival.
Recommendation: I recommend the flush cover for anyone with a compatible 24-space Square D QO load center who needs a fresh, flush-mounted trim and door. It’s an OEM, UL-listed part with dependable fit and finish, and it restores a panel’s appearance without a full replacement. Just verify your model, measure your opening, and keep an eye on packaging condition to ensure a smooth install.
Project Ideas
Business
Flush Cover Installation Service
Offer a trade service to convert surface-mounted QO load centers to flush mount using this cover: supply the cover, perform the field installation, coordinate drywall and paint touch-ups, and complete the cosmetic upgrade package for homeowners and contractors. Position as a quick, value-adding retrofit.
Custom Decorative Panel Covers
Buy covers in bulk, finish them (powder coat, textured paint, custom decals, or laser engraving) and sell as finished decorative magnetic boards, clocks, or cabinet fronts through Etsy or local home-decor shops. Market to customers wanting an industrial/modern look.
Property-Manager Compliance & Cosmetic Kits
Create a turnkey offering for landlords and property managers: combine UL-listed flush covers with professional installation and a cosmetic package (drywall repair, paint). Package as a one-call solution to bring aging units up to code and improve unit appearance between tenants.
DIY Repurpose Kits & Workshops
Assemble and sell DIY kits (cover + hardware + paint + magnets + mounting instructions) for crafters who want to repurpose panels into decor. Run paid local workshops where attendees convert covers into message boards or clocks; upsell finished pieces and kits online.
Supplier & Trade Bundle for Electricians
Offer bulk-purchase bundles targeted at electricians and builders: include the UL-listed flush covers plus matching screws, gaskets, and a concise installation guide. Provide volume pricing and rapid shipping to trades who often need a reliable source for flush-conversion parts.
Creative
Industrial Magnetic Message Board
Turn the metal flush cover into a sleek magnetic board for a mudroom or garage. Clean and prime the surface, finish with a durable paint or clear coat, mount with standoffs so it sits off the wall, and use strong magnets to hold notes, receipts, and schedules. (If you modify the cover, use it only as decor — don’t re-install a modified cover on a live electrical panel.)
Steampunk Clock Face
Convert the cover into an eye‑catching wall clock. Center a clock movement through a drilled or existing knockout hole, add exposed gears, rivets, and patina finishes for a steampunk look. Seal and finish for durability. This makes a striking focal piece for an industrial-style room.
Key & Mail Organizer (Wall-Mounted Cabinet Door)
Use the cover as the front of a shallow wall box: attach simple wooden framing behind it, hinge it to act as a door, and mount hooks or small pockets inside for keys, sunglasses, and mail. The flush cover gives a clean, built-in appearance.
Mini Vertical Planter Backplate
Repurpose the cover as a sturdy backplate for a small vertical herb planter. Attach small metal or ceramic pots, finish the surface for weather resistance (if used in a sunroom), and mount on the wall for an industrial planter display.
Workshop Tool & Bit Organizer
Create a compact tool organizer by mounting small magnetic strips, pegboard hooks, or foam cutouts to the cover. Hang screwdrivers, pliers, drill bits, and other small tools from a tidy, easy-to-access station in a workshop or garage.