
Nextronics Tool-Free Wire Connectors 25 Pieces - Quick Splice Terminal Blocks - No Crimp Tool Needed Review
Why I Reached for These Connectors
Halfway through a low-voltage lighting swap, I realized I needed a fast, reversible way to make clean connections without dragging out a crimper or a soldering iron. I grabbed a pack of Nextronics’ tool-free connectors and used them across several projects—low-voltage lighting, a quick guitar electronics mock-up, and a home theater speaker rewire—to see if they could earn a permanent spot in my kit. They did, with a few caveats.
What They Are
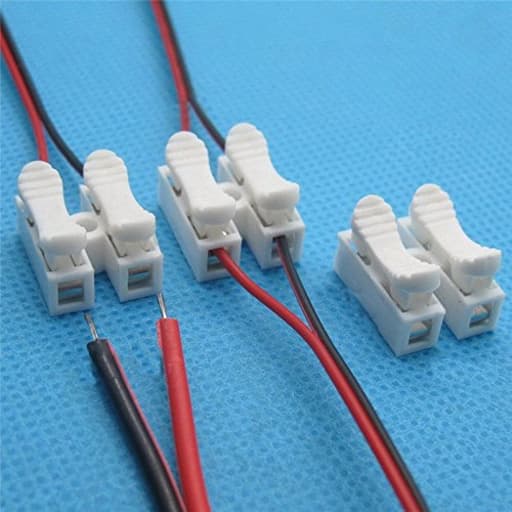
These are lever-style, tool-free terminal connectors in small, mountable housings. You lift a lever, insert a stripped conductor, and close the lever to clamp down on the wire. No twisting, no crimp sleeves, no screws to back out. Each block has mounting holes so you can fix it to a panel or board, which makes them especially handy for prototyping or building neat, serviceable junctions.
They’re reusable, too. Pop the lever back up, pull the wire out, and repurpose the connector—ideal for testing or temporary setups.
Build and Ergonomics
Out of the box, the plastic housings feel reasonably robust. The levers aren’t flimsy; there’s a definite snap as they seat, and you can feel the internal spring clamp bite as you close them. I noticed a tiny bit of side-to-side play in a few levers, but nothing that affected function. After multiple cycles of opening and closing (I stopped counting after a couple dozen), the springs still clamped consistently.
Size-wise, these aren’t miniature. In a cramped cavity—like a guitar control route—they look big at first blush. In practice, I was still able to fit them, and the larger levers actually made life easier when I was working with fat, flexible stranded conductors. If you’re expecting ultra-compact, plan ahead, but I’d call the footprint reasonable for what they do.
In Use: Three Real-World Scenarios
Low-voltage lighting conversion: I used them to swap 120V fixtures to 12V low-voltage, inside a dry junction box. Installation was straightforward: strip the wire, lift lever, insert, close, tug test. It took seconds per connection and made it painless to try different fixture leads without committing to a crimp or wirenut. I did not use them in any wet or damp locations; more on that in the cautions section.
Guitar wiring mock-up: For a pickup and pot layout experiment, these turned a fiddly solder session into a plug-and-play test rig. I could swap caps, reverse leads, and A/B wiring options without heating up an iron. They felt large in the cavity, but the trade-off in speed and reversibility was worth it for prototyping.
Home theater speaker wire: For joining runs and cleaning up terminations in a media cabinet, the connectors held both stranded 14–12 AWG speaker wire and finer control wires without slippage. The ability to mount the blocks meant I could route and label everything neatly.
Across all three, the common thread was repeatable, quick connections with a professional look and a secure clamp. The tug tests passed—no cold sweats about a conductor backing out.
Wire Compatibility and Performance
I tried a mix of solid and stranded conductors, from very fine signal wire up to roughly 12 AWG speaker cable. A few notes:
Fine, flexible strands: The clamps bit well, but for ultra-fine, soft-stranded leads (like magnet or hook-up wire), I got the most reliable hold by folding the stripped end back on itself or using a ferrule. Both approaches increased contact area and made the clamp feel much more secure.
Solid copper: No issues. Strip cleanly and insert; the clamp seats well and survives a reasonable tug.
Heavier stranded (around 12 AWG): You’ll want a clean, square strip and a gentle twist to keep strands together. If you force the wire in at an angle, it can splay and feel less confident. Seated straight, the grip is solid.
I didn’t experience arcing, hot spots, or any contact weirdness under normal low-voltage, low-to-moderate current use. That said, I did not push these at high current or in high-temperature environments—there’s no reason to under tight schedules and unknown ratings. For heavier loads, know the product’s published specs and certifications before committing to permanent service.
Mounting and Organization
The mounting holes are a bigger deal than they first appear. Fixing the blocks to a plywood panel or inside a junction enclosure provides strain relief, keeps conductors appropriately dressed, and turns a nest of splices into a serviceable, labeled terminal point. For prototyping, it’s a joy: screw a few down on a board, route wires cleanly, and iterate. For permanent work, mounting reduces the risk of a connection being stressed or levered open by cable movement.
Limitations and Cautions
Not for wet locations: Lever connectors like these aren’t waterproof. If your application involves moisture exposure, use a proper gel-filled or sealed connector rated for wet or damp locations and follow code.
Code and listing: Before using these in permanent or inspection-bound installations, verify ratings and certifications appropriate to your jurisdiction and application. Tool-free connectors from well-known brands often carry specific listings for splicing in building wiring; budget options vary. Use within clearly defined, compliant scenarios.
Bulk vs. tight spaces: In very tight cavities, these can feel chunky. They still fit in many cases, but measure first and consider whether you need a lower-profile solution.
Lever care: Don’t pry the levers with a screwdriver; they’re made to be finger-operated. Over-torquing them sideways could fatigue the hinge over time.
Tips for Best Results
Strip length matters: Aim for a consistent strip length so the conductor seats fully under the clamp without leaving bare copper exposed.
Tug test every time: Close the lever and give each conductor a firm tug. If it moves, reopen, reset the strip, and re-clamp.
Help fine strands: For very soft, fine-stranded wire, fold the conductor back on itself or use ferrules for a more reliable bite.
Keep it organized: Use the mounting holes. Label your runs. You’ll thank yourself later.
Enclose splices: Even for low-voltage work, housing your terminations in an appropriate enclosure protects the connection and looks professional.
Durability Over Repeated Use
I cycled several connectors repeatedly while prototyping. The spring tension stayed consistent, and I didn’t see any stress whitening or cracking on the levers. The housings resisted casual knocks and didn’t deform when mounted and slightly torqued by cable movement. I wouldn’t categorize them as “industrial abuse” grade, but they’re more than stout enough for bench work, residential low-voltage, and light-duty control wiring.
Value
Considering the convenience and the included mounting capability, these are priced competitively with other lever-style options. The reusability lowers the effective cost over time, especially if you’re frequently testing, iterating, or doing seasonal changes (temporary lighting, displays, hobby electronics). For one-and-done installations, you’re paying a bit more than basic wirenuts, but you’re getting speed, clarity, and serviceability in return.
Where They Shine—and Where They Don’t
Best for:
- Prototyping and test rigs
- Low-voltage lighting and controls
- AV and speaker wiring
- Educational and hobby builds
- Any project that benefits from tidy, mountable, reversible terminations
Think twice for:
- Wet or outdoor-exposed splices (unless used with appropriate enclosures and rated accessories)
- High-current or high-heat circuits without verified ratings
- Ultra-compact cavities where every millimeter counts
Recommendation
I recommend these Nextronics connectors for anyone who values fast, clean, and reversible wiring—especially in low-voltage, bench, and AV scenarios. They clamp securely, they’re genuinely tool-free, and the mounting holes elevate them from “quick splice” to “organized terminal solution.” I’d happily keep a box on hand for prototyping, upgrades, and any situation where I might want to revisit a connection later.
For permanent, code-governed installations, verify the specific ratings and use them within their listed scope; if you need waterproof or ultra-compact hardware, look to purpose-built alternatives. Used thoughtfully, though, these connectors save time, reduce mess, and make your wiring look like you meant it. That’s a win in my book.
Project Ideas
Business
Pre-wired DIY Lighting Kits (Etsy/Shop)
Package themed DIY lighting kits (e.g., farmhouse pendant kit, holiday garland kit, bike visibility kit) that include the connectors, pre-cut wires, LEDs, instructions and mounting hardware. Market to DIYers who want solder-free projects. Price by tier (basic, pro) and offer digital assembly guides and short how-to videos. Highlight safety and wire gauge compatibility.
Mobile Quick-Fix Lighting & Wiring Service
Offer a neighborhood service for renters and small-business owners to install or repair lamps, string lights, holiday displays, or simple low-voltage wiring using tool-free connectors. Low overhead (toolbox + connectors) and fast jobs (10–30 minutes) make it easy to charge per-job or hourly. Promote on Nextdoor, local Facebook groups, and bulletin boards.
Hands-on Workshops and Pop-up Classes
Run workshops teaching safe low-voltage wiring, lighting design, and rapid prototyping using tool-free connectors. Offer beginner sessions (lamp making) and advanced classes (wearable LEDs, interactivity). Sell small starter packs at the event. Partner with makerspaces, schools, or craft stores and price per seat with a materials fee.
Subscription Maker/Repair Pack
Create a monthly subscription box for hobbyists and educators that includes assorted tool-free connectors, small wire lengths, LED modules, terminals, and a short project plan. Add exclusive video tutorials and quick troubleshooting guides. Target makers, STEM teachers, and hobby electronics customers — use tiered plans (basic spare parts vs. full project kit).
Creative
Modular LED String-Light Kits
Use the tool-free connectors to splice and reconfigure LED string lights without soldering. Create custom-length patio lights, marquee shapes, or freestanding light grids by cutting and joining segments. Good for making interchangeable holiday displays, event installations, or mood lighting. Include clear layout templates and zip-ties or adhesive clips to mount the finished strings.
Upcycled Jar & Pendant Lamps
Turn mason jars, tins, or found containers into pendant lights and bedside lamps. The no-crimp connectors let you attach pre-cut lamp wire and LED modules quickly and swap parts for repair. Combine with dimmable LED strips or small LED bulbs, simple sockets, and decorative hardware for rustic or industrial-style lighting projects.
Wearable LED Costumes and Cosplay
Design wearable lighting elements (edge-lit panels, illuminated trim, or battery-powered accent strips) that can be quickly connected or disconnected using these splice connectors. They make field repairs easy at events, and allow modular costume sections (helmet, chest, arms) to be detached for washing or transport. Great for makers building festival or cosplay outfits with limited soldering tools.
Interactive Light Sculptures & Maker Prototypes
Build small kinetic sculptures or interactive art with LEDs, sensors, and tiny motors. The quick-splice connectors speed up iteration — you can rewire sensors, swap LEDs, or test different battery packs without soldering. This is ideal for classroom demos, gallery prototypes, or weekend experiments that require frequent changes and easy maintenance.