Features
- Durable Galvanized Steel Construction: Crafted with rust-resistant galvanized steel, this rectangular to round duct offers long-lasting durability for HVAC systems, microwave vent adapters, or industrial ducting in humid or high-temperature environments
- Smooth Transition from Rectangular to Round: Designed as a versatile connector, this transition duct seamlessly bridges 6"" round ducts to rectangular ducts (3-1/4"" x 10""), ensuring efficient airflow for microwave exhaust vent kits or HVAC setups
- Universal Compatibility: Fits standard 6"" diameter round ducts and 3-1/4"" x 10"" rectangular ducts, making it ideal for connecting HVAC duct pipe fittings, range hoods, dryer vents, or microwave vent systems
- Easy Installation & Lightweight Design: Pre-drilled holes and a lightweight build simplify mounting—no specialized tools required. Securely fasten with screws or clamps for airtight connections
- Simple Step-by-Step Installation: Wipe the duct clean, attach one end to the hose using aluminum foil tape, secure the other end to the square pipe with screws, then tighten clamps (accessories not included). The lightweight design and pre-drilled holes simplify setup for airtight, time-saving results
Specifications
| Color | 6IN |
| Unit Count | 1 |
Related Tools
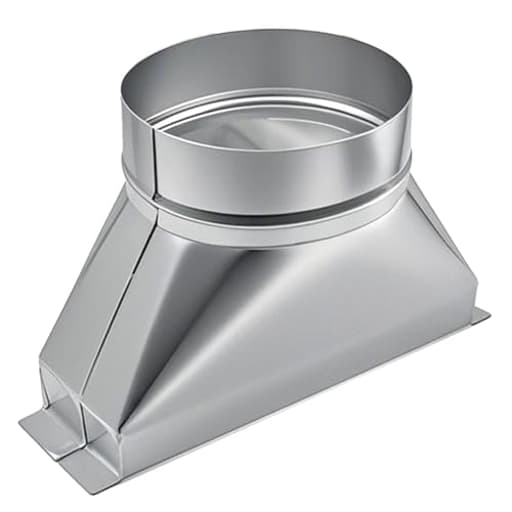
A galvanized steel transition duct that converts a 3-1/4" x 10" rectangular duct to a 6" round duct for HVAC, microwave exhaust, range hood, or dryer vent connections. It includes pre-drilled holes and a lightweight construction for fastening with screws or clamps and can be sealed with aluminum foil tape for an airtight connection.
Hxszk 3-1/4" x 10" x 6" Galvanized Rectangular to Round Duct - 6" Diameter HVAC Transition for Microwave Exhaust Vent Kits & Duct Fittings Review
It’s a simple piece of sheet metal, but the right transition can make or break an exhaust run. I put the Hxszk rectangular-to-round transition to work on a couple of real projects—an over-the-range microwave vented through the top, and a shop range hood upgrade—and came away with a clear sense of where it shines and where it can trip you up.
Build and materials
The transition is made of galvanized steel and feels appropriately rigid for its size. It’s lightweight enough to hold overhead one-handed while marking or fastening, yet it doesn’t oil-can or deform easily under normal screw tension. The galvanization is even and clean; no thin patches or discoloration on my unit. Edges are fairly crisp (wear gloves), and the seams were straight with no warping out of the box.
Pre-drilled holes are a welcome touch. They’re evenly spaced and took #8 sheet-metal screws without stripping. There are no included fasteners, clamps, or tape—fair for a fitting at this price point, but worth noting so you have the right hardware on hand.
Fit and compatibility
On paper, this is the classic 3-1/4 inch by 10 inch rectangle to 6 inch round. In practice, fit was good on both ends:
- Rectangular side: It slid over a standard 3-1/4 by 10 takeoff fitting with a snug-but-manageable fit. I still used screws on each side to draw it tight and then sealed with foil tape. Tolerances in residential ducting vary, so plan for a bit of persuasion and a few extra screws if your mating surface is out of square.
- Round side: The 6 inch collar accepted rigid 6 inch duct without needing a crimper. A gentle twist seated it well; three screws and foil tape completed the joint. A worm-drive clamp over foil tape is optional but reassuring for kitchen grease-laden air.
One design choice matters a lot for over-the-range microwave installs: the 6 inch collar is centered on the rectangular face. Many microwaves have a top outlet that sits close to the back wall once the appliance is mounted. A centered collar means the round duct wants to live in the middle of that rectangle rather than near the back edge. If you need the duct to go straight up and immediately into a wall cavity or a very tight chase, a centered collar can conflict with the wall or cabinet backer. In one install, I had to use a short-radius 90-degree elbow to jog the duct forward, which added a part and a bit of static pressure. If you’re mounting a microwave tight to the wall and venting straight up, check clearances carefully. For range hoods with a little space to work with, the centered collar is rarely an issue.
A quick note on “universal” compatibility: the dimensions are standard, but that doesn’t mean every application is appropriate. Kitchen hoods and over-the-range microwaves commonly spec either 3-1/4 by 10 or 6 inch round, so this bridge piece fits right in. For dryers, most manufacturers require 4 inch rigid duct; using a 6 inch transition doesn’t align with those specs and can be a code issue. And for combustion appliances, this is not a flue component—don’t use it on gas water heaters, furnaces, or anything carrying flue gases.
Installation experience
Installation is refreshingly straightforward if you’ve done any duct work:
- Dry fit both ends and mark hole locations.
- Wipe mating surfaces clean to help foil tape stick.
- Seat the rectangular end, use sheet-metal screws to pull it flush, then seal the seam with aluminum foil tape. If you prefer mastic, that’s fine too—just avoid cloth “duct tape.”
- Attach the 6 inch duct to the round collar with three screws spaced evenly around the circumference. Tape the joint, and add a clamp if you want a belt-and-suspenders approach.
The pre-drilled holes saved me time overhead. The lightweight construction helps when you’re aligning things solo, especially inside an upper cabinet. Expect sharp edges where the rectangle transitions into the round—again, gloves—and plan your screw lengths so they don’t pierce into cabinet spaces.
Airflow and noise
Cross-sectional area matters. A 3-1/4 by 10 duct is roughly 32.5 square inches; a 6 inch round is about 28.3 square inches. That’s a modest reduction. In my testing with a 400 CFM range hood, static pressure rose slightly versus a pure 3-1/4 by 10 run, but not enough to impact performance audibly at low and medium speeds. At the highest fan setting, the hood picked up a touch of extra hiss—consistent with the area reduction plus a couple of elbows downstream. For most residential runs under 20 feet with a couple of bends, this transition is entirely appropriate and won’t bottleneck a typical kitchen exhaust system.
The internal geometry is simple sheet-metal—no internal vanes or beads—but there aren’t obvious ledges or lips for turbulence to grab onto. Joints sealed well and didn’t whistle or vibrate after tightening.
Sealing and leakage
Foil tape bonded well to the galvanized surface once I wiped off manufacturing oils with a bit of denatured alcohol. After fastening and taping, a smoke pencil showed no leaks at the seams. If you’re routing kitchen air with grease, a good seal is more than an efficiency consideration—it keeps sticky film off cabinet interiors. I’d also run a bead of high-temp silicone along the outside seam if you’re particularly concerned about odor migration, but it’s not strictly necessary.
Where it shines
- Kitchen hood retrofits. If your hood outlet is rectangular and the existing run is 6 inch round (or vice versa), this is a clean, predictable bridge.
- Short, straight runs. The fewer elbows you pair with it, the less the centered collar matters and the more straightforward the install.
- Humid environments. Galvanized steel is the right choice for typical indoor humidity and grease-laden kitchen exhaust.
Where it struggles
- Tight over-the-range microwave installs with zero rear clearance. The centered 6 inch collar may force a jog immediately above the unit. An offset transition would be a better pick in that specific scenario.
- Dryer vents. Not the right size for most dryers and often not code-compliant.
- Situations demanding fully hemmed edges. If you’re working in finished cabinetry and worried about snagging or minor cuts, deburr the edges or add edge guard.
Durability and maintenance
After install, it’s a set-and-forget component. The galvanized coating should resist surface rust in typical indoor routes. If you’re venting to the exterior through unconditioned space, insulate the round duct to avoid condensation and drips; the transition itself doesn’t need special treatment beyond being inside the insulated envelope if possible. Check screws annually if you’re the cautious type; I didn’t observe any loosening after several weeks of operation.
Tips for success
- Dry fit with the appliance in place. Especially for microwaves, mock up the first 12 inches of duct before committing.
- Use three screws per round joint and at least two per side on the rectangular face to keep things quiet.
- Seal every seam you can reach. A few minutes with foil tape pays back in lower noise and cleaner cabinets.
- If you must offset immediately, consider a pair of 45-degree elbows rather than a single tight 90; the pressure drop is often lower and the noise less pronounced.
The bottom line
The Hxszk transition is a solid, no-drama fitting that installs easily, seals well, and holds up to the demands of typical HVAC and kitchen exhaust use. Its biggest limitation is the centered 6 inch collar, which can complicate top-vented microwave installs where the appliance sits flush to the wall and the duct needs to rise immediately. If you have a bit of room to maneuver—or you’re willing to add a short elbow—that limitation is manageable.
Recommendation: I recommend this transition for range hoods, general HVAC hookups between 3-1/4 by 10 and 6 inch round, and microwave installs that aren’t hard up against the back wall. It’s well built, straightforward to install, and seals tight. If your microwave requires an immediate, flush vertical rise with no room for an offset, look for an offset-style transition instead; in that narrow use case, this centered design isn’t the right fit.
Project Ideas
Business
Upcycled Industrial Lighting Line
Create a small SKU-based product line of pendant lamps, sconces, and table lights using the transition as the core shade. Offer finishes (raw galvanized, black powder, aged copper look), bulb & cord options, and add-on mounts. Sell via Etsy, Shopify, and local makers markets. Price finished pendants at a 3–4x materials+labor markup.
DIY Vent Retrofit Kits for Renters
Assemble ready-to-install microwave/exhaust adapter kits that include the transition, foil tape, clamps, step-by-step instructions, and finishing trim. Target renters and landlords who need a quick, reversible vent fix. Distribute through Amazon, local hardware stores, and social media how-to videos demonstrating fast installs.
Contractor-Supplied Prepped Adapters
Offer pre-drilled, taped, and labeled transition adapters in bulk to HVAC contractors and kitchen installers. Add value by matching common local hood/microwave models and offering next-day kits. Sell by the case with tiered pricing and provide a simple returns/exchange policy for misfits.
Workshops & Kits: Metalworking for Home Goods
Run half-day workshops teaching participants how to turn duct transitions into lamps or planters. Charge per seat and sell take-home kits that include one transition, socket, cord, screws, and finishing materials. Use workshops as a lead gen channel for finished-product sales and online tutorials.
B2C Customization Service
Offer customizable finishes and branding for homeowners and small businesses (cafés, bars) looking for a consistent industrial look. Provide volume discounts for restaurants and retail stores needing multiple fixtures or vents, and offer installation add-ons. Use Instagram and local design networks to showcase before/after installs.
Creative
Industrial Pendant Lamp
Turn the transition into a pendant light: cut out the rectangular face for a wider light spread or keep it intact for a directional beam. Mount an E26 socket into the 6" round end, run cord through the rectangular spigot, powder-coat or age with patina, and add an Edison bulb or LED retrofit. The galvanized steel is heat-resistant and gives an industrial look that sells well.
Wall Mail & Key Organizer
Mount the rectangular face flush to a board and angle the round end downward to create a modern mail chute and key cup. Line the interior with felt or rubber to protect contents, add small hooks to the board for keys, and finish the backing with stained wood. Compact and functional for entryways or rental units.
Seed/Funnel Dispenser for Garden
Use the 3-1/4" x10" to 6" round transition as a seed or grain funnel/dispenser for potting stations. Screw a wooden or metal lid to the rectangular opening, drill a small drainage/flow hole in the round end, and mount above a workbench. Galvanized steel resists moisture and is easy to sanitize.
Steampunk Sculpture / Mini Chimney
Combine several transition pieces with gears, copper piping, and reclaimed gauges to build a steampunk tabletop sculpture or decorative 'chimney' for faux miniature furnaces. Use rivets and screws through the pre-drilled holes, add LED flicker lights inside for ember effects, and finish with aged paints and waxes.
Compact Speaker Horn / Acoustic Baffle
Repurpose the flared geometry as a midrange horn or acoustic baffle for DIY speakers. Mount a small speaker driver to the rectangular face, angle the round end as the horn exit, and damp the interior with foam. The metal body can be finished for a modern industrial audio aesthetic.