Features
- Gravity-feed design for fine/precision spray
- Compact, lightweight construction
- 124 cc aluminum paint cup with lid
- 0.8 mm tip for fine spray
- Air flow valve, fan control screw and fluid control valve for adjustments
- 1/4 in air inlet
Specifications
| Air Inlet Size | 1/4 in |
| Tip Diameter | 0.8 mm |
| Paint Cup Capacity | 124 cc (approx. 4.5 oz) |
| Product Weight | 0.7 lb (11.2 oz) |
| Weight (Including Paint Cup) | 1.45 lb |
| Fan Size | 1 to 10 in |
| Maximum Air Pressure | 35 psi |
| Color | Silver |
| Includes | (1) Spray Gun |
| Warranty | 3 Year Limited Warranty |
Related Tools


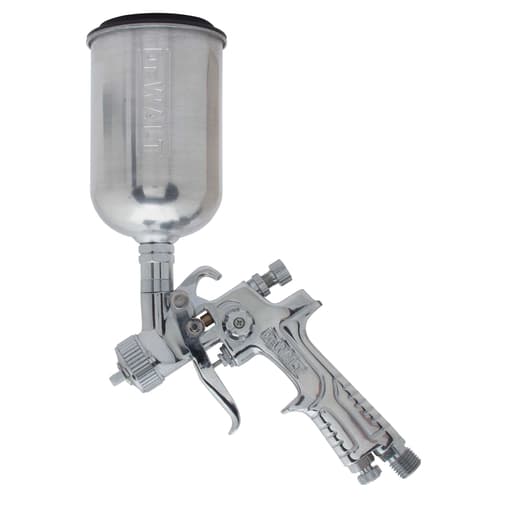
Compact gravity-feed spray gun intended for touch-up and other light, precision spray jobs. It uses a small gravity cup (124 cc) and a fine 0.8 mm tip for controlled atomization. Designed for thin, light-bodied materials rather than heavy paints such as latex.
DeWalt Gravity Feed Touch-Up Spray Gun Review
A compact sprayer that makes small jobs look easy
Small spray guns live or die by how quickly you can set them up, dial them in, and put down a clean line without drama. After several projects with the DeWalt touch-up gun, I’ve come away impressed by how capable this little gravity-feed sprayer is for light materials and precise work. It’s not a replacement for a full-size gun, and it’s not meant to push heavy paint, but within its intended lane it’s a tidy, reliable tool that rewards thoughtful setup.
Build and ergonomics
The first thing you notice is the size and balance. The gun weighs about 0.7 lb bare and roughly 1.45 lb with the 124 cc aluminum cup installed—light enough to maneuver all day, but not so featherweight that it feels toy-like. The compact cup keeps the center of gravity close to the hand, which makes edge work and tight spaces less fatiguing. With 4–5 ounces on board, you’re not covering a hood or a door panel in one go, but for spot repairs, trim parts, and cabinet edges, the capacity is exactly right.
Fit and finish are consistent with a pro-duty shop tool. The trigger pull is smooth with predictable take-up, the knurled fan and fluid controls have positive detents, and the air valve feels precise. Threads on the cup and cap engage cleanly and the cup lid seals well; I didn’t encounter drips even when tilting the gun into awkward angles to catch inside corners. A standard 1/4-inch air inlet simplifies hookup to a shop hose. DeWalt backs it with a 3-year limited warranty, which is reassuring if you’re planning to keep it in regular rotation.
Setup, controls, and dialing in a pattern
This is a gravity-feed gun with a 0.8 mm tip, designed for thin, light-bodied coatings. You get the usual trio of adjustments: fan control at the side, fluid control at the rear, and an air flow valve at the base. The fan pattern ranges from a tight 1-inch circle up to around 10 inches when fully opened—adequate for blending a panel edge or laying a pass across a cabinet rail without hammering the adjacent surface.
I found setup straightforward:
- Strain the material into the cup to keep the 0.8 mm orifice happy.
- Start with the fan open to about 75%, fluid turned in a bit from fully open, and a moderate working pressure at the gun.
- Make a quick test pass on masking paper and adjust air, fan, and fluid until the pattern is even with a faint, dry “crown” at the edges.
Because the needle is fine, small adjustments make a big difference. It’s worth spending a minute on test paper rather than chasing a wet edge on the workpiece.
Performance and atomization
With the coatings this gun is built for—automotive base and clear, lacquers, toners, shellac, and other low-viscosity finishes—it atomizes cleanly and predictably. The 0.8 mm tip lays down a surprisingly even fan, especially in the mid-width range where most touch-up work lives. I used it for:
- Spot repairs on an automotive door edge with base/clear, where blending into the existing finish needed a soft edge.
- Cabinet touch-ups with reduced lacquer, laying a tight fan into inside corners without pooling.
- Small parts and brackets with reduced acrylic enamel, where control over build was more important than coverage speed.
In each case, the gun delivered a uniform film without spitting or surging, provided the material was properly reduced and filtered. Overspray is manageable largely because you’re not pushing huge volumes, and the short distance from cup to nozzle helps maintain consistent feed as you tilt the gun.
It’s worth emphasizing what this sprayer is not for. Heavy-bodied coatings like latex wall paint or thick primers are out of scope. Even aggressively thinned, they won’t atomize well through a 0.8 mm tip at the gun’s modest pressure ceiling, and you’ll fight orange peel and dry spray. If you need to move thicker material or cover large surfaces, a larger tip and a bigger gun are the right tools.
Air management
While the gun’s maximum pressure is 35 psi, I had the best luck working below that, adjusting at the gun to suit the material and pattern. An inline regulator or gauge close to the handle helps keep settings consistent; line losses between the wall and gun can otherwise lead to head-scratching inconsistencies. The gun doesn’t advertise specific CFM demands, so I won’t quote numbers, but it ran without issue from a typical shop compressor. If your compressor cycles frequently, give it a moment to recover before final coats to avoid pressure drift mid-pass.
Moisture in the air line will spoil a finish faster than any gun setting. A small inline filter at the gun is cheap insurance, especially with solvent finishes where fisheyes reveal every contaminant.
Cup capacity and workflow
The 124 cc aluminum cup is a sweet spot for touch-ups: big enough that you’re not refilling after every pass, small enough that color changes and cleaning are quick. It’s also less tempting to mix more material than you need. I appreciated the speed—strain, fill a few ounces, shoot, and move on. On one project that ballooned beyond a “quick touch-up,” I found myself refilling several times. That’s a clue you’ve outgrown the gun for the task; switching to a full-size gravity gun saved time.
The cup lid seals reliably, and the cup threads cleanly onto the body. I recommend a short piece of tape or a Sharpie mark on the cup to track mix ratios; with small batches, a slight over-reduction is noticeable and easier to avoid when you’re deliberate.
Cleaning and maintenance
Discipline pays here. With fine needles and small passages, contamination shows up immediately as pattern defects. My routine:
- Dump any leftover material back to a labeled container if it’s clean.
- Flush the gun with the appropriate solvent until it sprays clear.
- Drop the cap and nozzle, wipe the needle, and use a soft brush to clean the air cap holes. Avoid poking with metal; it’s easy to nick the orifices.
- Lightly lubricate the needle packing and trigger pivot with a finish-safe lube.
Because the gun is compact, full teardown is fast. That encourages the good habit of cleaning right away rather than “after lunch,” which too often becomes “tomorrow.”
How it stacks up
Compared with rattle cans, this setup is worlds better in control, finish quality, and the ability to match existing sheen and color. Versus an airbrush, it moves more material and produces a broader fan, making it practical for blending and small panels rather than ultra-fine art or micro-detail. Against a full-size gun, you trade speed and capacity for precision and access; the touch-up gun gets into places a big cup and cap struggle to reach and wastes less material when you only need a few ounces.
Limitations and quirks
- The single 0.8 mm setup limits versatility. If you routinely spray thicker primers or want to push heavier clears, you’ll want a larger tip gun alongside this one.
- The small cup is perfect for touch-ups but tedious for larger panels.
- There’s no gauge included at the gun, so plan on adding an inline regulator for repeatable settings.
- As with any fine-tip sprayer, material prep matters. Skipping strainers or proper reduction will show up immediately in the finish.
None of these are deal-breakers; they’re intrinsic to a compact, fine-tip touch-up tool.
Who it’s for
- Automotive techs and hobbyists doing blend-ins, bumper corners, and trim parts with base/clear or single-stage reduced per spec.
- Woodworkers and cabinet shops applying spot repairs, toners, and lacquer to small parts and edges.
- Makers and restorers who need predictable, clean atomization on small items without dragging out a full-size gun.
If your workflow mostly involves walls, doors, or large flat panels with heavier coatings, this isn’t your primary sprayer. If precision on small workpieces is your day-to-day, it fits right in.
Recommendation
I recommend the DeWalt touch-up gun for anyone who needs a compact, precise sprayer for light-bodied finishes. It’s lightweight, easy to dial in, and produces a clean, controllable pattern with thin coatings. The small cup encourages efficient, on-demand mixing and quick color changes, and the 0.8 mm tip rewards careful prep with a professional-looking surface. Its limitations—modest capacity and a fine tip—are exactly what make it excel at its intended role. Keep it for the jobs it’s designed to do, pair it with a larger gun for bigger or thicker coatings, and you’ll have a dependable, capable tool that earns its spot on the hook.
Project Ideas
Business
Mobile Auto Spot-Repair
Offer on-site touch-ups for bumper scuffs, door-edge chips, and clearcoat blends. The fine tip is ideal for tight, localized repairs with minimal masking. Target used-car lots, detailers, and private owners; upsell headlight clears and chip sealing.
Property Turnover Touch-Ups
Provide quick cabinet, door, trim, and appliance touch-ups for property managers and realtors. Use thinned enamels/lacquers for nicks, water marks, and small discolorations. Package per-unit pricing and same-day service tiers.
Small-Batch Finishing for Makers
Partner with Etsy/market vendors to finish 3D prints, small wood goods, and jewelry displays with soft-touch clears, metallic mists, or gradients. Offer color sampling, batch pricing, and brand-consistent finish libraries.
Custom Sneaker/Helmet Studio
Set up a micro-shop for bespoke fades, stenciled logos, and candy tints on sneakers and helmets. Sell tiered packages (basic stencil, multi-layer art, protective clear). Promote via social and local teams; offer event pop-ups.
Intro to Precision Spraying Workshops
Run small classes teaching surface prep, thinning, fan/flow control, and stencil layering. Include a consumables kit (strainers, sample dyes/inks, practice panels) and sell follow-up kits and private-coaching add-ons.
Creative
Sunburst Instrument Finishes
Use alcohol dyes or thinned nitrocellulose lacquer to create classic sunburst and edge bursts on guitar or ukulele bodies. The 0.8 mm tip and adjustable fan let you build transparent layers, feather edges, and control overspray on small contours.
Ombre Frames and Home Accents
Spray smooth gradient fades on wooden picture frames, lamp bases, or small shelves using dye stains or thinned acrylic inks. Mask sections for crisp transitions, then seal with a light clear coat for a professional, boutique look.
Scale Model Weathering
Apply ultra-thin filters, panel shading, and rust/dust effects on miniatures, RC bodies, and model kits. The fine atomization lays down translucent passes that won’t obscure details, perfect for realistic weathering and color modulation.
Custom Helmet and Board Graphics
Create layered stencil art and soft fades on bike/skate/scooter helmets or decks using thinned urethane-compatible paints. Add candy tints over metallic base coats and finish with a clear for durability on curved, small surfaces.
Metal Leaf + Tinted Clear Glaze
Spray a thin adhesive size onto select areas of wood boxes or art panels, apply metal leaf, then mist on tinted clear coats to tone and age the leaf. The gun’s precise control keeps edges crisp and layers even.