Features
- Compatibility: Designed exclusively for Inogen One G3 systems with flow settings ranging from 1 to 5, for optimal performance.
- Easy Installation: Includes clear, step-by-step instructions for tool-free installation, allowing you to service your device.
- Replacement Reminder: The Inogen One G3 system features a "replace columns" alarm, alerting you when it’s time to switch out the columns, approximately every 12 months.
- Effective Solution: These columns allow for user replaceable servicing without the need to send your device in for repairs, that may save you time and money.
Specifications
| Size | 1 Count (Pack of 1) |
| Unit Count | 1 |
Related Tools
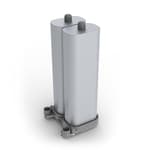
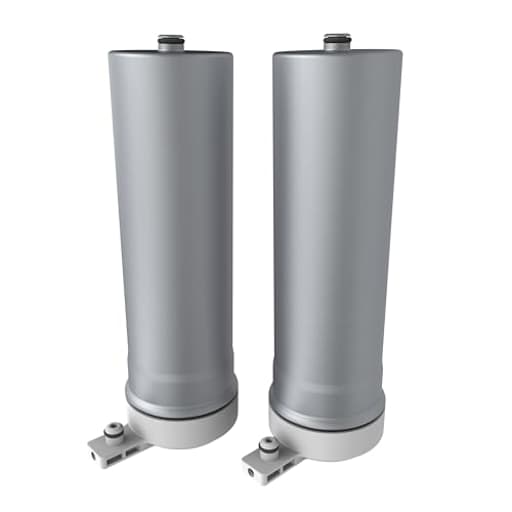
Two removable metal replacement columns for the oxygen separation beds in compatible portable oxygen concentrators with flow settings 1–5. They install tool-free using the included instructions and the device’s "replace columns" alarm notifies you to change them at roughly 12-month intervals. This user-replaceable set allows servicing the unit without sending it in for repairs.
Inogen One G3 Replacement Column Pair - Oxygen Accessories - Two Removable Metal Columns - 1.63 lbs., 17.8 x 3.66 x 3.62 in. Review
Why these G3 columns matter
Portable oxygen concentrators live or die by their sieve beds. When those beds (the “columns”) age out, oxygen purity drops and alarms follow. Swapping columns is one of the most impactful pieces of maintenance you can do on an Inogen One G3, and it’s something you can do at home in minutes. I installed this OEM pair of G3 replacement columns (model RP-321) on a five-year-old unit that had begun flashing a replace-columns reminder and intermittently kicking a low-oxygen alert at higher flow settings. The change was straightforward, and the payoff was immediate: purity stabilized and the alerts stopped.
What follows is my experience installing and living with these columns, plus some tips to avoid common pitfalls.
Installation: quick, tool-free, and forgiving
The G3 makes this easy. I powered the device down, removed the battery, and set it on a table with decent lighting. The column bay doors on the side are spring-latched; pressing the release button frees each module. You don’t need screwdrivers or pliers. My package included clear, step-by-step instructions and a small plastic pick that helps pop a stubborn column loose if it doesn’t slide on the first try. “Tool‑free” here means no traditional tools—if you can press a button and seat a cartridge until it clicks, you can do this.
A few small notes from my swap:
- Don’t force anything. The old columns will release once the latch is fully depressed. If one feels stuck, wiggle gently; the O-rings can cling a bit.
- Note orientation. The columns are keyed, so they only seat one way. Align the guide rails and press down firmly until you hear/feel a click.
- Reset the reminder. After powering back up, run the column replacement reset from the device’s menu (or follow the RP-321 card’s instructions for the keypress reset). If you skip this, the “replace columns” message can persist even though you’ve installed the new pair.
From battery removal to successful reset, I spent under 10 minutes. No calibration equipment, no shipping the unit out, and no downtime beyond the install itself.
Build and compatibility
These are metal-bodied OEM modules designed specifically for the Inogen One G3 with flow settings 1–5. If you have a G4 or G5, these will not fit—Inogen uses different columns per model. The build quality is solid, with clean machining and fresh O-rings that seal without needing extra pressure. The pair comes packaged to survive the kind of knocks a delivery run can bring, and each module is clearly labeled so there’s no guesswork about left/right placement.
A small point of clarity: the box sometimes lists “1 count,” but you receive the full pair you need to service a G3. You replace both columns together; mixing an old column with a new one undermines performance.
Immediate effect on performance
On my unit, the change was obvious. Before the swap, the G3 struggled at setting 4, occasionally throwing a low oxygen warning after a few minutes of continuous use. After installation and reset, the same workload ran without complaint. Audible pump cadence smoothed out a touch too, which I’ve come to associate with the concentrator no longer laboring to hit purity targets.
Remember, columns affect purity, not flow. The device still tops out at its rated settings; what improves is its ability to maintain oxygen concentration within spec, especially at higher settings or in warmer environments.
If a low oxygen alarm persists after replacing columns and resetting the reminder, the issue may be elsewhere (filters, compressor health, or leaks). In that case, don’t keep escalating settings—get the unit evaluated.
Lifespan and what actually determines it
Inogen suggests about a 12-month replacement interval, and the G3’s onboard timer/alarm will nudge you around that cadence. In practice, lifespan varies with:
- Hours of use and flow setting. Higher settings and longer daily use consume the sieve media faster.
- Environment. Humidity, heat, and airborne particulates shorten column life. The G3’s intake filter helps, but moisture is the enemy of zeolite.
- Storage habits. If you store the device in damp spaces or a hot car, expect an earlier replacement prompt.
I’ve seen columns last well over a year in light, indoor use, and much less for daily, high-setting operation in humid climates. The key is to treat the 12-month mark as a guideline, not gospel. The device’s purity monitoring and timer will make the call; listen to it.
A few maintenance habits that help maximize life:
- Keep the intake filter clean and replace it on schedule.
- Give the unit airflow—don’t run it wedged into a bag or under blankets.
- Let it come to room temperature before use if it’s been in a hot or cold car.
- Avoid damp storage; a dry cabinet is better than a bathroom drawer.
Resetting and verifying
After installation, the column reset isn’t just about silencing a nag. It tells the G3 to restart its countdown and purity tracking for the new pair. Once reset, I like to run the device for a few minutes on my typical setting and watch for stable operation—no warnings, consistent breath-triggered pulses, and normal sound. If you have access to a fingertip oximeter and your clinician approves, spot-checking SpO2 for peace of mind isn’t a bad idea. Just remember: clinical decisions belong with your provider, not a gadget.
What these columns won’t fix
Columns are a consumable, not a cure‑all. If your G3 has:
- Cracked housings or visible air leaks
- Persistent “Service Required” messages unrelated to columns
- Motor/compressor noises that suggest mechanical wear
- Error codes immediately on startup
Replacing columns won’t address those. It’s worth trying columns if your alerts specifically reference oxygen purity or column replacement, but don’t hesitate to seek service if problems persist.
Value and total cost of ownership
There are cheaper, third‑party options out there, but for a device that people rely on daily, I prefer OEM columns. The fit, finish, and predictable compatibility reduce the chance of chasing gremlins after installation. The bigger financial win isn’t in shaving a few dollars off the purchase price—it’s in avoiding shipment and service downtime. Being able to swap these at home keeps the G3 working and you mobile, which is the entire point of a portable concentrator.
If you rely on the G3 every day, consider ordering a spare pair before the reminder appears. Travel plans are less stressful when you’re not racing a countdown.
Tips for a smooth swap
- Power down and remove the battery before you start.
- Work on a clear surface to keep dust away from the open bays.
- Replace both columns as a pair; don’t mix old and new.
- Feel for the click—if a column doesn’t seat, don’t force it. Pull, realign, and try again.
- Perform the reset immediately afterward and confirm the reminder has cleared.
- Keep the documentation; the reset procedure varies slightly across firmware.
Who it’s for
- G3 owners seeing a replace-columns reminder or low oxygen alerts
- Users noticing reduced performance at higher flow settings
- Anyone wanting to perform routine maintenance without mailing their concentrator away
If you own a different Inogen model, these aren’t for you. Match your columns to your exact unit.
The bottom line
The G3 columns do exactly what they’re supposed to: restore oxygen purity and keep a trusted concentrator in service without drama. Installation is fast, genuinely tool‑free, and well documented. Post‑swap performance on my unit returned to normal, and the process fit neatly into a lunch break.
Recommendation: I recommend these OEM G3 columns for any Inogen One G3 user who’s due for replacement or seeing purity‑related alerts. They’re reliable, easy to install, and the most cost‑effective way to maintain your concentrator’s performance without downtime.
Project Ideas
Business
Timed Replacement Subscription
Offer a subscription that delivers replacement column pairs on a 10–12 month cadence timed to the device’s "replace columns" alarm. Include clear step-by-step install instructions, a reminder email/SMS sequence, and a small troubleshooting checklist. Subscriptions reduce downtime for users and build recurring revenue.
Mobile Swap & Verify Service
Create a local on-site service that visits customers (homecare clients, assisted living facilities) to swap the columns, verify concentrator function, and run a quick safety/fit check. Charge a service/visit fee and offer add-ons like spare batteries, travel cases, or priority scheduling. Train technicians on safe handling and manufacturer-recommended procedures.
Caregiver Starter & Travel Kits
Sell a bundled kit aimed at caregivers and frequent travelers: a replacement column pair, a compact install guide with photos, a small tool-free travel case for the spare columns, and a laminated quick-reference troubleshooting card. Position the kit as convenience + peace-of-mind for non-technical caregivers and families.
Instructional Course and Video Guides
Produce a professional video course and downloadable manuals that teach safe, manufacturer-compliant replacement, basic device checks, and common small fixes that don’t void warranties. Monetize via one-time purchases, memberships, or licensing to home health agencies. Include clear legal/disclosure language and advise customers to follow manufacturer guidance and local medical-device regulations.
Creative
Industrial Minimalist Desk Sculpture
Mount the two sealed metal columns on a hardwood or concrete block base as a pair of vertical accents. Use low-profile stainless-steel brackets or threaded inserts to secure them, then finish the base with oil or matte varnish. Keep the columns sealed and labeled “do not open” — the project is a modern, conversation-piece sculpture for an office or waiting room that highlights industrial form without altering the part’s integrity.
LED Tube Accent Lamp
Turn a sealed column into a short industrial lamp housing: thread a low-heat LED puck or strip around a center cylinder and slide the sealed column over the light as an outer shroud (or mount the column beside the LED on the base for an asymmetrical look). Use the column as a visual diffuser/casing rather than a light source, and ensure internal materials remain sealed. This creates a compact, rugged bedside or shelf accent lamp.
Cabinet Pulls / Drawer Handles
Repurpose the columns as stout, industrial drawer pulls or cabinet handles. Cut small mounting plates or clamps to cradle each column and bolt them to drawer fronts for a uniquely heavy-duty hardware look. Because you’re using the columns intact and not opening them, you preserve safety and keep the hardware functional and durable.
Weighted Curtain Tiebacks or Doorstops
Use one or both sealed columns as decorative weights for curtains or as a compact doorstop. Stitch a fabric or leather sleeve that slips over the column and finishes with a loop for hanging, or attach a rubberized pad and a low-profile base to convert the column into a desktop doorstop. Keep columns sealed and avoid any modification that would release internal material.