Features
- Compatible with 23 gauge pin nailers
- Headless (pin) design minimizes visible nail heads
- Chisel point to reduce splitting in trim materials
- Coated finish intended for interior use
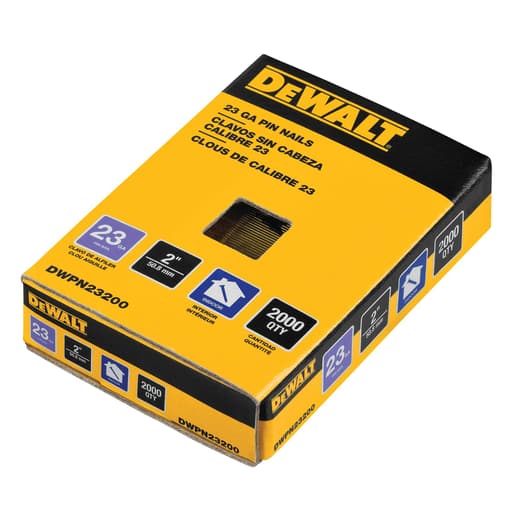
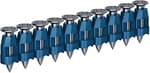
- Sold as 2,000 nails per pack (20 sticks of 100)
Specifications
| Fastener Type | 23 Gauge Pin Nails |
| Length | 2 in |
| Gauge | 23 ga |
| Point Type | Chisel |
| Collation Type | Glue |
| Finish | Coated |
| Head Type | Headless |
| Material | Metal |
| Diameter | 2.245 in |
| Package Quantity | 2,000 nails (20 sticks of 100) |
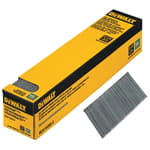
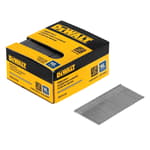
Headless 23 gauge pin nails, 2 inches long, collated with glue. Metal construction with a chisel point and coated finish. Intended for interior trim and molding applications and for use with compatible 23 gauge pin nailers.
DeWalt 2 in. 23GA Pin Nail, Chisel Point (2,000 PK) Review
What I used these pins for
I put the DeWalt 23-gauge 2-inch pins through a mix of trim and detail work: miter returns on base and crown, small cove and bead profiles on a built-in, cabinet face frame repairs, and some delicate inlay on maple and walnut. I also tried them for temporarily tacking thin stock to a substrate while glue set, where invisibility matters more than pure holding power. In short, the typical places where a headless pin makes sense: tiny holes, minimal risk of splitting, and just enough mechanical bite to keep parts from drifting while the adhesive does the real work.
Compatibility and setup
Not every 23-gauge pinner will fire 2-inch fasteners. Before you buy, make sure your pinner’s spec sheet lists 2 inches at the top end. Mine does, and these strips seated cleanly in the magazine with no trimming or fuss. The collation glue held the sticks together well enough to load without shedding chunks, and I didn’t notice any residue buildup on the driver or rails after a day’s use.
The pack includes 2,000 pins, arranged in 20 sticks of 100. The strips were straight and consistent; I found maybe one strip in the whole box with a slightly wavy end, which I tossed to avoid a potential jam. That’s on par with other pro-grade pins I’ve used.
Driving performance and accuracy
Headless pins are always a balancing act between finesse and predictability, and the 2-inch length pushes the limits on dense hardwoods. In poplar, pine, and MDF, these pins drove dead straight for me with the pinner held square. Holes were essentially pinpricks and buried slightly below the surface without crushing fibers. In maple and walnut, I started to see what you’d expect from long, slender wire: occasional deflection with the grain and a few blowouts when I was too close to an edge or hit a knotty spot.
A few things helped keep the shot path true:
- Keep the nose square and apply firm pressure so the nosepiece doesn’t skid.
- Stay a bit farther from the edge than you would with brads; I aim for at least 3/8 inch when possible.
- Adjust angle to cross the grain slightly if you’re seeing consistent drift.
- Choose the shortest pin that does the job; the 2-inch length is great for deeper reach, but it magnifies grain-following in hard stock.
I set my regulator to deliver just enough drive to bury the pin a hair under flush. Over-driving doesn’t improve holding power and can encourage the shank to veer on entry.
Holding power and best-use cases
These are headless pins; they are not a substitute for brads or finish nails. Their value is stealth and split resistance, not long-term structural holding. I use them:
- To tack trim while glue cures (particularly on delicate profiles).
- To secure small returns and end-grain joints that would split with larger fasteners.
- For light, thin moldings where a brad head would telegraph under paint or clear finish.
- For jigs and templates where I want minimal witness marks.
At 2 inches, these pins can reach through thicker trim and grab the substrate, which reduces creep while adhesive sets. Just be realistic about load: on baseboard or casing installations, they’re a supplement, not the main fastener.
Finish quality and surface repair
This is where these pins shine. The holes are tiny and consistent. In clear-finished maple, a light-tinted filler, quick sand, and the mark vanished. Under paint, one pass of spackle and a scuff sand erased them entirely. Because there’s no head, you don’t get that stubborn crater that sometimes shows under raking light with brads.
I didn’t see surface bruising, even in softer stock, which I attribute to a sharp chisel point and good depth control. If your pinner leaves a faint ring around the hole, that’s usually a nosepiece issue, not the fastener.
Splitting and deflection
The chisel point is designed to reduce splitting by cutting its way in rather than wedging fibers apart. In practice, I found it does well in softwoods and MDF. On brittle or tight-grained species, particularly near edges or on thin returns, the long shank can still follow grain. The trade-off with a chisel point is that it can also be guided by the grain. I saw the most deflection on hard maple and oak with the full 2-inch length. If you work primarily in those woods, consider stepping down in length for most tasks, or switching to a micro brad when a tiny head is acceptable.
Feed reliability and glue collation
The glue collation held up in the magazine and didn’t crumble during loading. I experienced no misfires attributable to the fasteners themselves. After a full day, there wasn’t noticeable glue residue on the driver or feed pawl. That’s not always the case with cheaper pins, which can shed and gum up the nose. Here, the strips ran clean.
Coating and corrosion considerations
These are coated for smoother driving and interior use, not for corrosion resistance. I wouldn’t use them anywhere moisture is a factor, and I avoid them on tannin-rich woods that may see water-based finishes unless I know the area will be fully sealed quickly. If you need exterior durability or are dealing with oak in a setting that might get damp, stainless pins are a better choice.
Consistency and quality control
Length, straightness, and point geometry were consistent across the box. I measured a handful against a caliper for curiosity and didn’t find outliers. The pins were uniformly sharp, and the sticks stayed together well through normal handling. I encountered one slightly bent pin that would have caused a jam if fed; easy enough to spot and discard before loading.
Tips for best results
- Confirm your pinner is rated for 2-inch pins and run a quick test on scrap of the same species.
- Use the shortest length that satisfies the job; longer pins deflect more in dense stock.
- Keep the nose square and steady pressure on the work; avoid shooting too close to edges.
- Angle slightly across the grain if you’re seeing repeatable drift in hardwoods.
- Let glue do the heavy lifting; use these pins to tack and align, not to carry load.
Value
With 2,000 pins in the box, this pack goes a long way on trim and cabinetry projects. Between the consistent feed, near-invisible holes, and minimal cleanup, the overall user experience is solid. There are pricier options in stainless and cheaper off-brand pins with more variability; these sit in a comfortable middle where reliability matters and you don’t want to fuss with jams or inconsistent penetration.
The bottom line
These DeWalt 23-gauge 2-inch pins do exactly what I want from headless fasteners: they disappear, they load cleanly, and they resist splitting on delicate profiles. In softer woods and composites, they track straight and leave tiny, easily hidden holes. In dense hardwoods at full length, you’ll need to mind technique to avoid deflection—and sometimes choose a shorter pin or a brad instead.
Recommendation: I recommend these pins for interior trim, cabinetry, and fine woodworking where minimal surface repair is a priority and glue is the primary bond. They’re reliable in compatible pinners, easy to conceal, and packaged in consistent, clean-running strips. If you work mostly in very hard woods or need exterior corrosion resistance, keep a stainless or shorter option on hand, but for everyday interior detail work, these have earned a place in my kit.
Project Ideas
Business
Mobile Trim Repair & Punch-List Service
Offer on-site fixes for popped shoe molding, loose casing, and baseboard returns. Use adhesive plus 23GA pins for nearly invisible repairs that require minimal caulk and touch-up. Market to realtors, property managers, and homeowners prepping for sale or rental turnover.
Feature Wall & Wainscoting Installations
Sell flat-fee packages for accent walls (board-and-batten, picture-frame molding, slat walls). The headless pins let you deliver crisp paint-grade finishes with fast turnaround. Upsell color consulting and integrated LED coves for higher margins.
Custom Picture Framing Pop-Up
Set up a mobile or shop-based framing service. Use 2 in. pins to assemble deep floater frames, shadow boxes, and canvas cradles with clean miters. Pair with mat cutting and hanging hardware; partner with local artists, photographers, and galleries for steady referrals.
Cabinet Refacing & Trim Upgrades
Offer quick kitchen refreshes by adding shaker trim to slab doors, installing light valances, and finishing panels. Adhesive provides strength; headless pins speed alignment without visible fasteners, reducing finishing time. Bundle with soft-close hardware for a complete upgrade.
Designer/Builder Glue-Up Support & Jigs
Provide glue-up assistance and on-site jig fabrication for local makers and remodelers. Use 23GA pins to create and attach temporary alignment blocks, cauls, and templates that won’t leave obvious holes. Bill per project or as a day-rate service for shops during peak workloads.
Creative
Floating Picture Frames
Build minimalist floating frames for canvases and prints. Use glue for the joint strength and 2 in. 23GA headless pins to tack miters and attach the inner spacer to the outer frame with virtually invisible holes. Ideal for hardwoods and painted frames; the chisel point helps prevent splitting at delicate miter tips.
Crown Molding with LED Cove
Create an indirect-lighting crown detail by installing a simple cove or flat stock a few inches below the ceiling and adding an LED strip. Use the pin nails to fasten trim and light valances without visible nail heads; rely on adhesive for strength and pins for alignment and hold while the glue sets.
DIY Acoustic Slat Panels
Laminate thin wood slats onto felt or MDF backers to make trendy acoustic panels. Apply construction adhesive and use 2 in. pins to secure each slat while the adhesive cures, keeping fasteners invisible on stained or painted slats. Mount the finished panels like art for style and sound control.
Wainscoting and Box Molding
Add architectural interest with applied box molding or shaker-style wainscoting. After laying out level lines, glue and pin the rails/stiles to the wall. The headless pins leave pinholes that vanish with a quick fill and paint, making it a clean weekend upgrade for hallways and dining rooms.
Curved-Lamination Light Sconces
Make sculptural wall sconces by laminating thin wood strips over a curved form. Use glue between laminations and pin through the stack into a sacrificial backer to lock alignment while curing. After sanding and finishing, add a puck light or LED strip for a modern, lightweight fixture.