Features
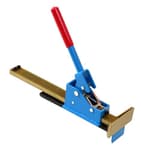
- 17-Inch Heavy Duty Pull Bar: Made from strong A3 steel with an anti-rust coating, the pull bar is designed with enhanced strength and corrosion resistance. The pull bar is 17 inches long and 6 mm thick, great for vinyl plank and other flooring.
- Fiberglass Mallet: 1-1/2 inch double-faced solid PVC head delivers a soft and positive strike, providing good resilience and high wear resistance. Meanwhile, the high-strength fiberglass handle with a non-slip rubber grip absorbs vibrations and reduces fatigue.
- Solid Tapping Block: The tapping block made from polypropylene is designed solid, which is more sturdy and durable, not easy to break. The size of the block is 7-7/8 x 2-1/2 x 3/4 inch, suitable for most types of floors.
- 40-Piece Spacers: The kit comes with 40 pieces plastic spacers which are designed with non-slip slots. The approximate size of the spacer 2-3/8 x 1-1/8 inch.
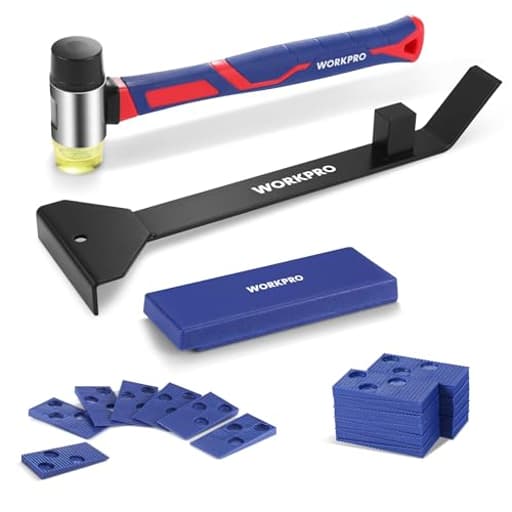
- Premium Flooring Installation Tools: 1 x rubber hammer mallet; 1 x flooring pull bar; 1 x tapping block; 1 x 10 Inch contour gauge; 40 x spacers. The kit is ideal for domestic and professional use for laminate, LVP, LVT, vinyl plank, and hardwood flooring. Great gifts for the homeowner!
Specifications
| Color | Blue |
| Size | 43-Pack |
| Unit Count | 43 |
Related Tools
This 43-piece laminate flooring installation kit includes a 17-inch A3 steel pull bar with an anti-rust coating, a 1.5-inch double-faced PVC-head mallet with a fiberglass handle and non-slip grip, a solid polypropylene tapping block (7-7/8 x 2-1/2 x 3/4 in), a 10-inch contour gauge, and 40 plastic spacers with non-slip slots (approx. 2-3/8 x 1-1/8 in). The tools are intended to assist with tapping, pulling, spacing, and contour copying during installation of laminate, vinyl plank (LVP/LVT), and hardwood flooring.
WORKPRO 43PC Laminate Flooring Installation Kit- Rubber Mallet with Fiberglass Handle, 17” Heavy Duty Pull and Pry Bar, Solid Tapping Block and 40 Spacers- Premium Wood Flooring Installation Tool Review
Why I reached for this kit
I recently laid a couple of rooms of click-lock LVP and used the WORKPRO flooring kit as my primary setup. I wasn’t looking for boutique, single-purpose tools—I wanted a compact kit that covered the essentials well enough to get a tight, gap-free install without fuss. This one includes a fiberglass-handled mallet, a 17-inch steel pull bar, a solid polypropylene tapping block, a 10-inch contour gauge, and a pile of plastic spacers. It’s a practical mix, and it largely delivered.
Build and ergonomics
Pull bar: The A3 steel bar is long (17 inches) and 6 mm thick, which gives you leverage without a lot of flex. The anti-rust coating held up fine through dusty cuts and sweat. The edges are crisp enough to bite, but not so sharp that they chew up plank edges, provided you use it correctly. It’s on the thicker side, which matters if you’re trying to slip it into extremely tight clearances under toe kicks or radiators. In most room-lay scenarios, the length and mass help more than they hinder.
Mallet: The 1.5-inch double-faced PVC head is the right hardness for flooring—firm enough to transfer energy, soft enough to avoid bruising. The fiberglass handle and rubber overmold absorb vibration well; after a full day, my hands felt better than they typically do with a wood-handled mallet. One note: check the faces occasionally during use; mine backed off once and needed a quick retighten.
Tapping block: The polypropylene block is dense and flat, with a footprint that spreads impact over a decent area. It doesn’t have a handle, which is normal for this style but worth mentioning—your grip becomes the handle. The surface is slick enough to slide along a row but grippy enough not to skate away at the first tap.
Spacers: You get a lot of them, and the non-slip slots keep them from squirting out when you’re shifting boards. They are thinner than a standard 1/4-inch expansion requirement, so I doubled them to get the gap I wanted. Plan on stacking pairs and you’ll be fine.
Contour gauge: Ten inches is a useful size for most baseboard profiles, door casings, and odd bumps along walls. It’s a straightforward gauge without a locking mechanism, so be careful carrying a traced profile across the room—support both ends and it holds shape well enough.
On-the-job performance
The pull bar is the differentiator in this kit. In the last rows, where a tapping block can’t reach, this bar lets you close joints cleanly. The extra length gives you more control over the strike angle, so you’re not swinging in cramped positions. Two tips from my usage that kept things tidy:
1) Pad your contact points. A strip of painter’s tape or a couple of stick-on felt pads on the plank-facing hook reduces the chance of marring the edge. I also stuck a felt pad on the hammering end of the bar to keep the mallet face from mushrooming the paint.
2) Stabilize the strike. If you find the bar wanting to slip when you hit it, place a scrap of plank or the tapping block under the hammer end to level it; that keeps the hooked end engaged and saves your knuckles.
The tapping block is solid for coaxing boards together lengthwise. It shines when the floor is flat and the subfloor prep is sound; you can work down a seam with light, consistent taps and see the micro-gaps disappear. If you need to persuade a stubborn end joint, I prefer placing a scrap of the actual flooring into the groove and striking the scrap rather than the board itself. The block can mark delicate edges if you get heavy-handed—respect the click-lock, and let alignment do most of the work.
The mallet feels good and hits true. Compared to a dead-blow, the PVC face rebounds a little more, which is fine for tapping blocks and pull bars but something to be aware of if you’re used to sand-filled heads. The handle’s vibration damping was noticeable over several hours. I’d rather have this than an inexpensive wood-handled hammer for flooring.
The spacers do the job once doubled. I taped them to the drywall with painter’s tape to keep them in place while I nudged rows into alignment. If you prefer single-piece 1/4-inch spacers or adjustable wedges, that’s an inexpensive upgrade—but it’s not a must.
I didn’t expect to use the contour gauge much, and then it saved me time around two door jambs and a wavy basement wall. It’s not as refined as a pro-grade gauge with a lock, but it transferred shapes quickly. Press in, check the pins are seated, transfer to a scrap piece to verify, then trace. Simple and effective.
What I’d improve
Pull bar edge protection: A couple more preinstalled pads would be welcome. It’s easy enough to add your own, and you should on both ends if you’re working on a premium finish.
Spacer thickness: Given that 1/4-inch expansion is a common spec, shipping thicker or adjustable spacers would reduce the need to stack.
Tapping block weight: A touch more mass or an integrated handle could make long runs smoother and improve control, especially for users who prefer to pull the block along the seam. That said, the current block works; just use proper technique and don’t overstrike.
Mallet face retention: Mine loosened once. Periodic checks solve it, but a light thread locker from the factory wouldn’t hurt.
Practical tips for better results with this kit
Stack and tape spacers. Doubling them gets you to a standard gap; taping keeps them from shifting as you square rows.
Protect finished edges. Add felt to the pull bar’s hook and the hammer end. It prevents scuffs on sensitive finishes and helps the bar bite consistently.
Use a scrap plank as a sacrificial striker. For stubborn end joints, place a cutoff in the groove and strike the scrap, not the finished board.
Keep the mallet faces snug. A quick twist every so often avoids surprises mid-swing.
Let alignment do the heavy lifting. Most click-lock systems respond to gentle, well-placed taps rather than force. If you’re hitting hard, something is misaligned.
Durability and value
After a full-room install and plenty of tinkering with offcuts, the pull bar remained straight, the mallet faces unscarred, and the tapping block square. The anti-rust coating on the bar helps when you’re sweating through a warm day or cutting planks nearby. You could absolutely use this kit across several projects. If you’re a flooring pro swinging tools daily, you might eventually step up to a heavier bar and dedicated wedge spacers, but for homeowners and occasional installers, this kit holds up and covers the bases.
Who it’s for
DIYers tackling laminate, LVP/LVT, or engineered hardwood who want a complete, cohesive setup.
Handypeople who don’t want to piece together a mallet, block, bar, and gauge from different brands.
Pros who need a backup set or a compact kit to keep in the van for quick jobs and punch-list work.
If you’re installing brittle solid hardwood or relying on an aggressive tap-in method, you’ll want to adapt technique and possibly upgrade certain pieces. For modern click-lock LVP and laminate, this kit is right at home.
Recommendation
I recommend the WORKPRO kit for most flooring installs involving laminate and LVP/LVT. It gets the fundamentals right: a stout pull bar with useful leverage, a comfortable mallet matched to flooring work, a solid tapping block that doesn’t crumble, and enough spacers and a contour gauge to keep you moving. The trade-offs—thinner spacers that need stacking, a bar that benefits from extra padding, and a tapping block that rewards finesse—are easy to work around and common at this price point. With a few simple tweaks and good technique, it delivers tight seams, clean edges, and a smoother install experience than trying to improvise these tools piecemeal.
Project Ideas
Business
Mobile 'Floor Patch & Refresh' Service
Offer a quick-call service for landlords and short-term rentals to fix damaged planks, replace high-traffic rows, or install accent strips. Use the 43-piece kit as your portable toolkit—pull bar for hard-to-reach last rows, mallet and tapping block for clean joins, contour gauge for tight-fit around obstructions, and spacers to guarantee correct gaps. Charge per-plank or per-job with tiered response times (same-day, 48-hour), market to property managers, and upsell preventative maintenance contracts.
DIY Install Kit + On-Demand Coaching
Package the 43-piece kit with a short printed guide and a library of on-demand video lessons (phone-friendly). Customers rent or buy the kit and can purchase 30–90 minute virtual coaching sessions for hand-holding during their install. Market via social ads targeting new homeowners and DIYers; offer local pickup/dropoff and a refundable deposit for rental kits. This scales with low inventory risk and generates recurring revenue from coaching and consumables (underlayment, transition strips).
Hands-On Weekend Workshops
Run small-group weekend classes teaching laminate/LVP installation basics and pro tips (using the mallet, pull bar techniques, contour copying, and finishing). Supply each student with a basic kit (or include one-kit-per-student fee), inexpensive practice flooring, and templates. Sell add-ons like custom cutting services or take-home kits. Target community centers, maker spaces, and real-estate investor meetups—workshops provide both direct income and a funnel for installation work.
Content & Affiliate Play: 'Tool Tips for Fast Installs'
Create short how-to videos and reels demonstrating clever uses of each tool (for example: contour gauge tricks for pipes, pull bar leverage for last rows, tapping block for glued edges). Monetize through affiliate links to the 43-piece kit, digital downloadable templates, and sponsored posts partnering with local flooring suppliers. Combine free micro-content with a paid course or downloadable job-costing spreadsheet for contractors and DIYers to increase average revenue per customer.
Creative
Accent Wall Mosaic from Vinyl Planks
Use leftover laminate/LVP planks to build a textured accent wall in a living room or entry. Cut planks into staggered lengths, dry-fit with the 40 spacers to maintain even gaps, then snap or glue them in place. The contour gauge helps copy outlet boxes, light switches, and baseboard profiles so the pattern fits flush; the tapping block and mallet give clean, damage-free seating of edges, and the pull bar tightens final rows. Result: a warm, low-cost feature wall that looks custom-built.
Floating Plank Top Table
Create a small dining or coffee table using vinyl planks as the tabletop surface. Join and test-fit the planks on a workbench, using the tapping block and PVC mallet to align seams and the pull bar to snug edge joints. Use spacers temporarily to maintain expansion gaps around the perimeter and the contour gauge to replicate rounded tabletop corners or to template leg mount cutouts. Finish by attaching a plywood backing and table legs for a lightweight, scratch-resistant surface.
Herringbone Headboard or Wall Art
Cut and arrange planks into a herringbone or chevron pattern to make an eye-catching headboard or oversized framed art. The solid tapping block lets you seat planks tightly without chipping edges, while the pull bar helps lock short end joints. Use the contour gauge to copy curved bed frames or nearby moldings for a precise fit, and the spacers to plan consistent joint spacing during dry assembly. This produces a high-end, grid-stable look using inexpensive materials.
Custom Stair Tread Covers & Nosing Fills
Refurbish worn stairs by overlaying LVP/laminate tread covers and riser accents. The contour gauge is invaluable for tracing stair nosing profiles and rounded edges; the pull bar and tapping block ensure tight seams at the back of each tread and against risers, while the mallet gives controlled seating without damaging the plank surface. Spacers help plan expansion at the ends and ensure consistency across flights. This yields a quick, clean stair refresh without full replacement.