Features
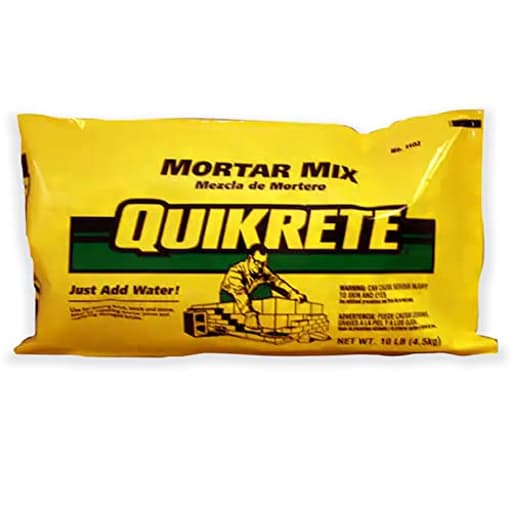
- QUIKRETE Construction Grade Mortar Mix of Masonry Cement and Graded Sand for Laying Brick, Concrete Units, and Stone, 10 Pounds
Specifications
| Color | Stone |
| Size | 6 |
| Unit Count | 6 |
Related Tools
A preblended construction-grade mortar mix of masonry cement and graded sand for laying brick, concrete units, and stone. The mix is supplied in a stone color and packaged in 10‑pound units.
Quikrete Construction Grade Mortar Mix of Masonry Cement and Graded Sand for Laying Brick, Concrete Units, and Stone, 10 Pounds Review
Why a 10-pound bag of mortar actually earns its spot on the shelf
Small bags make sense more often than you’d think. I keep a 10-pound bag of Quikrete mortar on hand for exactly the kind of fixes that don’t warrant dragging home an 80-pound sack: tuckpointing a few joints, re-bedding a loose brick cap, or resetting a couple of stones on a step. This compact “stone” color mix is a preblended combination of masonry cement and graded sand, so it’s ready to go with just water. It’s straightforward to use, behaves predictably on the trowel, and cures to a durable finish appropriate for typical brick, block, and stone work above grade.
Is it the most economical way to buy mortar? Not by a long shot. But if your project is small, access is tricky, or you just want to avoid waste and mess, this bag hits a sweet spot.
What I used it for
I ran this bag through a handful of common tasks:
- Repointing weathered 3/8-inch mortar joints on a short brick run (roughly 8–10 linear feet).
- Resetting two loose stones on a front step.
- Bedding a small flange and sealing a sleeve penetration where a conduit passed through a masonry wall.
In each case, the mix bonded cleanly, tooled well, and didn’t slump out of vertical joints when mixed to a proper “peanut-butter” consistency. For patch-and-repair work, I prefer smaller, fresher batches; this size encouraged that habit and kept my workability consistent.
Mixing and workability
The blend is uniform out of the bag, with a clean sand gradation—no rogue pebbles and only minimal clumping. I mix in a 5-gallon bucket with a margin trowel for small batches or a paddle on a low-speed drill when I’m using half a bag or more.
- Water: I typically start with about 1.25–1.5 pints of clean water for a full 10-pound bag and adjust from there. Always follow the printed instructions on your bag; temperature and humidity will nudge the water demand.
- Procedure: Mix for 2–3 minutes, let it rest for a minute to fully hydrate, then remix briefly. That short rest improves creaminess and reduces dry pockets.
- Consistency: For joints and vertical work, aim for a thick, spreadable feel that hangs on the trowel without slumping. For bedding applications, you can add a splash more water for better flow, but don’t chase a soupy mix—excess water weakens the final mortar and can lead to color variation.
Workability was solid, with a comfortable open time on a mild spring day. On hot or windy days, I keep a spray bottle handy to lightly dampen the substrate and slow the surface dry-out.
Setting behavior and tooling window
Expect a sensible, mason-friendly timeline:
- Pot life: About 30–60 minutes depending on temperature, humidity, and how wet you mixed it.
- Tooling: Joints begin to “thumbprint” within 20–40 minutes. That’s when I start tooling and striking—the point where the sheen fades and the mortar resists a light touch.
- Initial set: Within a couple hours in temperate conditions. Full cure takes 28 days.
It’s worth noting that this is mortar, not concrete. It contains no coarse aggregate, which is why it spreads and tools smoothly. Don’t use it for slab repairs, thick pours, or structural anchoring where concrete or an anchoring cement would be more appropriate.
Bond and durability
Prep matters more than anything else in repair work. After brushing out the joints and misting to control suction, I had reliable adhesion to brick, block, and natural stone. Joints cured with minimal shrinkage when I resisted the urge to overwater. On older work where the substrate is especially thirsty, a second light mist right before packing the joint keeps the bond line from drying prematurely.
For general-purpose, above-grade work—bricks, masonry units, and stone—this mix lands in the “everyday” category most DIYers and many pros reach for. If you’re working below grade, in high-load applications, or in severe freeze-thaw exposure, step up to a higher-strength mortar class (e.g., Type S) and follow your local codes and manufacturer guidance.
Color and finish
The “stone” color cured to a neutral gray on my projects—darker than a bright white Type N and lighter than many patched concretes. Like all mortars, color shifts with water content, substrate moisture, and curing conditions. If appearance matters, mix consistent batches, avoid overwatering, and protect the work from rapid drying and early rain. On older walls, I often blend a little masonry pigment in a small test batch to get closer to the surrounding aged joints, then scale up once I’m happy.
Tooling finish was clean. A concave jointer produced tight, weather-resistant joints that matched the existing profile. Cleanup with a stiff brush after the initial set removed thin smears without ghosting.
Coverage and yield
A single 10-pound bag goes further than you might expect for tuckpointing but won’t carry you through large bedding jobs. As a real-world reference, I repointed roughly 8–10 linear feet of 3/8-inch joints at typical depth with a full bag, with a little left for touch-ups. For bedding small stones or resetting a cap, I consider one bag a one- or two-piece session, depending on bed thickness.
If you’re facing anything beyond a short stretch of wall or a couple of stones, move up to standard 60–80 pound bags for efficiency and cost savings.
Packaging and handling
My bag arrived clean and double-wrapped, which kept dust in check. The smaller format is easier to carry up ladders, onto scaffolding, or through tight interiors without leaving a trail of sand behind. It also limits waste: rather than opening a big bag and scrambling to use the rest before it picks up moisture, I can finish a project with nothing sitting open in the corner of the garage.
As with any cement-based material, store it in a cool, dry place, elevated off concrete floors. Once opened, fold and tape the bag or transfer the remainder to a sealed container.
Value and who it’s for
- Best for: Homeowners and pros tackling small masonry repairs, spot tuckpointing, resetting a few stones, or sample/testing applications where consistency and convenience matter more than cost per pound.
- Less ideal for: Larger projects where you’ll burn through multiple bags; you’ll save substantially by stepping up to a standard bag size.
You’re paying for convenience here—measured in less waste, easier transport, and faster setup. For me, that trade-off is worth it on small, time-sensitive jobs or where site access makes hauling big bags impractical.
Tips for better results
- Prep is everything: Rake out crumbling joints to solid material, brush or blow out dust, and lightly dampen the substrate before packing.
- Mix small: Especially in hot weather. It’s easier to keep your mortar in the sweet spot if you work in half-bag batches.
- Mind the water: Start with less, then add in small increments. Overwatering weakens the joint and alters color.
- Watch the clock: Tool joints when the mortar loses its surface sheen and “thumbprints” cleanly.
- Protect the cure: Shield from direct sun, wind, and rain for the first 24 hours; mist lightly in hot, dry conditions to reduce shrinkage cracking.
- Match the profile: Use the same jointer profile as the surrounding work for both aesthetics and weather resistance.
A quick word on mortar vs. concrete
It bears repeating: this is mortar. Use it to bond masonry units and fill joints. For flatwork, thick patches, or structural anchors, choose the appropriate concrete mix or an anchoring cement. That distinction saves a lot of rework.
Recommendation
I recommend this Quikrete mortar in the 10-pound bag for small-scale masonry repairs, touch-ups, and situations where convenience and minimal waste are the priority. It mixes cleanly, tools predictably, bonds well to properly prepared substrates, and cures to a durable, neutral gray joint. If you’re laying a wall or tackling a larger repointing project, buy standard bags to keep costs in check. But for quick fixes, tight access, or keeping a ready solution on the shelf, this compact bag earns its keep.
Project Ideas
Business
Small-Job Masonry Repair Service
Offer targeted, high-margin services for homeowners and landlords: tuckpointing, crack repair, replaced brick slips, and small stonework fixes. The 10 lb preblended mortar bags are ideal for mobile kits and one-off patch jobs — lower waste, easier inventory, and quicker on-site mixing for fast turnarounds.
DIY Mosaic & Stepping Stone Kits
Assemble and sell weekend DIY kits that include a 10 lb bag of mortar, molds, decorative stones/tiles, instructions, and basic tools. Market them at garden centers, craft fairs, and online as an accessible home-improvement/craft crossover for homeowners wanting custom garden accents.
Workshop Series: Intro to Masonry for Crafters
Run hands-on classes (weekend or evening) teaching small-scale masonry projects — planters, stepping stones, veneer panels — using the 10 lb bags. Charge per attendee and offer bundled supplies for extra revenue; workshops build brand trust and funnel participants into follow-up paid services or kit purchases.
Custom Garden Furniture & Accents
Produce and sell small runs of handmade outdoor pieces — bench bases, stone-topped side tables, planter walls — using mortar-bonded stone or brick. The stone-colored mortar gives a finished, professional look; sell direct-to-consumer online, at markets, or wholesale to boutique garden shops.
Creative
Stacked Stone Planter
Use the 10 lb mortar bags to lay small reclaimed bricks or fieldstones into a low, decorative planter for herbs or succulents. Mortar mix bonds the stones, creating a durable, weatherproof container that can be made in varied shapes (round, square, tiered) and finished with a stone-colored grout for a cohesive look.
Mosaic Stepping Stones with Mortar Grout
Create garden stepping stones by arranging pebbles, broken tile, glass, or slate onto a plywood or rubber mold and use the mortar as the grout/binder. The stone-colored mix fills gaps cleanly, producing rustic, slip-resistant decorative steps or focal stones for pathways and beds.
Stone Veneer Accent Panel
Adhere thin natural or reclaimed stone pieces to plywood or concrete board using the mortar mix to craft a small accent panel or tabletop. The preblended mix speeds installation and the stone color provides a built-in grout look — ideal for mantel facades, garden walls, or custom furniture faces.
Outdoor Birdbath or Fountain Base
Build a pedestal or base by stacking brick/stone and bedding each course with the mortar mix, then seal and set a shallow basin on top. The mortar provides a stable, long-lasting bond for a weatherproof birdbath, small fountain, or decorative water feature.