Features
- Strong Support: The window shade brackets can easily fix the pulley track, ensuring the normal operation of the roller blind and preventing effectively the roller blind from falling off or loosening.
- Wide Rang of Uses:Ourroller shade hardware is ideal for roller blinds mounted on the outside of window frames. It is not only suitable for living room, bedroom, kitchen,dining rooms, but also for offices, school and hotel,helping to roller blind in place.
- Solid & Sturdy:These roller shades bracket is made of high quality metal which is solid, wear-resistant and sturdy for long-term using.They can keep roller blind stable without falling down.
- Easy to Install:Our roller shade holders are easy to install. It needs mark the hole,and then drill holes in suitable way. Finally install screws on them and put heavy curtain, and can be support easily on the wall.
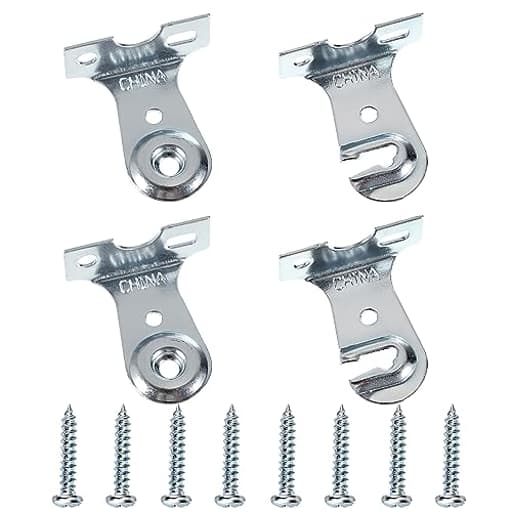
- Size Information:Item size is 1.2 x 1.2"(L x W ).It comes with 8 screws,allowing you to support roller blind stably. Item size has been marked in the picture in detail, please kindly check it before you purchase. If there is any problem, welcome to send us the email. Thank you!
Specifications
| Unit Count | 1 |
Set of four metal brackets for outside‑mount roller window shades that secure the roller tube and pulley track to a wall or window frame. Each 1.2 × 1.2 in bracket is made of wear‑resistant metal, includes mounting screws (8 total), and is installed by marking, drilling, and fastening to keep the shade stable and prevent loosening or falling.
Sumnacon Metal Window Shade Brackets-4PCS Roller Shade Hardware Outside Mount with Screws,Sturdy Roller Shades Bracket for Living Room,Bedroom,Offices Review
Why I reached for these brackets
I needed a compact, no‑nonsense way to mount a couple of outside‑mount roller shades in a home office and a guest room. The stock hardware that came with one shade was flimsy; the other shade arrived without brackets at all. I picked up the Sumnacon shade brackets because they promised a small footprint, straightforward installation, and a metal build that could handle daily use without fuss.
After installing and living with them for several weeks, here’s how they stacked up.
Build quality and design
These are simple stamped metal brackets with a square, 1.2 x 1.2 inch footprint. There’s no decorative finish or over‑engineering—just sturdy, utilitarian hardware. The metal feels adequately rigid for residential roller shades. Under hand pressure, there’s minimal flex, and I didn’t notice any sharp burrs or sloppy edges. For indoor use, I don’t have concerns about longevity.
A couple of design notes to set expectations:
- They’re intended for outside‑mount installations. There’s no deep “cup” to capture the tube end like some inside‑mount brackets use.
- The flat profile keeps the shade close to the mounting surface, which looks clean but gives you less wiggle room during alignment.
- The footprint is compact. That’s great on tight window casings or narrow frames but demands accurate placement so the roller end hardware seats fully.
Each pack includes four brackets and eight screws. For most single shades, you’ll use a pair and have spares on hand. The included screws are basic wood screws—fine for mounting to wood jambs or frames. If you’re going into drywall, plan on using anchors.
Installation experience
Install is straightforward if you take time on alignment. I mounted two shades into painted wood casings and one into drywall over a window with trim. The process for all three was similar.
What worked well:
- Layout: The small footprint made it easy to tuck the brackets where I wanted them without hitting trim returns or header moldings.
- Pre‑drilling: Pilot holes eliminated any risk of splitting the casing and helped the brackets draw tight to the surface.
- Clearance: Because the profile is low, the shades sit close to the wall, which looks tidy from the side.
What took extra care:
- Alignment tolerance: With no deep inset to “capture” the roller end, you need to be precise on bracket spacing and height. Even a couple of millimeters off can make snapping the tube hardware into place fiddlier than usual.
- Heavier fabrics: A wider blackout shade I mounted felt more sensitive to any misalignment. Once squared up, it operated fine, but the process was less forgiving than with brackets that have deeper sockets.
If you’re new to hanging roller shades, here’s the approach that kept me out of trouble:
1. Dry fit the shade and mark the bracket positions with a pencil, using a level across the bracket tops.
2. Confirm the roller’s end hardware (clutch side and idler side) will seat without rubbing the wall or trim.
3. Pre‑drill pilot holes. For wood, a 1/8 inch bit works well; for drywall, use appropriate anchors.
4. Fasten the first bracket snugly, then loosely set the second and adjust before final tightening.
5. Test fit the shade, then fully tighten once the roller engages smoothly.
Plan on 15–25 minutes per window if you’re careful about layout. With experience, it’s quicker.
Compatibility and fit
These brackets are best suited to:
- Outside‑mount roller shades that use standard clutch and idler ends
- Medium‑weight fabrics and typical residential widths
- Installations where a small, square bracket footprint is preferable
They’re less suitable if:
- You need an inside‑mount solution with deep capture cups
- You’re hanging extra‑wide or very heavy shades that benefit from more substantial, inset hardware
- Your shade’s end hardware requires a proprietary bracket profile
If your roller uses an unusually large clutch or a pin that protrudes far beyond the tube, double‑check clearances. The compact profile leaves less room behind the roller than some bracket systems. In my installs, standard clutches fit fine once spaced correctly.
Performance over time
Once installed, the brackets have been quiet and stable in everyday use. No wobble, no loosening, and the shades track straight. The metal hasn’t picked up play around the screw holes, and the brackets haven’t twisted under pull‑chain force.
I intentionally tugged the pull chains with more enthusiasm than I normally would; the brackets held steady. For the blackout shade (heavier fabric and wider width), I did add a stronger drywall anchor on one side to counter torque, which I recommend for any non‑wood mounting surface.
Where they fall short
- Less forgiving installation: Without a deep inset to cradle the tube end, alignment matters more. Expect a bit of fiddling during setup, especially on wider shades.
- Limited versatility: These are purpose‑built for outside mounts. If you’re hoping to repurpose them for inside recesses or top mounts with capture sockets, this isn’t that hardware.
- Value perception: You’re paying for availability, simplicity, and metal construction. If you were expecting a more complex bracket (adjustable angles or deeper cups), this minimalist design may feel sparse for the price.
None of those are deal‑breakers if you go in with the right expectations, but they’re worth noting.
Practical tips
- Use anchors when mounting to drywall, especially for shades over 36 inches wide or heavier fabrics.
- Mark both bracket heights off a single level line, not from the sill or trim, which may not be perfectly square.
- If your shade edges rub the wall, add a thin spacer behind one bracket to shim the roller out by a few millimeters.
- Keep the included screws for wood. For masonry or tile, switch to appropriate fasteners.
- Before final tightening, test the roller engagement; a small nudge of a bracket can make insertion much easier.
Durability and maintenance
Indoors, the metal should last indefinitely under normal use. There’s not much to maintain beyond occasionally checking screws after a season of use, especially if you installed into drywall. If you’re in a humid space like a bath, I’d avoid mounting directly into soft or swollen wood and would use rust‑resistant screws.
Who benefits most
- DIYers replacing lost or flimsy OEM brackets on outside‑mount shades
- Renters or homeowners who want a small, unobtrusive bracket that doesn’t fight trim profiles
- Anyone outfitting multiple rooms who appreciates getting four brackets and a consistent install pattern
If you’re outfitting an extra‑wide picture window with a very heavy fabric, look for a heavier, inset bracket system or consider adding a center support compatible with your roller.
The bottom line
The Sumnacon shade brackets do exactly what they promise: provide a compact, metal, outside‑mount solution that’s easy to install and reliable in daily use. They’re not the most forgiving brackets on the market, and they don’t have deep insets or adjustability, but the trade‑off is a clean profile and straightforward hardware that fits a wide range of standard roller shades.
Recommendation: I recommend these brackets for most outside‑mount residential roller shades—light to medium weight—especially where you want a small, tidy mount and can take a little extra care during alignment. If you’re dealing with very heavy or extra‑wide shades or you need an inside‑mount, look for a more substantial bracket with inset capture cups or a system designed specifically for your shade hardware.
Project Ideas
Business
Window-treatment installation & repair service
Offer a mobile service specializing in installing, replacing and repairing roller shades and their hardware. Market to busy homeowners, landlords and small businesses—services include bracket replacement, re-mounting outside-mount shades, cord/roller adjustments, and fast same-day fixes. Charge per window or offer package deals for whole-home installs.
“Shade-ready” accessory kits for short-term rentals
Assemble and sell ready-to-install kits (brackets, screws, anchors, simple roller shades and an illustrated quick-install guide) targeted at Airbnb hosts, boutique B&Bs and property managers who need blackout or privacy solutions quickly. Position as an easy upgrade to improve guest comfort and listing photos; offer bulk/recurring shipments for multi-unit operators.
DIY video course + kits on Etsy/Shopify
Create a series of short instructional videos (installation, measuring tips, creative repurposes) and sell companion DIY kits containing the brackets, anchors, screws and a printed instruction sheet. Offer tiered bundles (basic bracket pack, full shade kit, creative repurpose kit). Use short clips on social media to drive traffic to the paid course or kits.
Wholesale supply & trade partnerships
Partner with builders, interior designers, window-treatment retailers and property management companies as a wholesale supplier of sturdy outside-mount brackets and curated accessory bundles. Offer volume discounts, next-day shipping options, and on-site installation training or branded how-to sheets to make you the go-to hardware vendor for projects and renovations.
Creative
Floating mini wall shelf system
Use the metal shade brackets as discrete supports for slim floating shelves. Mount two brackets per shelf (bracket lips facing up), cut narrow wooden planks or reclaimed boards to length, slide them onto the brackets and secure with small screws. Finish with paint or wax for a modern industrial look—works great for holding small plants, spices, or display pieces.
Industrial curtain / room-divider kit
Turn the brackets into outside-mount supports for a lightweight pipe or wooden dowel to hang curtains or fabric panels. Screw a pair of brackets firmly into the wall or frame, run a copper pipe or stained wooden rod through them, and hang curtains, beaded panels, or textile panels for a low-cost room divider or privacy screen with an industrial aesthetic.
Hanging herb rail for kitchen windows
Mount a row of brackets outside the window frame and span a thin metal rod or wooden dowel between them to create a narrow hanging rail. Use S-hooks to suspend small pots, planters, or mason jars with herbs and trailing plants—ideal for renters because it’s outside the frame and removable, and keeps plants close to sunlight.
Modular gallery & picture-hanger system
Create a modular wall gallery by using brackets as repeatable anchor points for cables, metal rods or slats. Attach thin wire or plated cable between brackets and use adjustable hanging hooks to suspend frames, prints or lightweight shelves. You can design geometric patterns with the brackets as exposed hardware for a contemporary, customizable display.