Features
- 【 HIGH QUALITY MATERIAL】GLAMIN Bath Sealant Tape is made of High Quality Material with strong Adhesive and waterproof layer which makes it stronger & durable in wet conditions. The caulk strip Sealant tape is environmentally-friendly and has long-lasting seal and adhesion
- 【HOW TO USE】Before installing Self Adhesive Bathroom Shower Sealant Strip tape, please clean the area and keep it dry. Peel off the sealant film on the surface of the adhesive, then press firmly and smooth it with the scraper
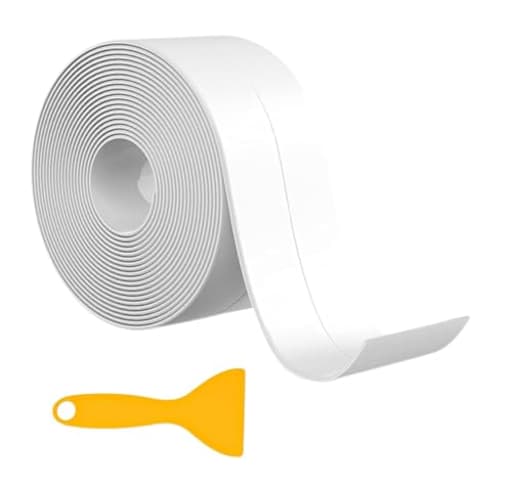
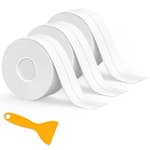
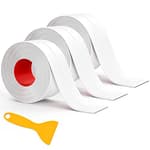
- 【SIZE】You will receive apprx. 10.5 ft / 3 Meters long roll of bath sealant tape, and width 38mm x 1.4 inches (L x W)
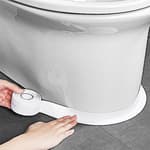
- 【USAGE】Bathroom Sealant tape can be used to seal the joints of sinks, bathtubs, basin, toilets & walls to keep the bathroom and kitchen clean and tidy for a long time
- 【DESIGN】Our adhesive Shower Sealant Caulk Strip has a linear design with a crease in the middle, which can be bent at a right angle of 90° and be sticked well in the corner of the wall
- 【CUSTOMER HAPPINESS】is what we believe in! YOU are our PRIORITY. If You are not happy with our product, DON'T WORRY! We are happy to give back your valuable money with free item change. All the complaints, queries and suggestions are handled promptly.
Specifications
| Color | White (A) |
| Unit Count | 1 |
Related Tools
This is a 10.5 ft (3 m) self-adhesive silicone caulk tape, 38 mm (1.4 in) wide, intended to create a waterproof seal on joints around sinks, bathtubs, basins, toilets, and walls. It features a waterproof adhesive layer, a center crease that bends to 90° for corners, and includes a sealing/smoothing tool; apply by cleaning and drying the surface, peeling off the protective film, then pressing and smoothing the tape. Initial hardening occurs in about 30 minutes.
GLAMIN 10.5 ft Caulk Tape Waterproof Self Adhesive with Sealing Tool, White, Strip, Silicone, 30 min Initial Hardening, Bathroom Sealant Review
A fast, tidy way to refresh tired seams
I tested the Glamin caulk tape across a few common problem spots: the tub-to-tile joint in a shower, the perimeter of a bathroom sink, and behind a kitchen faucet where splashes constantly break down traditional caulk. As a quick-refresh product, it did what I hoped—cleaned up the look of those seams and kept water out—with less mess and fuss than cutting and tooling a traditional bead of silicone. It’s not a cure-all, and success hinges on proper prep, but when used within its strengths it’s a handy upgrade.
What you’re getting
This is a self-adhesive, silicone-faced strip in white, 10.5 ft long and 38 mm (about 1.4 inches) wide. There’s a centered crease that lets the strip fold neatly to 90 degrees for inside corners, and the roll includes a small plastic smoothing tool. The adhesive backing is waterproof and grabs quickly. Glamin states an initial hardening in about 30 minutes; in practice, that’s the point where it stops shifting and feels “set,” though I still avoid water for longer (more on that below).
The width is generous. On a tub or countertop seam it gives a clean, finished look and plenty of coverage, but it can feel oversized on tiny pedestal sinks or tight vanity backsplashes. If you prefer a thin reveal, you’ll be trimming.
Installation: prep makes or breaks it
I can’t overstate this: great results start with surface prep. The tape is only as good as the surface you stick it to.
Here’s the process that gave me the best bond:
- Remove all loose or moldy caulk. I use a plastic scraper and a utility blade, then a calcium-lime-rust remover if needed.
- Degrease and clean thoroughly. Dish soap first, then a wipe-down with isopropyl alcohol to strip any remaining oils.
- Dry completely—really completely. I wipe with a lint-free cloth and then run a hair dryer on low to chase moisture out of pores and grout lines. If a surface is even slightly damp, adhesion suffers.
- Dry fit. Measure, cut to length, and test position before peeling the backing. For corners, a 45-degree miter looks cleaner than overlapping.
- Apply slowly. Peel a little backing at a time, anchor one edge, then work along the seam using the smoothing tool. The crease makes inside corners straightforward; press firmly on both planes.
- Roll and set. I like a small J-roller or the rounded handle of a screwdriver to apply even pressure. The adhesive grabs fast; you can lift and reposition once or twice early, but it degrades the bond, so aim to get it right the first time.
While the tape feels stable after about 30 minutes, I give it a conservative 12–24 hours before exposure to continuous splashes, especially in a shower. The wait pays off in longer-term hold.
Fit and coverage
One roll is enough to run a typical vanity backsplash and a sink perimeter with some left over. Around a standard tub alcove, 10.5 ft will cover the long back seam and one short side, but not all three sides with generous overlaps. If you’re planning the entire tub perimeter and vertical corner seams, expect to need two rolls.
The 38 mm width easily spans a typical seam plus a little onto each surface, which helps with water shedding. For very narrow ledges or tight sink lips, you may need to trim the width with a sharp utility knife and a straightedge.
Performance and durability
After several weeks of daily use:
- Water resistance was solid. Water beads on the silicone surface, and the edges didn’t wick moisture.
- The crease performed as intended in corners; I didn’t see splitting along the fold.
- On smooth ceramic tile, acrylic tub, enamel sink, and laminate counter, adhesion felt strong and uniform.
Where I had trouble was a textured backsplash tile with micro-ridges. Even after careful cleaning, a small section near the faucet lifted at the edge after a week. Heating it with a hair dryer and rolling it back down improved the bond, but in that area I ultimately ran a thin bead of clear silicone along the top edge for insurance. On smooth, non-porous surfaces, I didn’t need that extra step.
It’s worth acknowledging that this is a tape solution, not a structural sealant. Joints that flex significantly, gaps wider than about 1/4 inch, or surfaces that move relative to each other (like a tub that deflects under load) are tougher on any adhesive strip. If you’re bridging a larger void, use backer rod and silicone caulk first, let it cure, then apply the tape for a clean finish.
Cleaning has been easy. Soap scum wipes off, and I haven’t seen any discoloration. There’s no strong odor during install or afterward.
Aesthetic results
The white finish is a good match for standard fixtures—bright, not cream. Lines look crisp, and the tape does a nice job hiding uneven, stained, or cracked old caulk. With careful miters, the seams read as intentional, almost like trim; with quick overlaps, they’re more noticeable. If you need color matching beyond white, you won’t find it here, and the material isn’t paintable.
Limitations and edge cases
- Adhesion is surface-sensitive. Smooth, sealed, or glossy surfaces are ideal; textured tile, unsealed stone, and flaking paint are not. If in doubt, test a small offcut first.
- It’s not a substitute for proper movement joints. In high-movement areas, use a quality silicone caulk; consider the tape as a cosmetic cover over a sound seal, not the primary defense.
- Tight radiuses are tricky. The strip doesn’t stretch; sharp curves or irregular profiles require careful relief cuts, which are visible.
- Removal is possible but not mess-free. Warming with a hair dryer helps lift the tape. I was left with some adhesive residue; citrus-based adhesive remover or mineral spirits cleaned it up.
Tips that improved my results
- Degrease thoroughly and finish with isopropyl alcohol before install.
- Let recently cleaned surfaces dry longer than you think—especially grout lines.
- Warm the room and the tape slightly for better conformability.
- Plan your overlaps away from direct spray or standing water; miter corners for a cleaner look.
- After application, run a bead of clear silicone along the top edge in high-splash zones if you want extra insurance.
- Avoid water exposure for at least 12 hours, even though the initial set happens around 30 minutes.
Who will appreciate this
- Renters and homeowners looking for a fast, tidy refresh around sinks, tubs, and backsplashes.
- Anyone who dreads the mess and learning curve of tooling silicone but wants a clean-looking seam.
- People tackling maintenance in guest baths or secondary spaces where convenience and appearance matter more than maximum longevity.
If you’re rebuilding a shower, managing large gaps, or dealing with a substrate that flexes a lot, traditional silicone or polyurethane sealant remains the better long-term solution. The tape can still play a role as a finishing cover once the primary seal is sound.
Recommendation
I recommend the Glamin caulk tape for quick, low-mess sealing and cosmetic cleanup on smooth, non-porous surfaces—especially along tub ledges, vanity backsplashes, and sink rims. It installs quickly, looks tidy, and resists everyday splashes well if you prep correctly and give it time to set. Be mindful of its limits: textured or damp surfaces can compromise adhesion, large or moving gaps are better served by true caulk, and you may need more than one roll for a full tub surround. Used thoughtfully, it’s a practical, time-saving addition to a DIY maintenance toolkit.
Project Ideas
Business
Fast Reseal Service for Landlords
Offer a low-cost, quick-turnaround resealing service targeted at landlords and property managers between tenants. Pitch it as a faster, cheaper alternative to full re-caulking — you can visit, clean the joint, apply the self-adhesive tape and finish in under an hour per bathroom. Charge per fixture (e.g., sink/tub/toilet) with volume discounts for multi-unit buildings.
Airbnb Host Maintenance Kits
Assemble and sell Airbnb/short-stay host maintenance kits: pre-cut caulk strips for common fixtures, instructions for application, the smoothing tool and quick-care tips. Market via online marketplaces and local host groups as a subscription or one-off kit to keep turnovers quick and bathrooms looking guest-ready. Include a small card with before/after photos and time-saving tips to increase perceived value.
Bathroom Refresh & Upcycle Products
Design and sell small bathroom accessory products that use the tape as a functional feature—e.g., waterproof mirror frames, floating shelf edge seals, or decorative tub surrounds sold on Etsy or at craft fairs. Emphasize durability, mold resistance and the finished look; bundle the tape with matching screws/adhesive accents and how-to instructions to create a premium DIY product line.
On-call Leak Patch & Maintenance Service
Create a local on-call service for emergency leak mitigation (bathroom/kitchen) marketed to homeowners, Airbnb hosts and marinas. Use the tape for immediate waterproofing and temporary fixes, then offer follow-up permanent repair options. Monetize via a service call fee plus materials and optional longer-term repairs—position it as fast, professional triage that prevents water damage while customers plan full renovations.
Creative
Waterproof Shower Accent Trim
Use the white silicone caulk tape as a neat, low-effort trim around shower niches, tub edges or the perimeter of a backsplash. Cut lengths to size, use the center crease to form crisp 90° corners, smooth with the included tool, then paint the adjacent wall (if compatible) or leave white for a clean spa look. Result is a fast, mold-resistant decorative edge that refreshes a bathroom without ripping out tile or re-caulking with paste.
Framed Mirror Finish
Create a finished, waterproof frame around bathroom mirrors by adhering the tape around the mirror perimeter (between glass and wall). It hides rough edges, seals against steam and prevents grime build-up. For a custom look, trim the tape to a thin border and top with a narrow wood or PVC trim glued over it for color/texture while maintaining the moisture barrier beneath.
Indoor Planter Leakproof Liner
Line the inside seams and drainage holes of decorative indoor planters with the caulk tape to stop soil and water leaks without using messy sealants. Use it to create a waterproof lip at the rim so moisture won’t damage shelves or windowsills. This is ideal for upcycling thrift-store pots into houseplant homes quickly and cleanly.
Mini Boat/RV Patch Kit
Cut the tape into pre-measured strips sized for common leak sites (corners, hatch seams, sink surrounds) and assemble a compact repair kit for boats, RVs or campers. Include instructions and the smoothing tool so you can apply a quick, temporary waterproof seal while on the road or water. Useful for emergency fixes or seasonal maintenance.